From Idea to MVP

User Story Mapping - From Idea to MVP

User Story Mapping is the perfect tool for taking an idea of a group, and refining it with shared understanding into a perfect MVP.

If you are just starting or have a project that is stagnant or facing a barrier, read on how to easily figure out if you have a product already, or how to best start the planning process in 2021.

When we look at User Story Mapping, you may think of the backlog of user stories, or how it can be a great methodolgy to reduce and refine your current project or product flow. But User Story Mapping doesn’t just need to be a tool applied to a backlog heavy project. It can be used to refine an idea to a product.

Refine the Idea

To start, you’ll be going on a User Story Mapping journey. Take your product and start writing out all the steps out, be as broad as you want.

Take the product and ask yourself and your team these questions:

  1. What is the overall idea?
  2. Who are the customers?
  3. Who are the end users?
  4. Why would they want it?
  5. Why are we building it?

Find out what the project and product is for, validate your reasoning, search for problems, take the steps to refine your idea.

Build to Learn

With the initial idea fleshed out, build your product with the aim to learn. A less than MVP (Minimum Viable Product), a product that covers the simple basis for your users.

With this stage you do not want to market, push or give out the product as “The product” but instead share with a small group of users. Ideally users you spoke to initally that may have sparked the idea of the product or are in your alpha/beta group and open to seeing the progression.

As part of this step you need to harvest the feedback, and constantly refine your idea. Build wants but be care ful to actually listen to what the user wants.

At this stage metrics will help as it is common people will fall into a loose three categories:

  1. The Polite Enabler. — The user who says everything is great, but doesnt use the product.
  2. The Complainer. — The user who sends in lists of feedback and demands, but actually uses the product.
  3. The Mute. — The user who uses the product and says nothing.

The polite user is probably the worst for building to learn, with the complainer being your favourite user. However be careful the complainer is not just demanding features that detract or do nothing.

The Mute you’ll need to reach out, engage and ask for feedback with offered incentives. The mute can be valuable if you can change them from mute to talking.

If you are reading this to get started, you can get started straight away for free. You get given a premium trial for 2 weeks when you sign up, but even if you revert to a starter account you’ll still have access to edit, move and make your map.

You can get signed up, but if you are planning, read on for now.

Applying it all to a Story Mapped Backlog

You now have your project released, some feedback and ideas of how to take it from big idea to big success.

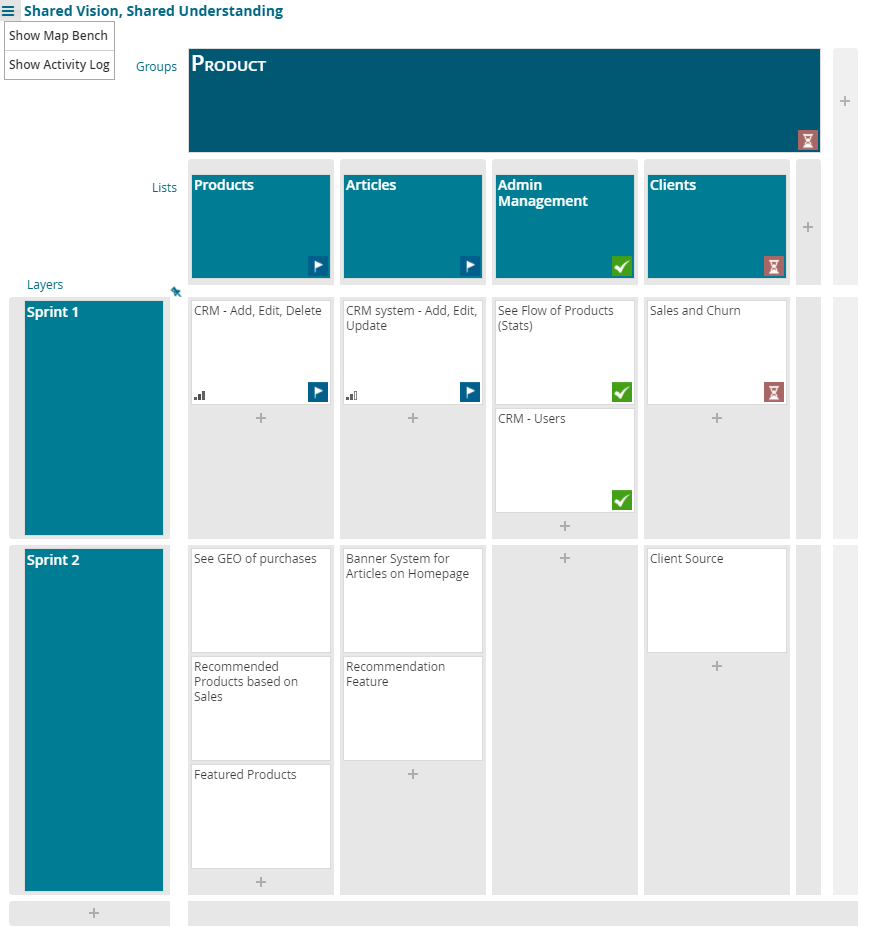
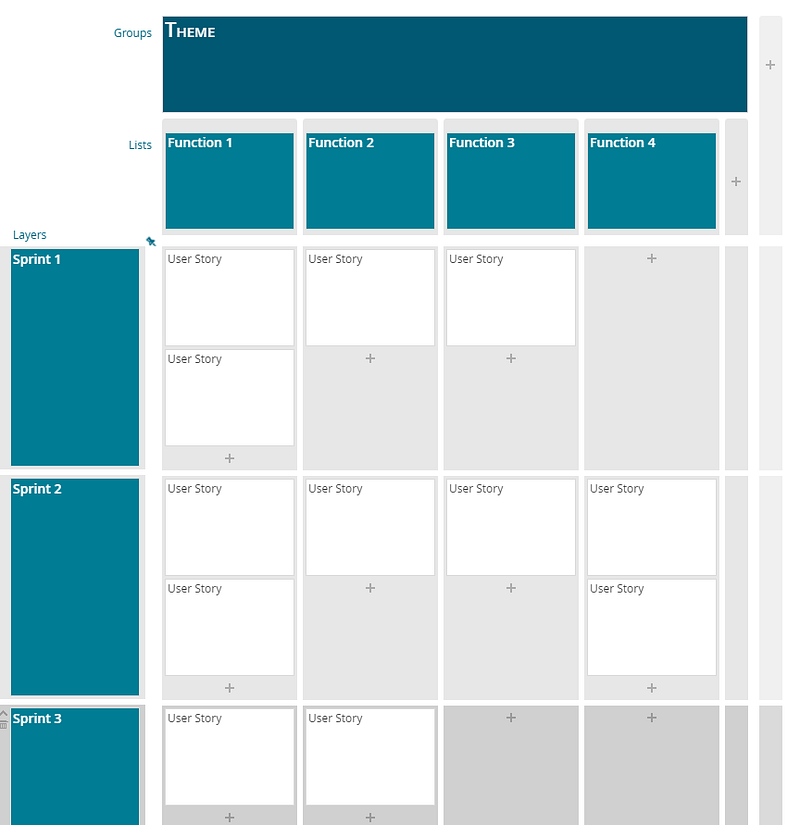
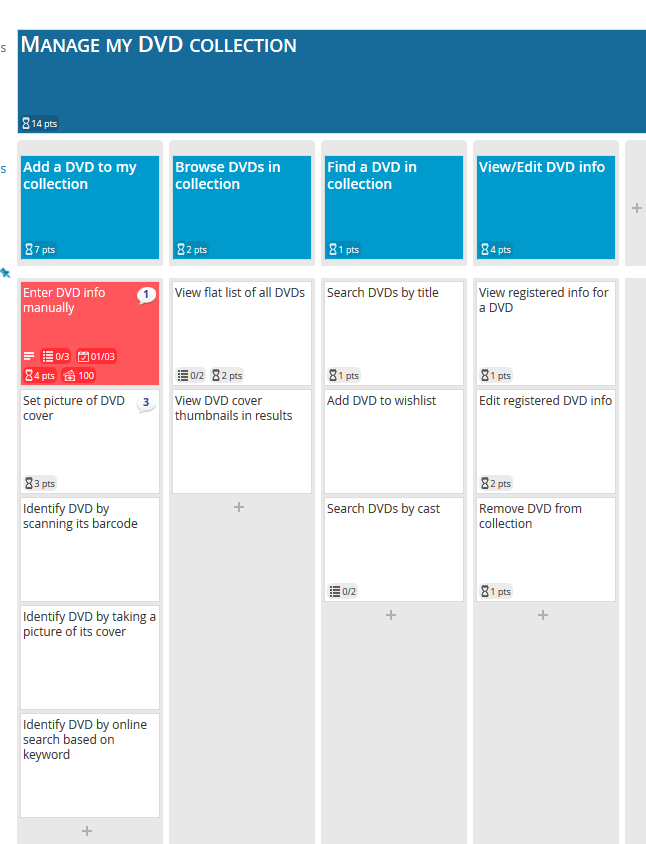
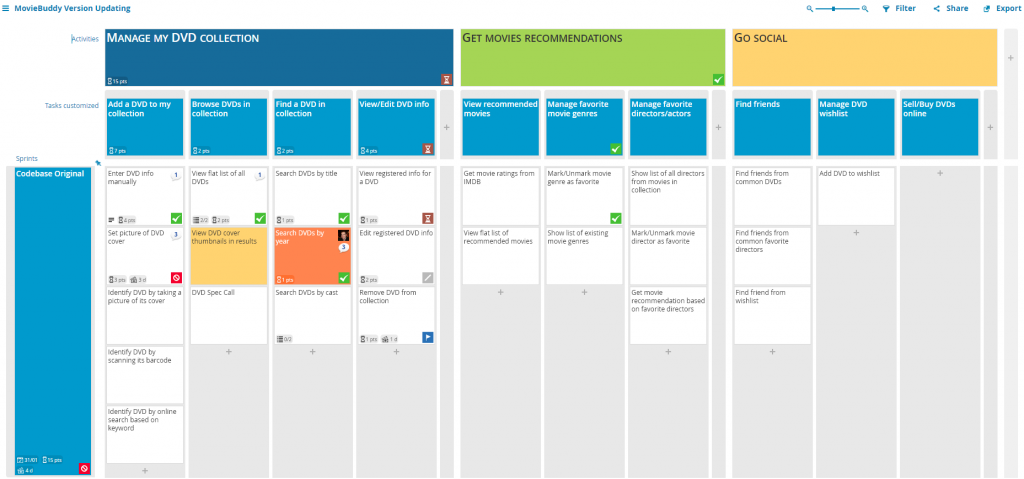
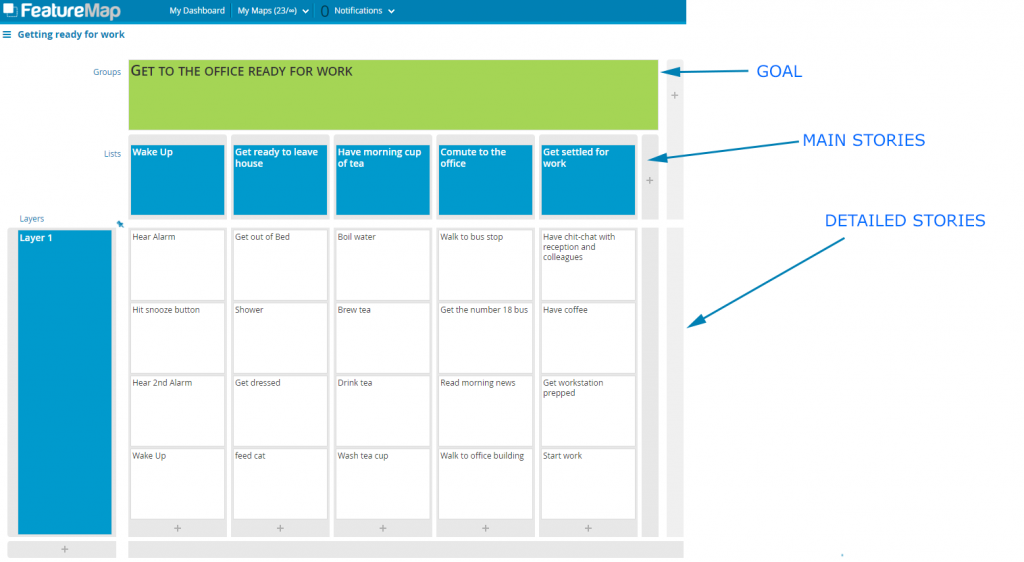
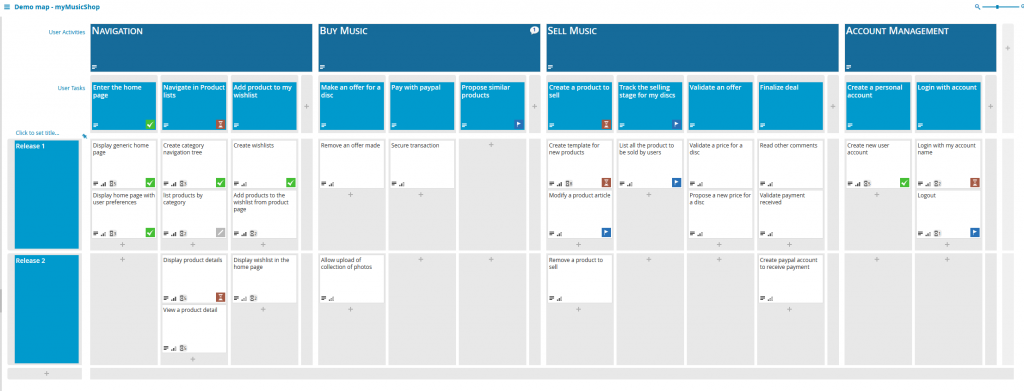
For a practical start, we recommend organising a horizontal strip of User Actitives. You will have this from the first step, and the questions. This will form the backbone and be the foundation of your map.

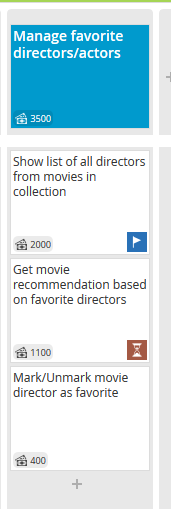
You can lay it out how you like, but if you want guidance you can lay it out in vertical strips, and arrange it into three tiers:

  • Current Relase
  • Next Release(s)
  • Future Ideas

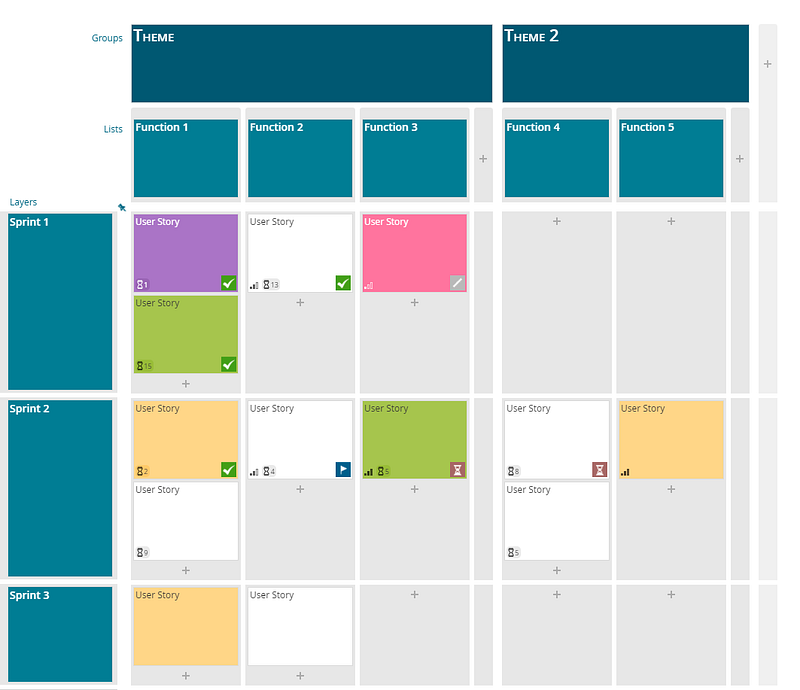
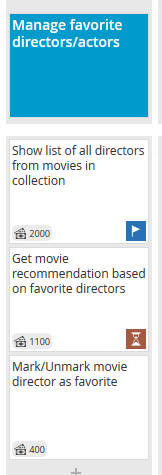
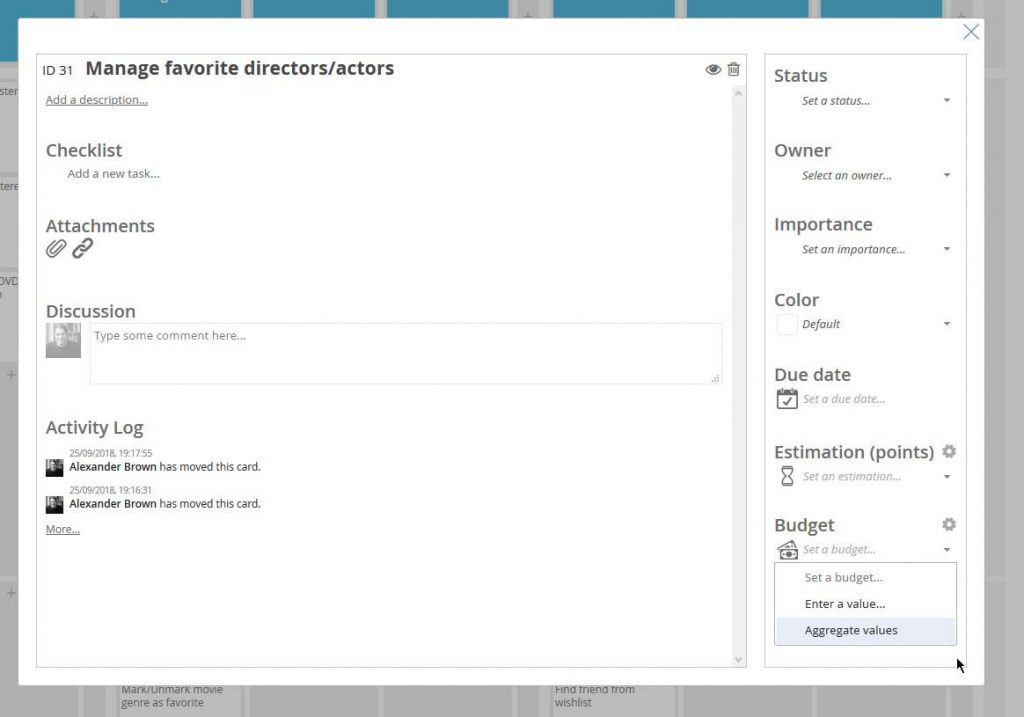
Each card will have indepth details about the feature.

Example Layout in FeatureMap.co

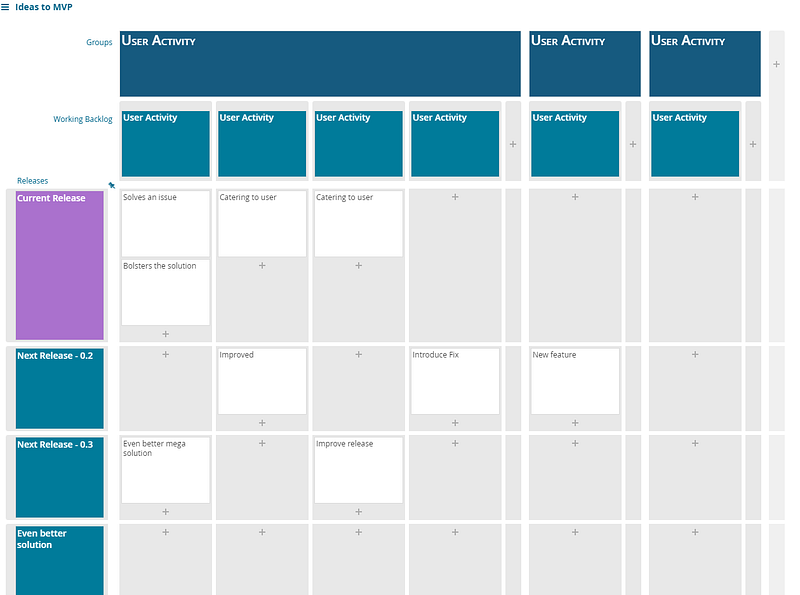
Then when organised, take the highest priority stories or layers and move into the current sprint.

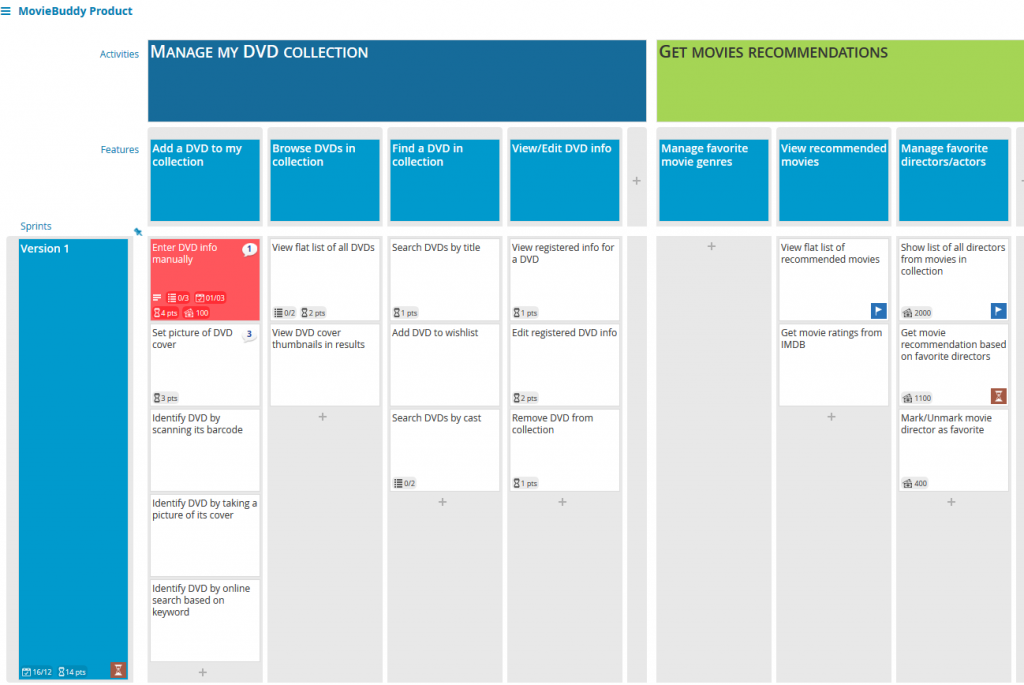
This is one great way to refine your Idea down to a core set of principles. You can find out your MVP.

When I created my app, I went beyond the MVP and made the pre-MVP core functions. This allowed me to generate an ugly, functional core system to then expand on. I never released the pre-MVP but it helped me define the principles of our app.

Common Pitfalls

I might write a piece entirely about the pitfalls I see new projects and products fall to when designing their story map and MVP but for now, the key two points echoed everywhere:

  1. Perfection — When designing a product do not focus and lose yourself to the “Just one more feature” which adds time and bloat to inital ideas.
  2. Make a skateboard first — When making a car, first design a skateboard that allows the user to at least get somewhere. Do not fall into the trap of building car parts with no method to go.

To illustrate this Henrik Kniberg wrote an article talking about how he prefers “Earliest Testable/Usable/Lovable” over MVP.

Henrik Kniberg

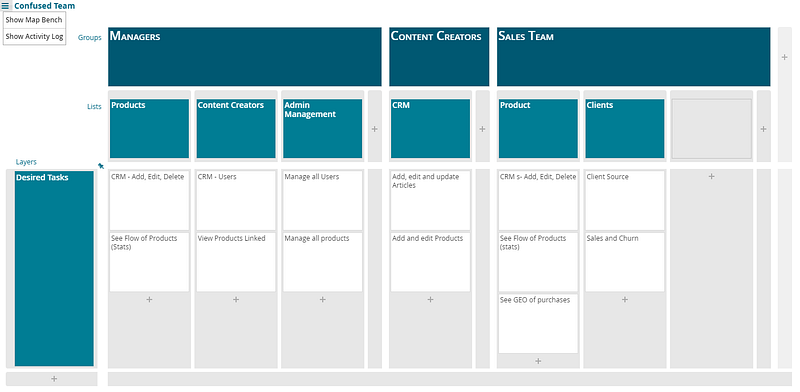
I was once hired to salvage a project. When I started digging into the functions and principles I found that they had been in a state of “not yet ready” and “coming soon” for over a year. I learnt that each time they had developed a section the designers, artists, and owners all had differening ideas of what they all wanted.

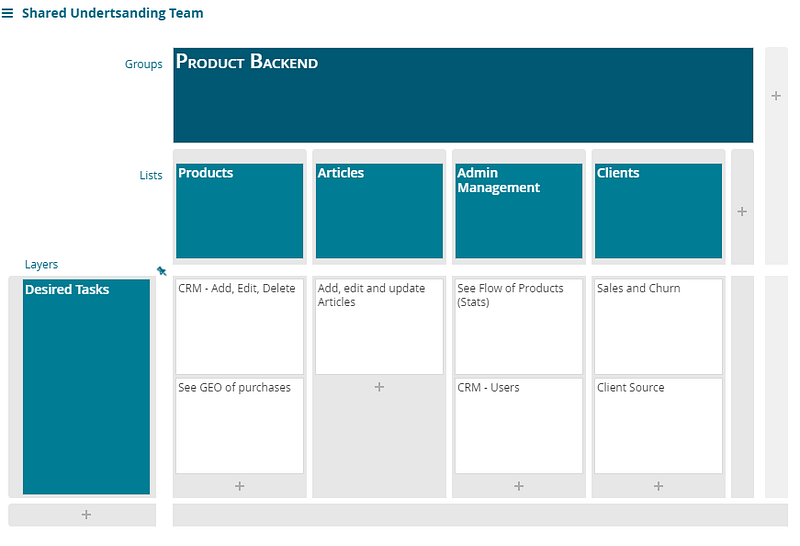
I first sat them down with a task of shared understanding, figuring out exactly what everyones vision was, and how it translated to actionable steps.

Then secondly I highlighted they already had a MVP, and had an MVP since the year prior. We seperated the whole system into stages (the horizontal sprints) and were able to wrap up and release the project.

If translated that to Henriks image above, I realised they were at stage 3, while they were aiming to develop to stage 5. Stage 5 before they had even earnt a penny.

Do not do it.

Summary – Validate your MVP

So to summarise.

When designing your product, each sprint sent to product should be reviewed, measured and with feedback and data. To learn.

With that learn knowledge, collect data, read feedback, refine your idea.

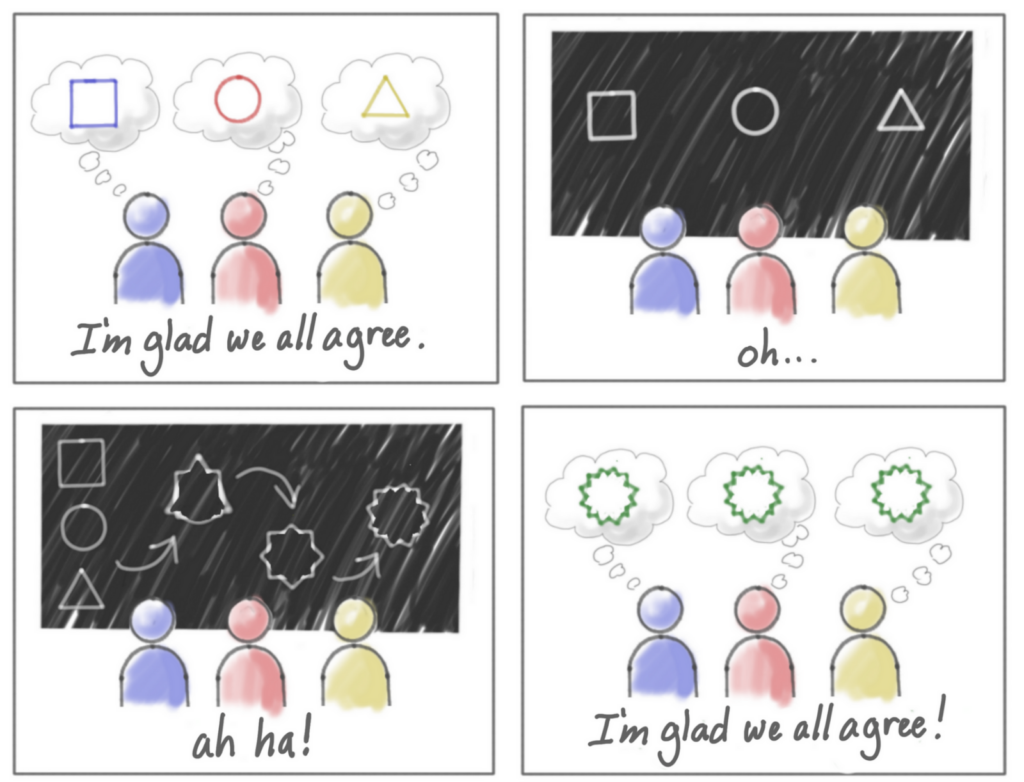
If it ever seems out of kilter with the rest of your team, you shouldn’t worry as you are all working on a Story Map, you will all see the steps and sprints. That shared understanding of the project elimates the issues.

With that refined idea, revamp your MVP and build.

  • Build — MVP
  • Measure — Get feedback and data
  • Refine — Improve with better ideas
  • Repeat — Back to Build.

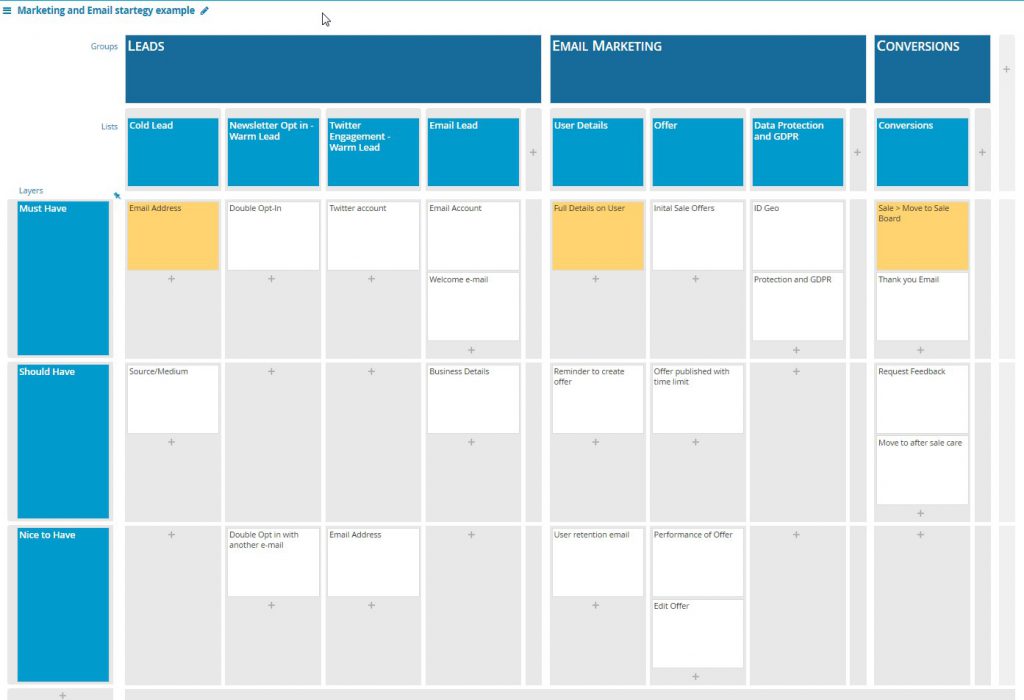
With User Story Mapping this is easy, especially when using a tool like FeatureMap.co as the ease and flow of a team all working, moving and adjusting cards on the fly makes it invaluable.

Get started today, and get your project working. You may already have an MVP!

Shared Understanding – Benefits of Story Mapping

Shared Understanding - A buzzword to describe group knowledge

“Shared Understanding” is a well known buzz word, or common expression, in the User Story Mapping and project management scene. It really easily breaks down to a common group concenus of a projects. Getting to the point of a common shared concensus can be met with pitfalls and misunderstandings without even realising the issue is there!

Paul, Alex and Simon can all believe they agree and understanding one anothers design idea…. but do they?

User Story Mapping is not strictly a method of building software as it can be applied and utilised in a multiple of ways, but for this.. it is perfect.

The main drive is to result in a shared understanding, to expose the absolute “given” in philsosophy.

Shared Understanding in 2021
Shared by Jeff Patton, author of User Story Mapping – The Shared Understanding Problem.

When working with a large organisation it is not uncommon for everyone to picture the product in different ways.

When you have multiple smaller teams come together to create a product, each team can have different requirements. This can clog up development and in some instances waste time, building the same features in multiple different ways.

Check out FeatureMap and start your trial now.

A few years ago I was assisting in the development of a now-popular mobile app. The team of designers all had different ideas on the end goal and it wasn’t until we mapped the entire user story that this was realised.

Confused Team Mapping Out Individual Requirements

The managers wanted to see a CRM in the backend that would allow them to see the flow of products and users and to manage the support workers and content creators.

The content creators wanted to have a CRM in the backend that allowed them to edit, create and update articles and products.

The sales team wanted to have a map system that would allow users to find a product based on location.

Seeing our goals visually on a map was a big help in shared understanding

Project Manager in this case.

Before using FeatureMap to plan out their goals, the team used multiple shared documents, lists and tasks. It was possible to achieve what they sought, but it was certainly wrought with overlapping issues.

Shared Understanding with a Shared Vision

When we put all three together we could see an overlap of two different CRM systems and a product completely overlooked by the other teams.

Mapping your story helps you find holes in your thinking.

When we set out and built an entire wall, it was clear that each team had a different idea. Once they were able to list each card across the map, teams merged ideas, worked on the initial idea and framed the entire product.

Once the ideas had been merged, expanded and realised, the team was able to expand their understanding to a shared understanding.

Shared MVP Achieved With Understanding

The team were then able to split up their design into a minimum viable product that successfully achieved the desired outcome.

Sadly, it was realised that months had been wasted on planning features of a project with no compatiblity with the rest of the team.

Which teams should be involved?

Really, the answer is as many as you can.

  • UX/UI Team
  • Agile Coaches
  • Software Engineers
  • Product Owners
  • Product Managers
  • Customers
  • Marketing Teams
  • Executives

User Story Mapping is better when a group advises, rather than an individual.

How to get Started?

Getting started is easy, assembled your team, open up a map and start talking!

The Future of Remote Work in 2021

The world saw a huge shift in the 2020 working environment due to the Covid-19 Pandemic. While still here in many countries, and fears of third waves on the horizon, many are holding hope for the Vaccines that seem to be still shaping out the future landscape of the working world.

While some companies used to offer a work from home perk, it has fast become the go-to standard. Now in 2021 companies are transforming workplaces to places of collaboration, rather than a dedicated heads-down workplace.

Many companies are making the permanent move to dedicate a number or all of their team to a remote working solution. Dell want to move 50% of its workfoce to remote. Amazon have picked up over 3000 remote workers, and other companies such as Saleforce and SAP have been well reported as remote working companies.

With the economy, the after effects of the worldwilde pandemic, the stagnant wages and growing government state incentives. It is clear to see why it is predicted that by 2025, nearly 70% of the workforce will work remotely, at least part-time.

By 2025, 70% of the workforce will work remotely part-time.

Kate Lister, president of Global Workplace Analytics

A few years before the Pandemic; FeatureMap itself moved from its dedicated office space to remote employees across three countries. In making these changes, we identified more effective practices, saved on overheads and costs, and introduced a new culture and productivity.

As the pandemic forced other companies also turn to the remote online workspace, we thought it would be a good time to share some of our experiences and tips for getting the best out of your distributed team. We shared our initial thoughts and experiences in our last blog related to working from home. But how baout 2021?

We are here to help, so if your small–medium business is impacted by COVID-19, reach out to us at team@featuremap.co and see how we can find a solution for you during this time.

Working from Home

Things you need for your team to be successful while working from home remotely:

  • Team chat
  • Video conferencing capability with screen share options
  • Digital backlog management
  • Shared documents
  • Time management
  • Ways to stay connected with each other
A laptop of a remote worker starting with distributed team about to utilise user story mapping with featuremap.co
Make your office space at home comfortable for remote working.

Team chat

There are many chat tools available online. We recommend Slack, Teams and Skype, but Slack in particular. It allows you to continue conversations throughout the course of work, either directly through private messages or in channels that act as meeting rooms. Everyone will be able to see discussions in these channels, so wise management using features like thread conversations will be key to an effective collaborative environment. You may already have a Microsoft solution and Teams have developed well in the last year.

Video conferencing

This includes daily discussions, team voice chats, and one-to-one meetings. We recommend video conferencing to encourage a continued level of professionalism, but being able to chat with somebody face-to-face can create more effective communication.

Good video conferencing software offers voice chat, video, and screen share. The ability to easily and quickly share your screen to your remote team during a meeting is time-saving gold dust. Zoom, TeamViewer, and Slack all offer this functionality.

However, be aware that both chat and voice calls can be disruptive if used unnecessarily: imagine getting called to meeting after meeting in the office!

We found a careful balance of start of the week meetings and end of the week meetings with ad hoc, required, progress meetings when required.

Common Problems

Remote work, does have its problems. Some people dislike working in the same place where they live, relax and can be hard to create a personal seperation. Other people require face to face, contact and interaction with people and the seperation can cause a disconnect. Some talk about the challenge of how to collaborate and state it is difficult to get on the same page with projects.

Luckily while we cannot help with the face to face contact. We can advise creating an area or state to help with the switch from work to personal.

Establishing discipline, dressing for work, and setting your desk or workspace in a particular manner. One trick I use is different coffee cups! Bizzare, I know, but it works!

Finally we can help with collaboration. Projects, teams, and remote working on completing a project, blacklog or product is the name of the game here at FeatureMap.

Digital backlog management

When you first start working remotely, it’s important to update the management of your tasks and responsibilities to your new environment. All those sticky notes on your monitor and scribbles left on your desk won’t work anymore. You have to go digital.

If you have a project manager, ask them to recreate your collaborative spaces in a digital space as soon as possible. Your remote team being able to access a single platform for project planning will not only help foster self-discipline but will also improve productivity. Ensure you use a tool that protects you, is easy to set up, and is clear, precise, and agnostic.

If you have any questions about FeatureMap.co, privacy, security of our online cloud or our on-premise options, drop an email over to team@featuremap.co

When we first created FeatureMap, we designed the fundamental principles based on Jeff Patton’s User Story Mapping model. Since then, however, we have evolved and developed to create a tool that can be used in multiple environments with a wide range of practices, including user story mapping, development, product management, team task management, agile workflows, kanban, and task lists.

When you recreate your collaborative space online, remember that utilising labels, custom fields, colour tags and assignments can really help you take control of your workflow.

A remote worker taking his user story mapping post it notes to a digital tool
Take your post-it notes and put them online for your team.

Moving to the digital space for project management

If you are moving from a physical workspace to the digital one, and are starting afresh, you will need to first identify and define the project’s backbone.

Designate a group of people to explore your project and identify the user experience and journey. Focus on the breadth of tasks first, then build in the depth.

If its easier we now support SAML integration to allow an easier onboarding process for On-Premise accounts

Using a shared workspace to collaborate live, whilst using video chat, can really help bring your session together as well as improve the quality of the end result.

Build a map and, if you need to, outline all the projects, cases, tasks and work within it. If you want to dig deeper into user story mapping while your team is distributed, check out our guide on how to get started.

If you are still uncertain and want a demo of FeatureMap.co, do reach out at sales@featuremap.co and we’ll be happy to schedule a live demo for a small team.

A FeatureMap marketing story map demonstrating some of the features of User Story Mapping and Agile.
Covid-19 – Taking your physical to the digital with FeatureMap.co

Distributed team culture

Building a culture, keeping the team connection healthy, and improving communication with remote teammates is crucial. For this, team chat and communication is important. Adding a space where people can chat, share their daily lives, or simply talk before work or a meeting fosters healthy growth, keeps people engaged, and helps your teammates learn about each other. You can even build on this by creating virtual lunches together, having healthy competition about the “best lunch”, and more.

Try FeatureMap Today, and if you need more users, have feedback or suggestions we have new solutions for 2021 to help get you onboarded.

Do reach out and we can find a solution to help cover you while Covid-19 impacts your business.

FeatureMap – User Story Mapping Tool 2021

Categories

Archives

Story Mapping in 2021: A Reliable Agile Methodology

Managing a project can be approached in a multitude of ways, and in 2021, with remote working and offices on the rise. User Story Mapping has rapidly stood out amongst the many agile methods. In one sentence, it can be easily explained as ordering a project (or product) into tasks and organising by priority and sophistication.

Let’s start with a brand new project, or we can take an existing project backlog. When it comes to backlogs it can be overwhelming, at times difficult to grasp, or what you should prioritise. At times projects are entirely sidetracked by mismanagement of priorities but user story mapping can resolve this.

Story Mapping can be utilised to reduce the backlog, refocus the project and remind the entire team of the end goal.

When designing a Story Map you must look at the bigger picture. It is often sensible to set aside a period of time (hours or days) to effectively cover exploring your vision.

You will need to set out the goals of the entire product, the ideals, the dreams, think big. To best utilise Story Mapping is the big picture, not just a sprint. Do not fall into the trap of a niche narrow sprint at this stage.

First write out the user stories by setting out functions.

Step 1 — Functions and user stories set out in a grid.

Horizontally, set out the title and set the user story under each function.
Vertically, set out the main stories or issues related to each other.

At this stage you can then prioritise importance from left to right, and from up to down. This creates a format of the top left card, being the most important.

Slicing the list.

Once the stories are organised into groups and themes. You can start with slicing the list into sprints of what is the Minimum Viable Spec, or as Jeff Patton puts it — “The minimum viable product in the smallest product releases that successfully achieves its desired outcomes”.

Step 2 — You can see the sprints have seperated, clearly, what functions are required in each layer.

You can set sprints into what you need to achieve. The trick of utilising story mapping is by setting out the entire dream product, then breaking your product/project into sections of achievable, working, and required sprints.

Next Steps.

Do remember, the story map is not a static beast, it can be adjusted, amended with feedback, changed and adapted to suit the needs of each sprint.

With multiple team members working on it, as a team, you can start to see the end goal. The ideal product starts to form and when working as a group you will be able to clearly define what each task, and part of the project needs.

  • Set status of a card
  • You can set time estimations
  • Set importance of cards
  • Use colours to set a custom identifier, such as challenge or complexity.
  • Use extra columns and set sections

The use of a story map will grow with each iteration, and with each demand.

Step 3 — Expanded map with colours, rags, and time estimations.

One thing is to ensure you are always planning the entire project, clearing backlog and not focusing on individual sprints.

If you want to see the tool we used for the images, check out FeatureMap.co

If you want to dig deeper into User Story Mapping, check out the how-tos Tutorials.

Online User Story Mapping for Remote Teams

If you are new to User Story Mapping or have already done user story mapping, it is highly likely that you’ll be doing Remote User Story Mapping online in 2020.

Since the pandemic we have seen over 31% of the US Workforce migrate from offices in March 2020 to working from home in April 2020.

Already we see businesses changing the way they work, creating permanent changes to include remote working, hot desking, partial office attendance and in some cases, removal of the office entirely. It is clear that if we seek out a positive from all this, the education of a better work-life is certainly one.

One downside of the removal of a physical office space is the ability to carry out planning, and if we look at User Story Mapping – the ease to create a board. This is where FeatureMap comes in as an online digital space.

Lets go over the 5 things for a successful remote User Story Mapping session.

  1. Foundations

First make sure your entire team understands the principle of User Story Mapping. Who, What, Why? Of user story mapping, the multi-uses, some examples of why to use it for project management and basic intros. As long as your team understands – you will be golden.

  1. Plan your introduction

It may take a few days, may take a week, or may take a quick catch up over the day. Whatever the use case of your group is, and the required time, be sure to keep in mind the differences between working in the office and working from home.

Figure out an agenda, plan the day over introductions, activities, presentations, and when to carefully place the breaks.

For some, working from home can be distracting, while for others it can provide a freedom and comfort to allow them to work efficiently. Cater to everyone.

Is everyone on the same timezone?

Will everyone be available for the full time?

Social time?

Can you create a course?

  1. Get your Tech in order.

If you’ve been in any meetings with people new to remote working it can derail the meeting to tech support and cause all sorts of issues.

Ensure everyone is ready with their hardware, software and prepared to participate and collaborate.

This will be basic things such as:

  • Your main communications, be it Teams, Zoom, Skype or Slack – ensure everyone is signed in, ready and working.
  • VOIP, Headphones, Microphones, audio tests – Ensure everyone is good ahead of time. There is nothing worse than having one person spend 45 minutes troubleshooting a microphone.
  • Webcams working – These are great to make the remote working feel like you are all in it together.
  • The PC and Internet! – Basic basic basic tests. Make sure it all works.
  • FeatureMap Accounts – signed up, invited an in the correct map ready (either in a trial if new, or setup with the group leader if business). We’ve made this bit easy ?

You can send this out pre-meeting and ensure everyone can do a mock load, test and make sure they are ready to go 9am the day of the course.

  1. Set out clear rules

So this is more of a per group basis. I’ve sat in meetings where everyone is completely new to remote working, and I’ve sat in groups where it is a tried and tested done deal. The huge range of experiences were staggeringly immense – talking over one another, crunching of food, tech issues, volume, lag – oh my.

Set out some rules to ensure your remote user mapping session is productive:

  • One person talks at a time
  • Ensure everyone has had time to participate
  • Check chat frequently
  • Eat only in your break
  • Good audio and camera (put your webcam on!)
  • Mute your microphone between conversations and don’t hot mic!

In an ideal world, your remote colleague might be in a self contained home office, free from distractions and sound – but in a real world… sometimes the kids, dog, neighbours or even home office equipment may not behave. So give slack but also be aware of your team and work to these requirements.

  1. Meeting Execution

Now we have our tech sorted, our plan, our rules and accounts. It is worth considering that working online for long periods of time can be extremely tiring and regular breaks are recommended.

One simple rule for remote working is that when scheduling meetings plan them to finish 5 minutes before the end of the hour, or before the half hour, to build in time for much needed breaks.

Here are some basic tips for running effective online sessions:

  • Manage Talking Time – Communicating online can take longer, typing, thought process (the removal of visual feedback) but also allow clearer and direct communication. However it can take time so try timeboxes. Use a timer, visible to all, to ensure conversations do not drift.
  • Visualise Information – Share sources of information when referring to it in the meeting, use your dedicated channel to get a clear visualisation. This is an important goal and why the User Story Map and its visual collaboration is important to be real time.
  • Avoid repetition – Maintain engagement, and keeping attention is important as so you do not need to repeat coverage. There are many tips to do this, but random selection or asking the last person who spoke to choose who speaks next is a good way to keep everyone alert and listening to the course.
  • Records and Notes – If the call needs to be recorded, or notes do so in an online document. Webcams at flipcharts, photos of whiteboards can deliver a very poor and low impact experience. While you’ll have the story board covered with FeatureMap, it is important to ensure accompanying tech to deliver a strong course.

One thing 2020 has shown us – Remote Working is here to stay, so get ahead of the curve and ensure your team is productive and effective.

FeatureMap Aggregation – A premium feature for visualisation

User Story Mapping boasts quick visual understanding at a glance. See cards, layers, groups, headers and quickly determine the map state.

FeatureMap can utilise coloured cards, multiple layers, importance settings and assignment to users.

One of the FeatureMap premium features is the aggregation of values.

Moviebuddy is our go to demo map and let’s jump straight into it.

Here below you can see the Map with aggregation enabled for the horizontal layer, but not the vertical layer.

In the header to the left “Version 1” you can see the aggregated total for all values placed within the defined “Time”.

We want to add aggregation of values and costings in the Features and Activities layers.

MovieBuddy Map with Horizontal Aggregation

Let’s go through the steps to add aggregation for the verticals.

Enable Aggregation

It’s as easy as clicking the cards and choosing from the dropdown.

First lets take a look at the column “Manage favorite directors/actors”:

Here you can see the card contents below and at the bottom left a value of cost.

Mark/Unmark movie director as favorite is costed as $400

At a glance any user can look at the map and can very quickly get an idea of individual cards, but not the entire group.

Click the desired card or header (in this example we are clicking the card used as a header “Manage favorite directors/actors”

Select the custom options at the bottom right and select “enter a value” or “aggregate values”:

We enable aggregation under budget and will see the overall cost at a glance

Once enabled, the header card will act as the parent and anything below that will aggregate.

This can work with cards, or even sub aggregations.

Now you can see the “Manage favorite directors/actors” displays $3500 automatically.

With aggregation you can see you entire maps costings, time or estimations aggregated as totals in your headers

This premium feature can work across any map, any cards and is entirely optional.

In addition you can rename the Budget and Estimation (points) to something appropriate and change the currency.

Enabling the aggregation for “points” in the vertical for all light blue layers and again in the dark blue layer:

With just a few clicks the map will now automatically aggregate all entered values.

Happy aggregating!

Basic Intro to Agile User Story Mapping

It can be tricky to see and prioritise hundreds of Jira entries, you need to know which of them are the highest valued features so that you can build them in an effective agile order. One easily adopted method is using Story Mapping and over a messy product backlog. Here I write how it is easier to create a quick User Story Map with the JIRA integration tool at FeatureMap.co

User Story Map is invented by Jeff Patton, he wrote a book (User Story Mapping) to explain about the concept and its practice, it is highly recommended to read the book to use story map more efficiently.

User Story Map
The Moviebuddy Current Version

Story mapping visualises the user’s journey in a step by step flow. These steps create a clear visual display of the requirements and help define your backlog. Compared to a flat backlog a user story map has added dimensions of position and movement through all verticals of your product. This allows you to first map and then navigate the entire user space of your product. With a user story map, you can then see you entire product, the full range of features and steps and gain a better understanding overall.

How a Story Map works

The StoryMap of Alex’s Morning

Groups: The broad actions that users take in order to reach their larger goals.

Lists: lower level under Groups, create the backbone of the map by telling the story or narrative of the user’s journey.

Stories: Basic building blocks of a map which describe something you can delivery and evaluate. Each block can be viewed for deeper detail.

Layers: Horizontal layers which split the story map to show what is in and out of each release.

Benefits of using Story Map

Here are few benefits of using story map as a user story tool:

  • Manage backlog with an overview and leveled structure
  • Brainstorm, discuss and prioritize user needs in a collaborative approach
  • Manage activities and tasks, and divide them into epics or user stories systematically
  • Arrangement and prioritization of user activities and user tasks, or drill down to refine them into related epics or user stories
  • Manage user stories in the online for both remote and co-location environments collaboratively for keeping everyone in your team the same page.

Working From Home in Isolation due to Covid-19

As the world reacts to the COVID-19 pandemic, we are faced with new challenges every day. Countries go into lockdown, workspaces close, and individuals go into self-isolation. Although remote work is already a reality in 2020, with some companies prepared or completely online, for some it may be an entirely new approach.

FeatureMap has moved from its dedicated and shared offices to a mixture of shared spaces, distributed offices and remote employees across three countries. In making these changes, we identified more effective practices, saved on overheads and costs, and introduced a new culture and productivity. As other companies also turn to the remote online workspace, we thought it would be a good time to share some of our experiences and tips for getting the best out of your distributed team.

We are here to help, so if your small–medium business is impacted by COVID-19, reach out to us at team@featuremap.co and see how we can find a solution for you during this time.

Working from Home

Things you need for your team to be successful while working from home remotely:

  • Team chat
  • Video conferencing capability with screen share options
  • Digital backlog management
  • Shared documents
  • Time management
  • Ways to stay connected with each other


A laptop of a remote worker starting with distributed team about to utilise user story mapping with featuremap.co
Make your office space at home comfortable for remote working.

Team chat

There are many chat tools available online. We recommend Slack, Discord and Skype, but Slack in particular. It allows you to continue conversations throughout the course of work, either directly through private messages or in channels that act as meeting rooms. Everyone will be able to see discussions in these channels, so wise management using features like thread conversations will be key to an effective collaborative environment.

Video conferencing

This includes daily discussions, team voice chats, and one-to-one meetings. We recommend video conferencing to encourage a continued level of professionalism, but being able to chat with somebody face-to-face can create more effective communication.

Good video conferencing software offers voice chat, video, and screen share. The ability to easily and quickly share your screen to your remote team during a meeting is time-saving gold dust. Zoom, TeamViewer, and Slack all offer this functionality.

However, be aware that both chat and voice calls can be disruptive if used unnecessarily: imagine getting called to meeting after meeting in the office!

Digital backlog management

When you first start working remotely, it’s important to update the management of your tasks and responsibilities to your new environment. All those sticky notes on your monitor and scribbles left on your desk won’t work anymore. You have to go digital.

If you have a project manager, ask them to recreate your collaborative spaces in a digital space as soon as possible. Your remote team being able to access a single platform for project planning will not only help foster self-discipline but will also improve productivity. Ensure you use a tool that protects you, is easy to set up, and is clear, precise, and agnostic.

If you have any questions about FeatureMap.co, privacy, security of our online cloud or our on-premise options, drop an email over to team@featuremap.co

When we first created FeatureMap, we designed the fundamental principles based on Jeff Patton’s User Story Mapping model. Since then, however, we have evolved and developed to create a tool that can be used in multiple environments with a wide range of practices, including user story mapping, development, product management, team task management, agile workflows, kanban, and task lists.

When you recreate your collaborative space online, remember that utilising labels, custom fields, colour tags and assignments can really help you take control of your workflow.


A remote worker taking his user story mapping post it notes to a digital tool
Take your post-it notes and put them online for your team.

Moving to the digital space for project management

If you are moving from a physical workspace to the digital one, and are starting afresh, you will need to first identify and define the project’s backbone.

Designate a group of people to explore your project and identify the user experience and journey. Focus on the breadth of tasks first, then build in the depth.

Using a shared workspace to collaborate live, whilst using video chat, can really help bring your session together as well as improve the quality of the end result.

Build a map and, if you need to, outline all the projects, cases, tasks and work within it. If you want to dig deeper into user story mapping while your team is distributed, check out our guide on how to get started.

If you are still uncertain and want a demo of FeatureMap.co, do reach out at sales@featuremap.co and we’ll be happy to schedule a live demo for a small team.


A FeatureMap marketing story map demonstrating some of the features of User Story Mapping and Agile.
Covid-19 – Taking your physical to the digital with FeatureMap.co

Daily check-ins

Daily check-ins can really bring together a remote and distributed team. Each morning, share what your tasks are, or what you are working on, via chat and then follow up that report by mirroring the workflow on your map for the later check-in. This is a great method to check who is working on what, the progress, where blocks may occur, and how everyone is progressing with their tasks.

Management can be utilised by sharing Google docs, following up on emails or arranging voice calls. A story map can be a quick snapshot view for all team members to understand the project stage.

Distributed team culture

Building a culture, keeping the team connection healthy, and improving communication with remote teammates is crucial. For this, team chat and communication is important. Adding a space where people can chat, share their daily lives, or simply talk before work or a meeting fosters healthy growth, keeps people engaged, and helps your teammates learn about each other. You can even build on this by creating virtual lunches together, having healthy competition about the “best lunch”, and more.


Try FeatureMap Today, and if you need more users, have feedback or suggestions. Do reach out and we can find a solution to help cover you while Covid-19 impacts your business.

Importing and Exporting your Maps

FeatureMap can be used for free for an unlimited period of time, but if you want to use some advanced features such as Word/Excel exports or unlimited maps, you’ll have to subscribe to a Premium account.

Premium FeatureMap grants you you to export your map into various formats; documents, an image or even another application.

In this blog post we will take you through every step of the process.

We support export for file formats and platforms as below:

  • CSV
  • XML
  • JSON
  • Microsoft Office Documents
  • PNG image
  • Atlassian JIRA
  • Trello

Export

I will be using the MovieBuddy Product Map as examples so you can follow along.

To get started with Export go to your map and click at the top right – “Export”

Here you will be given four different options:

As a new file or document…

Choosing to export as a new file or document will allow you to export your map as a CSV, XML, JSON, XLSX, and DOCX.

As well as support each file format, some of the file formats support different file layouts to give you full control of how your document is presented:

  • Simple list of cards
  • Groups at first level
  • Layers at first level

In addition we also have the option to add comments, attachments and checklists to your export. Some exports do not need to show all the details so these options can be disabled.


Export map as image

When exporting as an image we generate your image as a PNG format.

We realise that this can be used for printing large images for your work environment or simply having a copy for digital display and so we offer four different DPI versions. Please consult your printer for the ideal DPI, but we recommend 300 DPI for paper printing.

  • 72 dpi
  • 96 dpi (best for display on screen)
  • 150 dpi
  • 300 dpi (best for printing)

In addition we wanted to give you further control of your image so we offer different widths of the cards:

  • 5cm (2 inches)
  • 6.3cm (2.5 inches)
  • 7.5cm (3 inches)
  • 10cm (4inches)

We advise selecting these options first with a low resolution image to find the best format and then opting for a higher DPI for when you are happy with the width.

We also offer printer friendly grey and white background options.

We also give full control over your columns and rows. If you wish a column (group) to be displayed in full, collapsed or hidden entirely.

Trello

When exporting to Trello you will first need to connect Trello and FeatureMap together by following the on screen prompts.

We will never take your information and use it for other than connecting FeatureMap and the desired service.

Once you have connected Trello and FeatureMap you can remove those permissions at any time from Trello.


Here you can choose how the export of your FeatureMap will be translated over to Trello.

  • Map to Board
  • Map to Kanban
  • Groups to Boards
  • Layers to Boards

Each setting can be repeated into new maps, the image above shows what turns into what.


Please note that creating the board may take some time as FeatureMa.

You can see an Example below:

This Demo Map is exported into the Trello Board Below.

Of course this can be exported in multiple formats.


Atlassian and REST API

For Atlassian and Trello navigate to Export and follow the on screen wizard to connect your account by allowing permissions.

A future Blog post will explore the optional JIRA Integration options.


Finally, we also have REST API where you can develop, edit and create your own export/import functions within your own REST framework.


Get started with FeatureMap now!