User story mapping has become a go-to technique in Scrum for effectively capturing and visualizing user requirements. While Product Managers and Agile teams commonly leverage this approach, user story mapping extends its benefits to various stakeholders involved in the Scrum process. This article will act as a comprehensive guide for Agile Product Development. Indeed, it will explore how the different users in Scrum can harness its power to drive successful product development.
Product Managers
As the orchestrators of product vision and strategy, product managers play a vital role in user story mapping. Not only do they utilize this technique to gain a holistic view of user needs, but also prioritize features. User story mapping helps product managers identify gaps, dependencies, and opportunities, enabling them to make informed decisions that align with the overall product vision.
A holistic view of the roadmap provides insightful information on the overall progress of the project
Scrum Masters
Scrum Masters act as facilitators and coaches for the Scrum team. They play a crucial role in ensuring effective collaboration and communication. Hence, user story mapping serves as a valuable tool to guide and facilitate user story discussions and sprint planning. It helps them create a shared understanding among team members and fosters a collaborative environment.
Development Teams
As for development teams, they are at the heart of the Scrum process, responsible for transforming user stories into working product increments. As a matter of fact, user story mapping helps development teams gain clarity on user requirements, dependencies, and priorities. It enables them to plan their work effectively, break down stories into actionable tasks, and align their efforts toward delivering value to end-users.
Designers
Next, user story mapping allows Designers to understand the user journey and design experiences that meet user needs. By visualizing user stories, designers can identify touchpoints, pain points, and opportunities to enhance the user experience. They can collaborate with product managers and development teams to create intuitive and user-centric designs.
Stakeholders
Finally, stakeholders such as executives, customers, and business analysts, benefit from user story mapping by gaining visibility into the product development process. The tool provides a clear picture of the product’s direction, timeline, and expected features. All stakeholders can actively participate in discussions, provide feedback, and ensure alignment with business objectives.
Easily leave comments or discuss with all stakeholders on the selected card
All in all, user story mapping is a versatile technique that caters to various users involved in Scrum. From product managers shaping the product vision to development teams delivering working increments, each stakeholder benefits from the shared understanding and collaborative environment fostered by user story mapping. By leveraging this technique, Scrum teams can streamline their processes, enhance communication, and deliver products that truly meet user needs.
Start embracing the power of user story mapping and unlock the full potential of Scrum!
You would like to implement user story mapping in your team but don’t know where to start? Check out our games to Teach & Learn user story mapping! Use our premade templates as a basis or read through our step-by-step guide to create your own from scratch!
Agile project management has become an integral part of software development methodologies. It has revolutionized the way software development teams operate, making them more flexible and adaptable to changing market demands. At FeatureMap, a User Story Mapping Software company built by engineers, we believe that User Story Mapping is the best agile technique for managing software development projects.
What is User Story Mapping?
User Story Mapping is a technique used in agile project management to plan and organize product development based on user needs. It involves creating a visual representation of user stories, which are short, simple descriptions of a feature or functionality that a user needs to accomplish a specific task. The user stories are then grouped into themes or epics, and arranged in a hierarchical order to create a map of the product development process.
Why is User Story Mapping the Best Agile Technique?
User Story Mapping is the best agile technique for several reasons. Firstly, it helps in prioritizing techniques by providing a clear understanding of the user needs and requirements. This enables the development team to focus on the most important features and functionalities, ensuring that the product meets the user’s needs and expectations.
Secondly, User Story Mapping is a lightweight and non-nonsense stand-alone solution, which means that it is easy to use and does not require any additional software or tools. This makes it accessible to all members of the development team, regardless of their technical expertise.
Thirdly, User Story Mapping is an effective tool for creating agile project plans. By providing a clear and concise overview of the user stories and their priorities, it enables the development team to plan and schedule their work more efficiently. This ensures that the project stays on track and is completed within the required timeframe.
Example of User Story Mapping in Agile Project Management
Let us consider an example of how User Story Mapping can be used in agile project management. Suppose we are developing a project management software using agile development software. The first step is to identify the user needs and requirements. This can be done by creating user stories, such as “As a project manager, I want to be able to assign tasks to team members, so that I can track their progress and ensure timely completion of the project.”
Once the user stories have been created, they can be organized into themes or epics, such as “Project Management,” “Task Assignment,” and “Progress Tracking.” These themes can then be arranged in a hierarchical order, creating a map of the product development process.
Using User Story Mapping, the development team can easily prioritize the user stories based on their importance and create an agile project plan that focuses on the most critical features and functionalities. This ensures that the project is completed within the required timeframe and meets the user’s needs and expectations.
The Bottom Line
User Story Mapping is one of the best agile techniques for managing software development projects. It helps in prioritizing techniques, creating agile project plans, and providing a lightweight and non-nonsense stand-alone solution. At FeatureMap, we believe that User Story Mapping is essential for any software development team that wants to be agile and flexible in today’s fast-paced market.
You can try FeatureMap and get started with making your first map right away, and for free.
A User Story map is a perfect tool to visualise product roadmaps for non-technical stakeholders. Feature Map allows you to create your entire product and give an incredibly rich overview.
This allows you to visualise the whole user journey and how it maps its features into the product.
A completed user story map is the perfect centrepiece of any product discussion with stakeholders.
How it works is simple.
First, identify your personas.
They capture your goals, your behaviours and the needs for the end user.
They help you build your story map and give it life.
The personas should always be kept in mind when you add features to your board. Personas can naturally be real people or groups and made up.
The next step is simple.
Understand the user journey.
Take those personas and map out your product with each feature identified as a goal.
Break down each goal into a set of consecutive activities. It can help if you line up these personas to each of these goals.
Then capture each requirement to help achieve that user goal with the help of the stakeholders.
You should be able to formulate all the user stories and the acceptance criteria of what you want to build. Add as many details as you wish to each feature for your team to fully understand the goal.
Control your map, add details, add status, aggregate and take control of your backlog.
You can add with future map annotations and estimate your features, time, budget or any other custom status.
Your team can collaborate on each feature by adding comments and tagging one another.
You can also add a set of different colours to help organise your map.
Once you have completed mapping your user stories journey, you will then be able to prioritise your backlog.
Each feature needs to be mapped to release, and the Golden Rule is that each release needs to be a valuable product slice across the user journey.
Finally, do your last steps.
The most important features are placed at the top.
You’ll wish to start out simple and expand on the functionality of your product by adding new product slices.
These product slices can be converted into MVP’s or Sprint’s. With Feature Map, your product can evolve constantly and cards can be moved around by simply dragging and dropping.
You can also aggregate the values of each task on your map and be able to see how long in time or how much in budget each slice and goal may cost.
You can finally eradicate your long list of features, your overwhelming sprint lists, and your misleading Gantt charts.
A story map is the perfect tool to communicate your product vision with the members of your team and non-technical stakeholders. It beautifully pulls together the big picture and allows you to prioritise your product and progress while not forgetting the details.
Once you are happy, you can share your feature map board to anyone. Or you can invite your own team to collaborate further. Additionally, you can integrate with JIRA.
Creating a product map can feel intimidating, but with the right tools, it can be completed in no time. A systematic planning process and the right tool can get your project plan mapped out and finished in less than an hour.
A product map answers three basic questions:
What activities do you need to do?
Who will do these activities?
How long will these activities take?
It’s super easy, and it’s even better when you bring a team along with you to get started.
So how to start?
Step 1: Define your product
A story user map can be used as a method for visually outlining your roadmap for your product.
You will need to think of your product in stages, from high level to detailed level. Break your product down to varied groupings, then into steps, and then into further detail. Turn these steps into cards.
Product owner, testers, technical lead, customer support, architect, developers, UX/UI designer, sales and marketing, etc. All have their own techniques and requirements which will help you create your map.
With the questions above, what, who, why.
Step 2: Build that Map out.
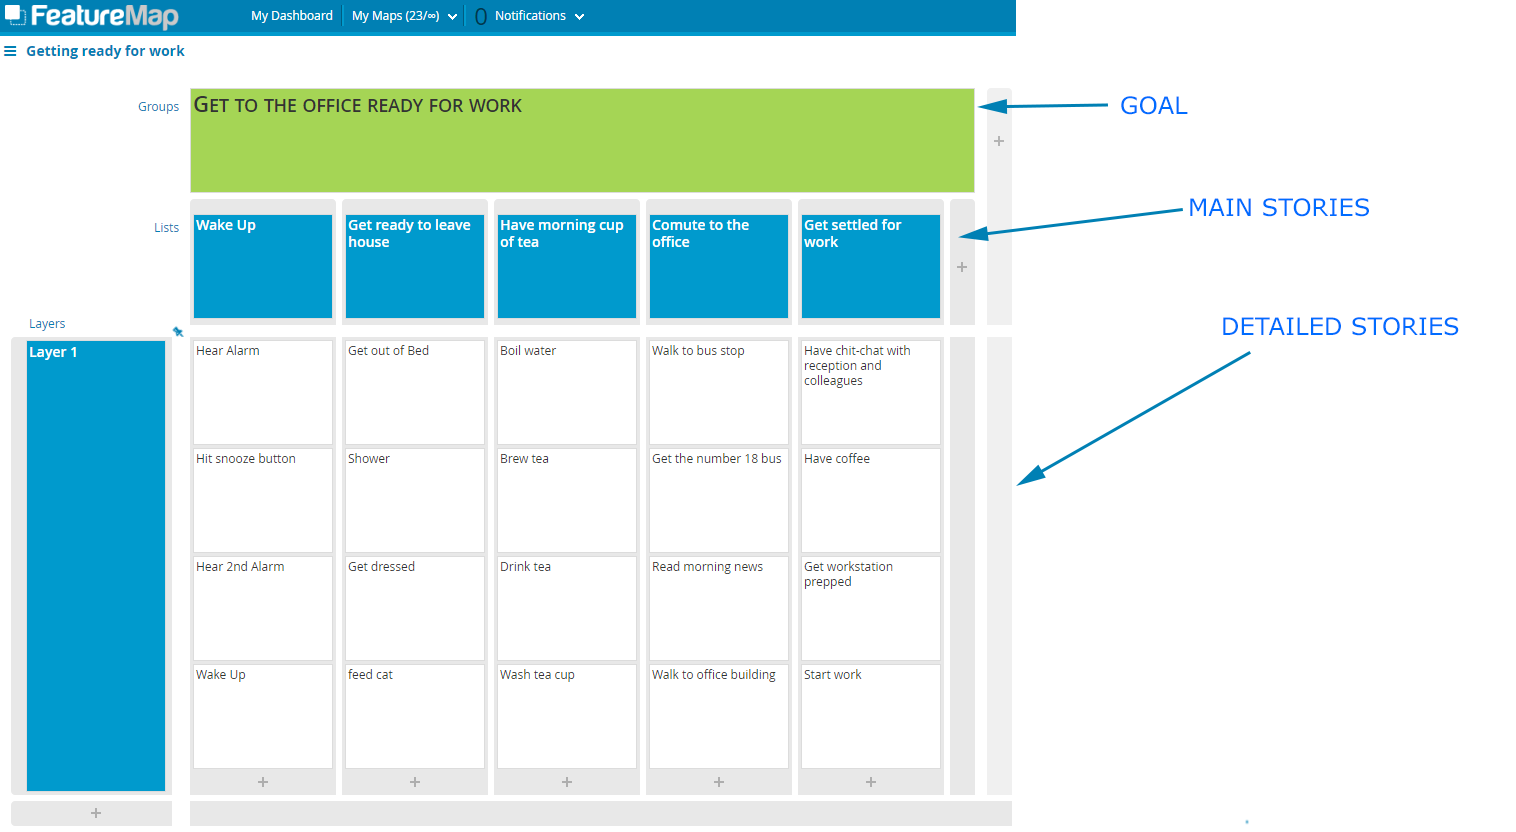
If you are brand new to user story mapping, we have a short and sweet exercise. Let’s take a simple real-life example of “getting ready for work”.
The Story Map of Alex’s Morning
Start with the goal. What is the story map about? What are you trying to accomplish? The main overall purpose.
Second, list your main stories, your main tasks or activities. From left to right, insert the main steps of the story map that need to happen.
Move on and detail each main list – column by column, left to right.
In the case of product features, the layers can be then developed and then bingo bango. Done.
In a simple step you have your Product Map of high level tasks.
Product Map complete.
And it’s only step 2… granted the product map would have been done as soon as you applied your main stories and really its more like step 3 if we need drag out tasks, but really… User Story Mapping as a tool for Product Maps offers a value you can only understand once it is underway.
Step 3: Now you have your Product Map – Let it breath!
Story User Maps are ideal for allowing a team to design out a product feature and reduce the need to go back halfway through development because XYZ requirement. Let the project develop, evolve and change into larger, bigger projects or features.
You can develop and maintain any feature creep by creating new cards and assigning them into new sections.
You can add new requirements and manage the product map by assigning times, values, budgets and aggregating those values to the higher level cards.
The product map can become the defacto aid and tool in all your roles as Producer or CTO!
When building your story map approach it from all roles, if alone think about each responsibility in an order and feel free to create duplicates to then merge later. It’s about going with the flow and giving creative freedom to fleshing out a detailed product map. You can always edit, merge, delete in a later step. Due to their different foundations and interests, all roles have valuable points of view. As well as when working collaboratively with a team, everybody has an unmistakable and common comprehension of what they are about to build together.
As an aside, for further reading, we covered a series intro to story mapping with a basic run down and a simple exercise taking you through the morning tasks and making a map that may help, also don’t forget to check out some good practises in going from Idea to MVP.
Examples
We have a two examples below.
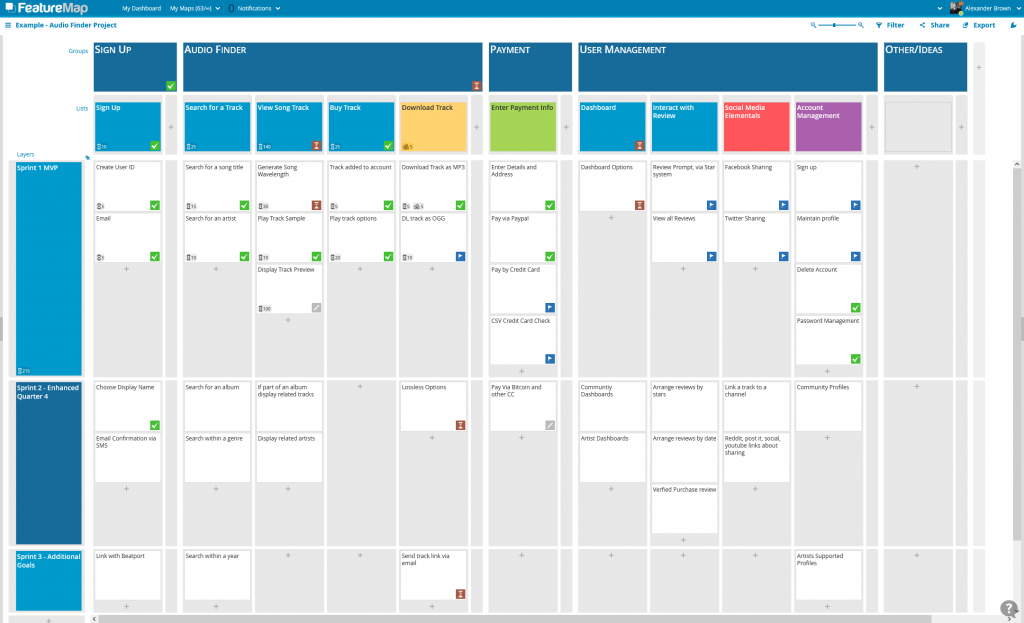
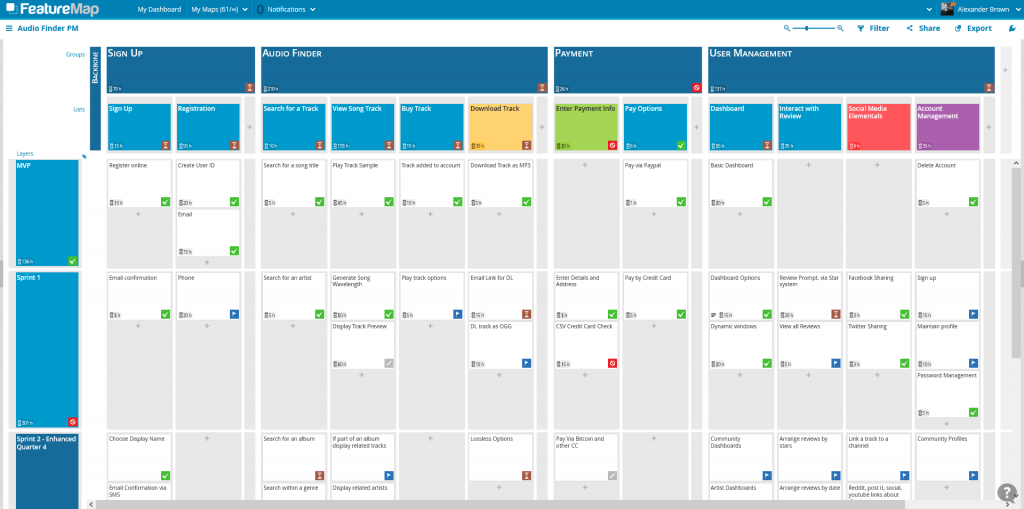
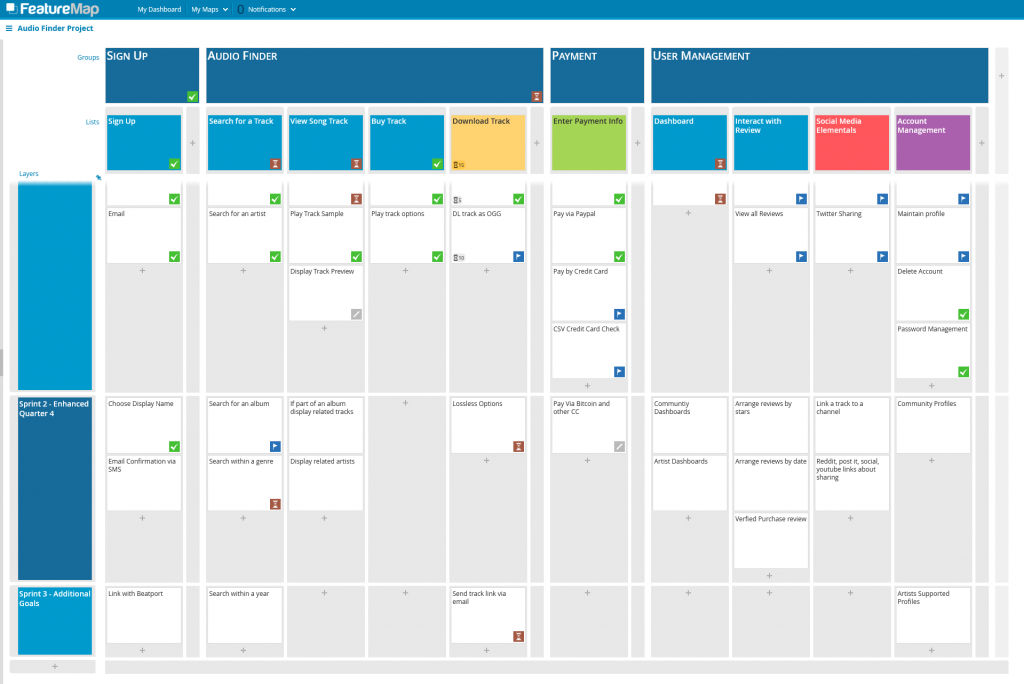
One is the Audio Finder Project, a board finished, with MVP defined, sprints defined and using some aggregation on the cards. A good example to see a finished map.
Audio Finder, a product map example with a finished MVP and aggregation.
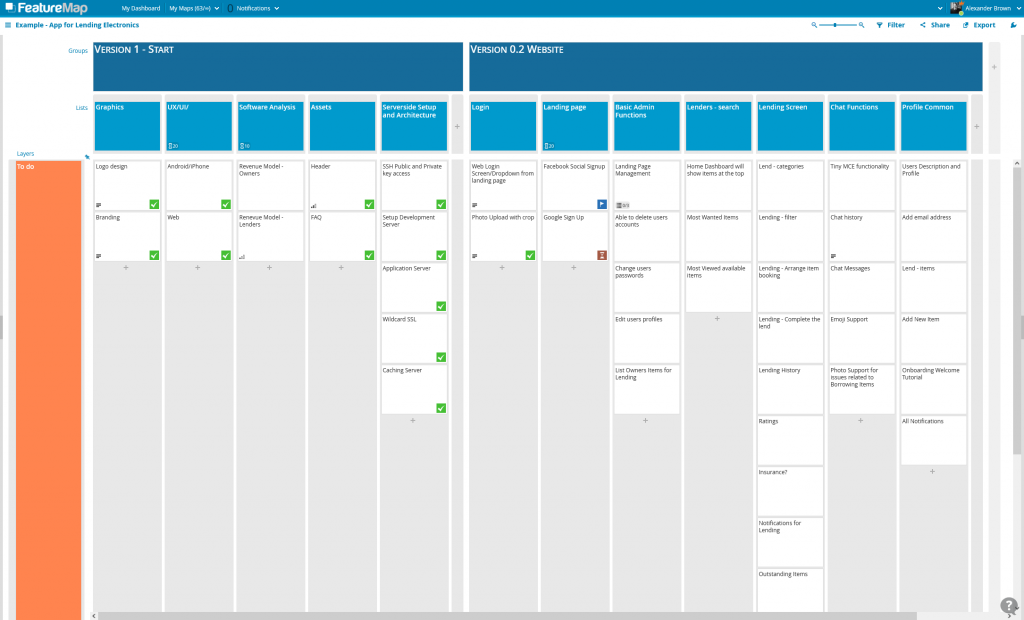
One is the App for Lending Electronics, a board and map which is in the stage of “undergoing fine-tuning” and shows an example of half the map with tags and status applied, while the other half is still in flux. A good example to see a map undergoing evolution.
Lending Electronics, a product map example in progress.
If you want to give making your product map a go, quickly, check out FeatureMap and start for free.
User story mapping can allow your team to see and understand the product from a user-centric design. You can see the bigger picture of the product, help the team identify gaps and dependencies, and give the first framework of a shared understanding between your entire team.
A finished FeatureMap Board should have your entire product outlined. The team will have sections separated, and you’ll be scheduling and planning the outline of prioritized stories into sprints and releases.
In this article, we will share how to gain a better shared understanding of a map by utilising the feature of aggregation.
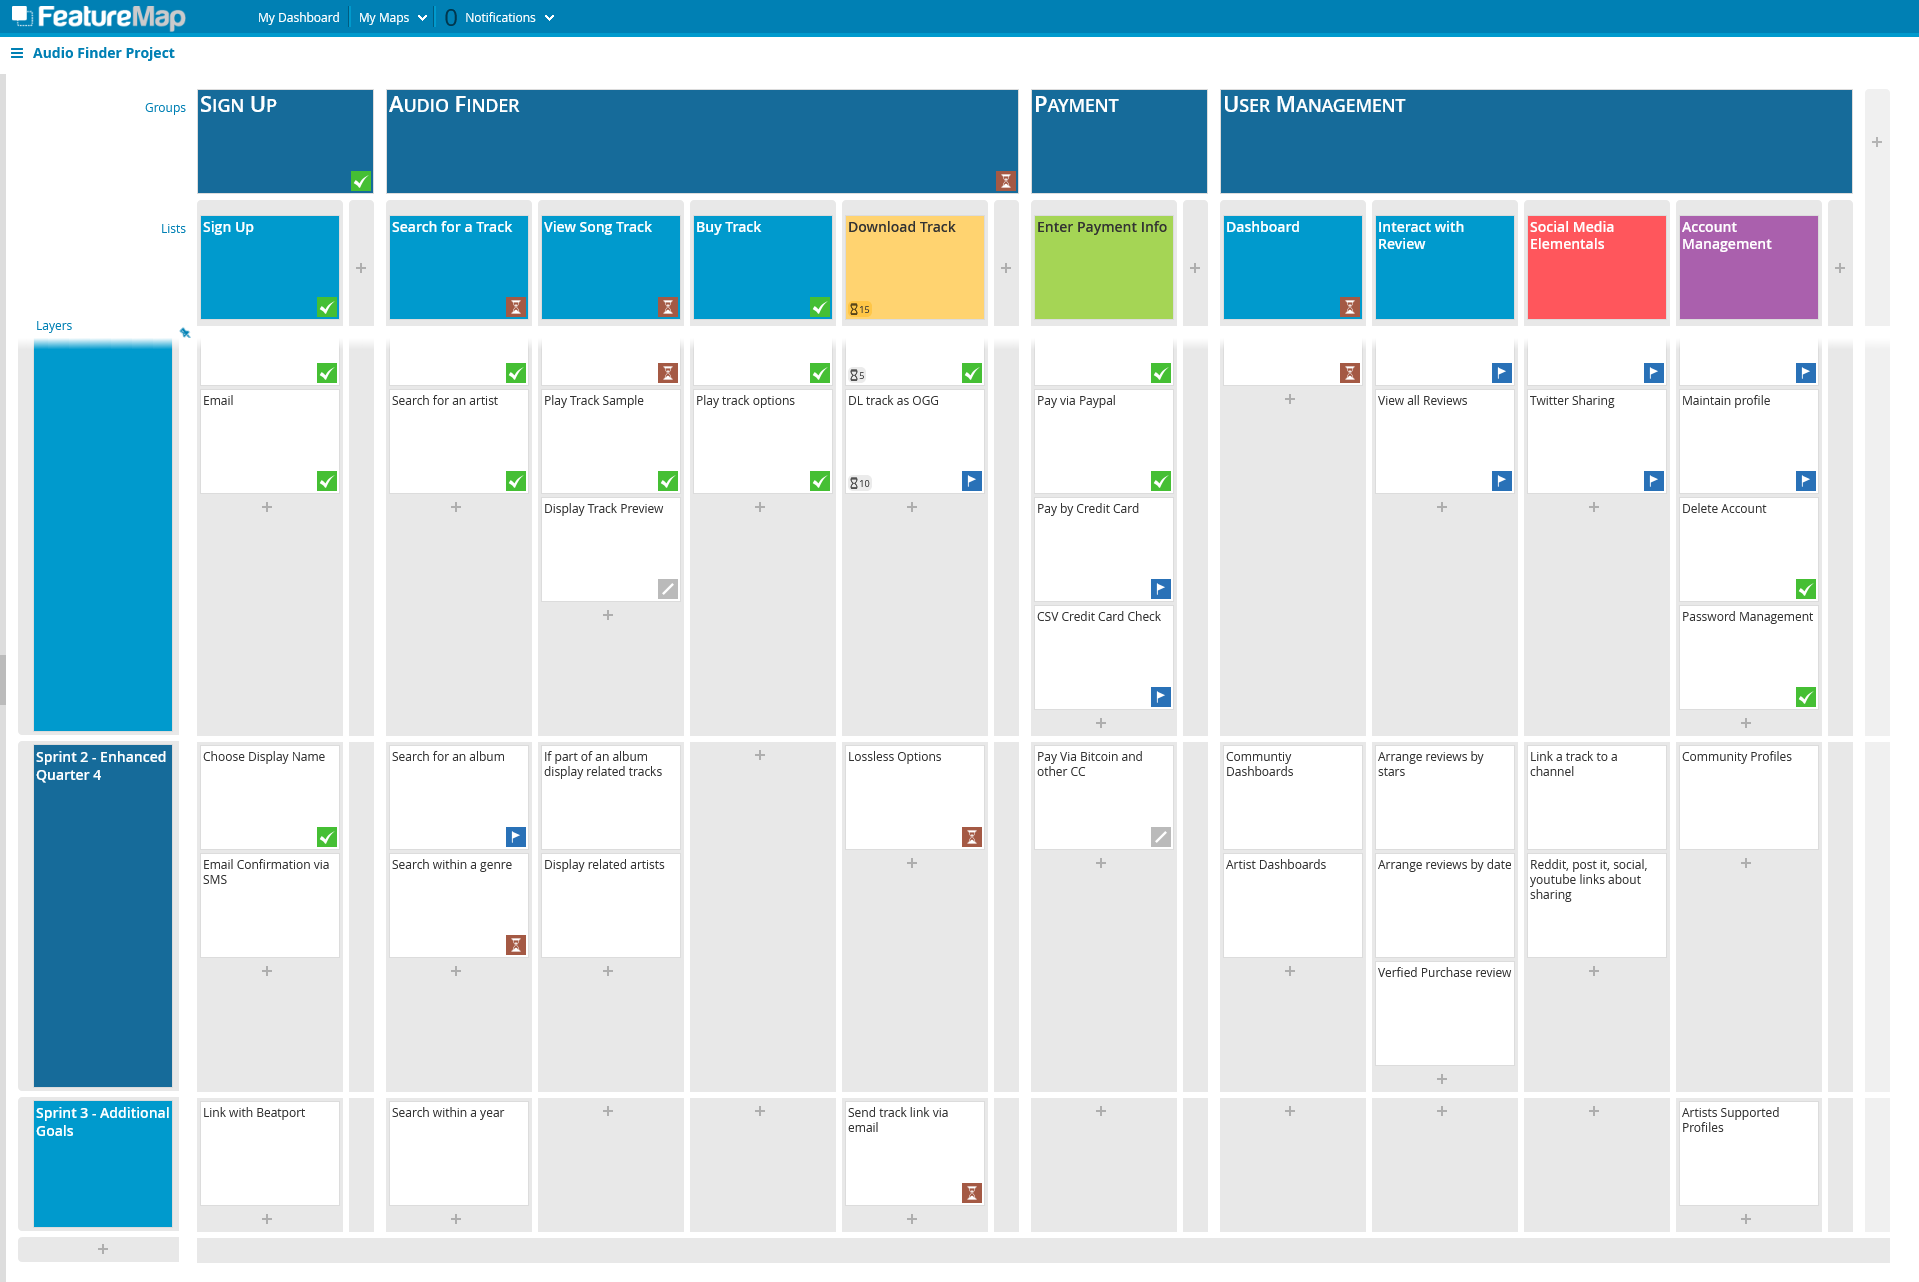
In short, it is the option of aggregating values. On each card you can assign a status, estimation and a budget. When you assign the aggregation option to a header card, the card will gather the values of all sub cards and calculate, dynamically, the overall status or number.
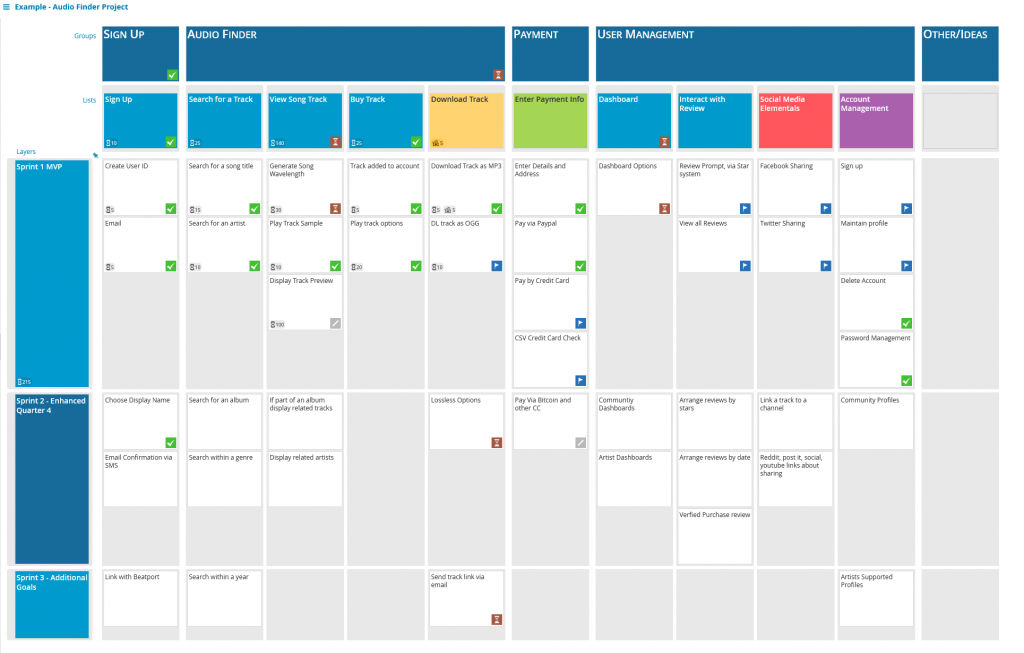
Here you can see the FeatureMap Board of the Audio Finder Product, fully incorporated with aggregation of both status and time.
A beautiful map, full of information, which can be daunting, but with ease you can see if the product development has any issues just by looking at the aggregated dynamic values on each of the layer headers.
Let’s break it down.
Status Aggregation
With Status, you are able to assign to a card, displaying a coloured icon on the main map. Great for that easy acquisition when viewing the larger map.
The statuses you can apply are: Todo, Ongoing, Done, Cancelled, Blocked.
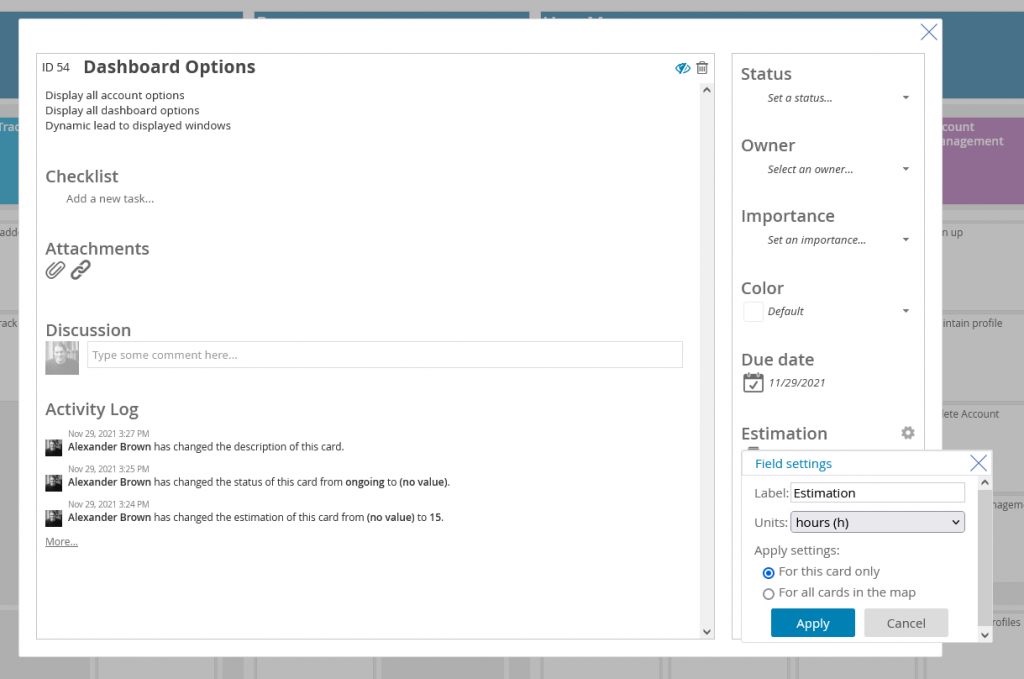
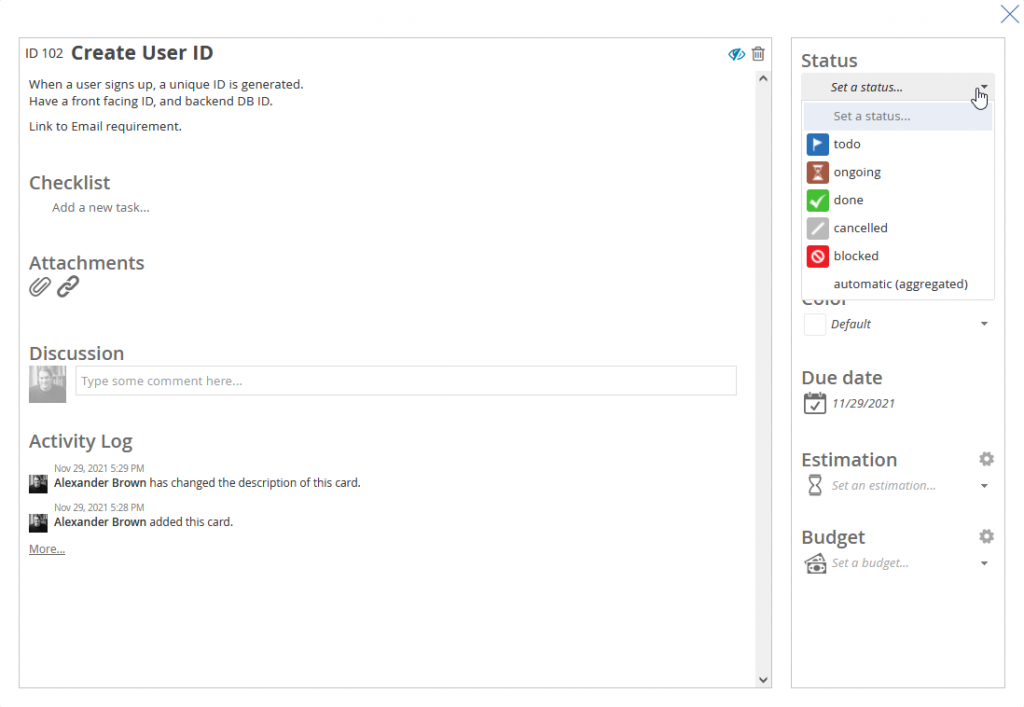
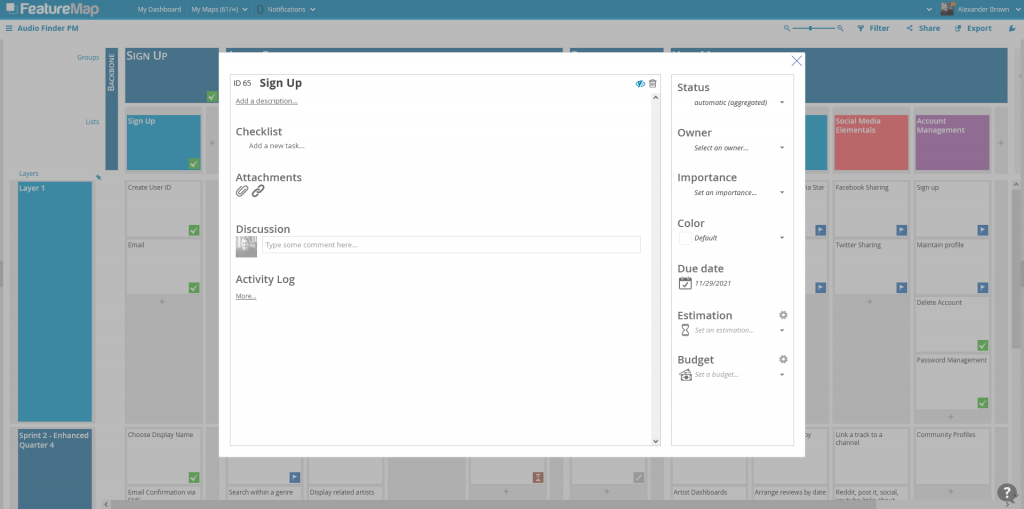
The Card – Register Online: Applying a status for the state of its task.
With aggregation, you can apply the option “automatic (aggregated)” on your header cards, and the header card will a value by priority to display allowing the team to see each header, and associated higher task status.
A quick glance at a busy map can be even quicker with good application of status icons, and aggregation allowing you to identify issues and solve them quickly. This is one huge advantage for those busy product owners or leads ?
The priority for aggregation display is by importance: Blocked -> Ongoing -> Done.
When a card is set to “To-Do” and “Ongoing” are is aggregated as “Ongoing”.
When a column or layer has a “Blocked” card, this takes priority and is aggregated as “Blocked” as to draw attention to issues.
When all cards within a column/layer are done, the aggregated value draws “Done”.
The status “Cancelled” is ignored.
Automatic (aggregated) has been applied to this Sign Up Card (Header).
The header card (groups) Sign Up has been set to an automatic (aggregated) value.
The sub headers (lists), Sign Up and Registration are also set to automatic (aggregated).
The cards in those columns have all be seen set with “Done” status.
The value will dynamically be displayed based on the values of the cards within the sub-cards.
In this case, FeatureMap draws the values from Register Onlineand Email Confirmation.
Both are “Done”, so the value aggregated is “Done.”
Budget and Estimation Aggregation
The task status is not the only aggregation option. You can also track your assigned values of budget and estimation.
When you assign numbers to a card, and then aggregation to the header. It will draw vertically to each header group and list or, if applied to a layer header, it will draw horizontally to each layer. This allows you to see the overall bigger picture, but also a specific collection of times, costs or the main status of the project.
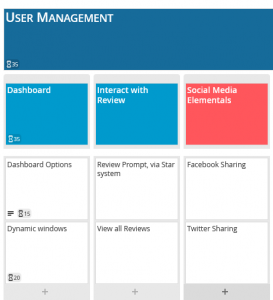
In this FeatureMap we are utilising Aggregation.
On the User Management Section, we are not aggregating status instead we are estimating the time it will take for our developers to code the described section.
You can see the Dashboard Options Card is estimated to take 15 hours, and the Dynamic Windows Card is estimated to take 20 hours.
The header above – Dashboard draws those numbers and calculates both, giving us 35 hours. At a quick glance, the team now know the Dashboard feature should be done after 35 hours.
This aggregates higher to the USER MANAGEMENT header as well, showing us the value of 76 as it draws all estimations in it’s sub lists of Dashboard, Interact with Review and Social Media Elementals.
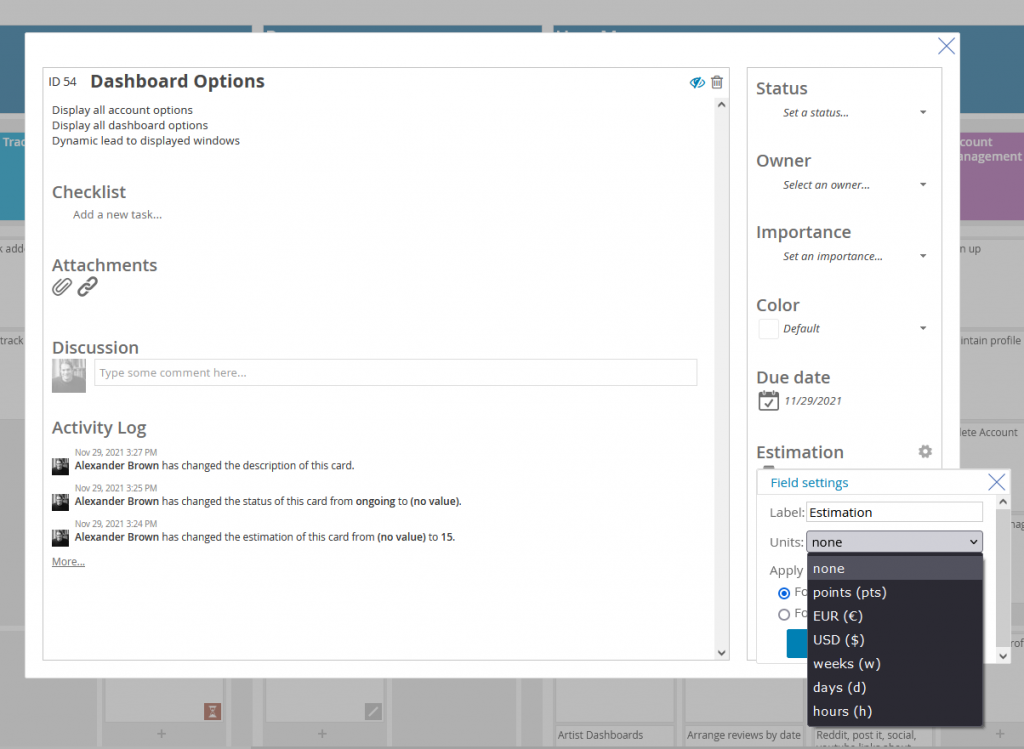
Customising the Aggregation Options.
On both Estimation and Budget, you can rename the labels of these fields and assign units.
If you decide to do this after the fact, worry not, you can assign the field settings to a single card, or all cards on the map when editing the options.
The list of options available when customising your fields.
To edit, open up a card and click the grey cog wheel next to the Estimation or Budget field.
Here you can rename the fields, and assign units.
Units available are:
none (default)
points (pts)
EUR (€)
USD ($)
weeks (w)
days (d)
hours (h)
I settled on Estimation and used the units as “hours”.
Apply to all cards please, and let my map be beautifully informative.
Vertical or Horizontal
Aggregation can be applied horizontally or vertically.
When you apply it to the Group and List Headers (Vertically) the aggregation will be drawn from the entire column, spanning every sprint or value.
As such, it is much more common to see the aggregation applied horizontally to see the Sprint status.
Aggregate up or across. Dynamically see your sprints and tasks.
Aggregation Helps
A user story map need not be static. Teams can update it with findings from research spikes, revised estimations, and user feedback from sprints and releases. The story map can also be used as a visual roadmap to communicate both the planned work and the work that remains.
So if you find yourself as a product owner or project manager wondering the status of your developers, and you want to avoid it interrupting them distracting them or holding unnecessary meetings, the aggregation tool is invaluable for your management.
It allows your developers to keep you updated while allowing an optimal level of communication. Maybe they’ll get more done? ?
Give aggregation a go, you’ll be surprised how much control it gives to your map. You can access aggregation options with a Premium Subscription, or with the free sign-up trial.
As a product manager or product designer, you’re constantly thinking about how you could improve your product further.
Most of the time, this means building new features, or improving existing UX.
With FeatureMap you can build out your maps, get a visual broad understanding, but what about supporting your next steps?
How do you know if the features you are planning to build are what is going to really drive user value, while pushing your company closer towards its revenue goals?
You can use prioritization frameworks, of course but first and foremost you should…talk to your customers.
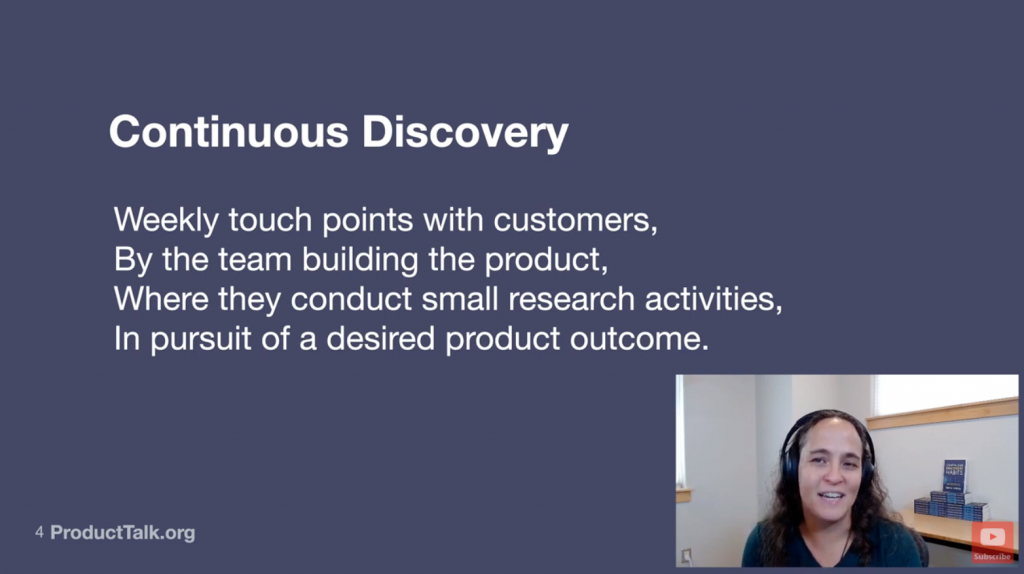
And Teresa Torres, a renowned Product Management expert, wants you to talk to them more often!
Let’s see how you can recruit more users for your interviews without spending more time and effort on it – and get better results from your product delivery efforts?
What is Continuous Product Discovery?
Continuous Product Discovery is a mindset of developing a weekly cadence of having conversations with your customers.
The term has been coined by Teresa Torres, an authority in the field of product management, who recently published an eponymous book on that topic.
The expectation that you will start talking to your customers every day or even every week, if you’re not talking to them at all now (or once in a blue moon) is a bit like going on a crash diet – an extreme change that is not likely to last.
Continuous discovery implies a continuous improvement mindset – if you talk to your users quarterly, take a small step and talk to them monthly. If you talk to them monthly – try talking to them bi-weekly.
Now – you may be asking yourself – why bother to increase the frequency of talking to your customers at all?
Why is Continuous Discovery important?
We make product design decisions every day. But we talk to our customers every…6 months? What happens in the meantime?
You’re more likely than not to work on features that nobody wants, or that the users are likely to find confusing.
Learning from user behavior only after you have launched is very expensive. If you find out that the feature you’ve just launched was a big mistake and you basically need to go back to the drawing board and redo it – you’ve already wasted the precious time and resources.
This could have been prevented through exposing your users to the planned features at the stage of paper sketches – making the whole process easier and cheaper.
Escaping the “Build Trap”
Continuous Discovery also helps you to understand your customers and users a lot better, thus avoid falling into the ‘build trap’ – a situation where the product team is stuck in the cycle of building and launching features, without giving much thought to the outcomes.
This term, in turn, was coined by Melissa Perri, an author of another great book for PMs on that topic.
The Curse of Knowledge
Another reason why you should employ Continuous Discovery is our “curse of knowledge” as PMs.
We are experts, but our customers are not.
They are not familiar with our products. They don’t know the ins and outs of our interface. What seems “so obvious” to us may be total rocket science for them.
In consequence – we make product decisions that are not good for our customers, from an expert point of view.
Validation mindset vs. Continuous Discovery Mindset – it’s cheaper
PMs tend to have a “validation mindset” – they build things, and then A/B test them to check if the users are getting them. This mindset, however, is very expensive.
Continuous discovery mindset, in turn, helps us test our hypotheses a lot earlier in the process – before we have built anything.
When we get feedback at an early stage, on “paper sketches” and half-baked ideas – it’s faster, easier and cheaper to iterate.
This is what we call the co-creation mindset – where the customer is actively involved in the feature creation process.
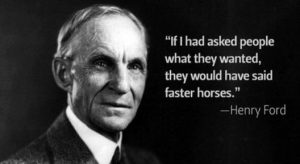
You shouldn’t ask customers what to build
A common objection to continuous discovery is that “customers don’t know what they want.”
You may recall these famous Steve Jobs quotes, or even Henry Ford’s famous “If I had asked people what they wanted, they would have said faster horses.”
This sentence is actually quintessential to explaining the common misconception about Continuous Discovery. You should never ask your customers what they want. Your customers are not aware of what’s possible to do with technology.
That’s why you shouldn’t ask them what to build. But you should totally liaise with them over what you decided to build early, to get feedback and see if they see it as easy to use, valuable or important as you (once again – the curse of knowledge is a thing!)
Who should do Continuous Discovery?
Hopefully, if you’ve reached this point in the article, you’re at least to some extent convinced that you need Continuous Discovery.
But who’s supposed to do it? Do you have to hire a product researcher?
You will feel relieved to hear that, according to Teressa Torres, the answer to that question is “no”.
The team responsible for Continuous Discovery should be the same as the team that is building the product, on a weekly basis.
You don’t want a hand-off between a discovery team and a delivery team. Your delivery team should be talking to the customers too.
The product “trio” is the minimum team that is doing discovery. They should focus on having small, but frequent touchpoints with the customer.
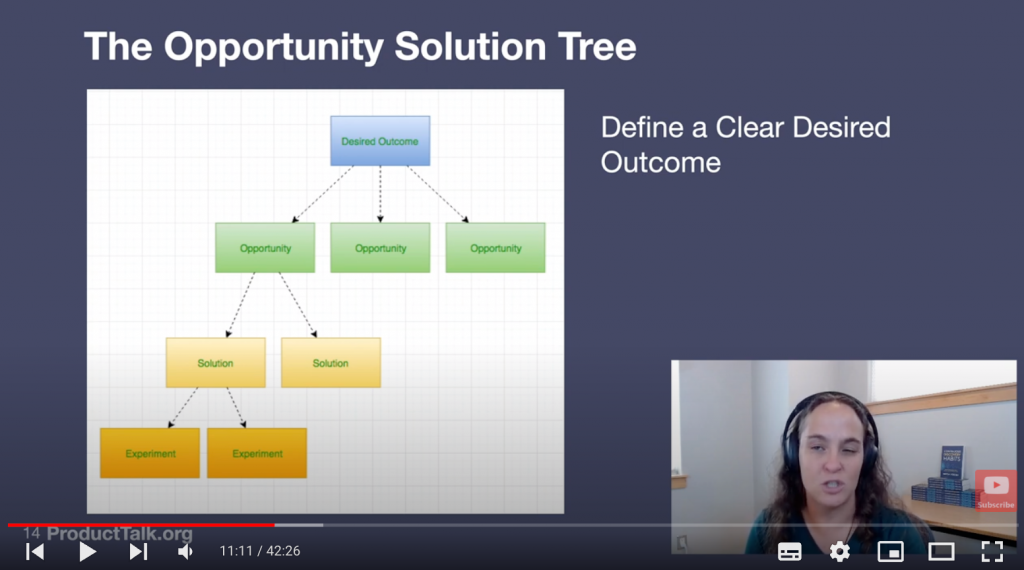
We need to do research in a way that discovers customer value that drives business value.
How do you discover features like that?
Opportunity solution tree helps you find opportunities that increase financial metrics by increasing customer value at the same time:
Ok, so now you’re probably wondering…how on earth do I get my customers to talk to us, especially in the busy B2B world?
Problems with Continuous Discovery
Apart from finding the right people to conduct discovery, and finding time (and motivation!) to do it consistently – you also need to find the users who will want to jump on a call with you.
Filling your calendar with customer interviews may have been a challenge, but it is now becoming increasingly easy with digital adoption tools that can be used to recruit users for discovery calls on autopilot.
How to recruit users for Continuous Discovery?
How to fill your calendar with user interviews without even thinking about it? You need to ask your users when they are already engaging with your product:
You can do it directly on your website, by showing a popup with a link to your calendar
You can get your customer-facing teams to recruit customers for user interviews – e.g. your Customer Success or Customer Support teams.
Or – if your buyer persona is the same as user persona (e.g. in B2C, or SMB-B2B) – the best way to do it is inside your app.
Make it in-app
Your users are most likely to respond to your bid for connection – and accept an invitation to a user interview – after they have successfully accomplished something using your product.
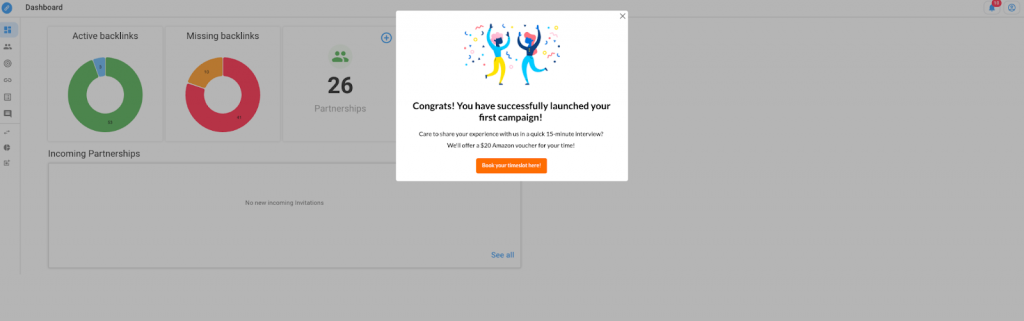
You can do it by building reactive in-app experiences that appear only when a custom event has been triggered by the user:
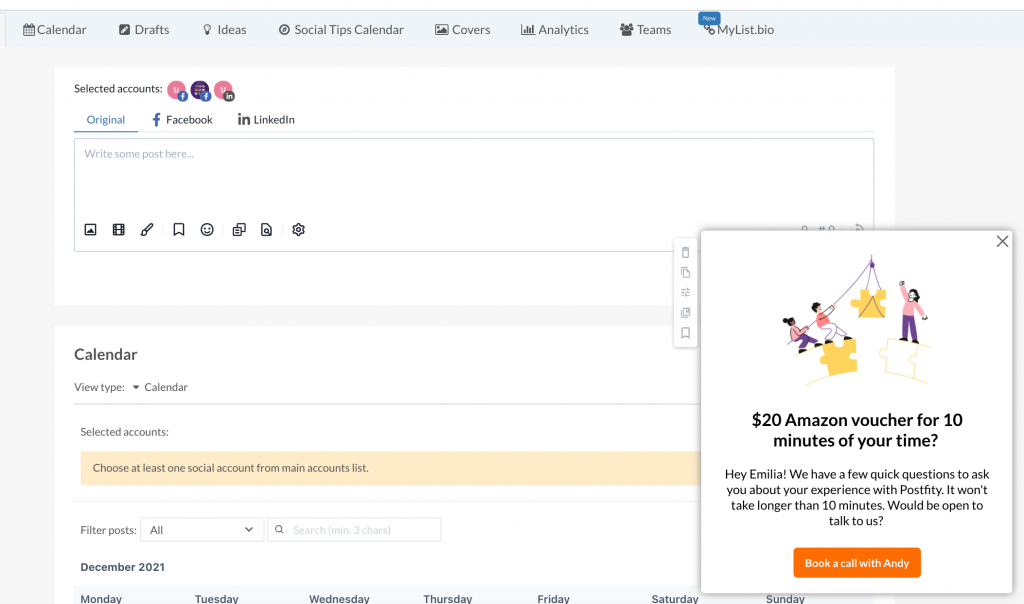
BacklinkManager asks the users to jump on a quick, 15-minute interview after the user has launched their first link building campaign.
Offer incentives
As you can see in the example above – offering a small incentive in the form of e.g. an Amazon voucher, or a discount on your annual subscription or upgrade – can make it more likely that the users will book a call with you.
Make it relevant
If you have a more complex SaaS product, it’s likely that you cater to different audiences and personas. Using segmentation will enable you to reach the right audience.
You can then invite a specific segment of users to interviews focusing on a particular problem you’re trying to solve for this specific audience segment.
This is why you should use user segmentation to trigger interview requests.
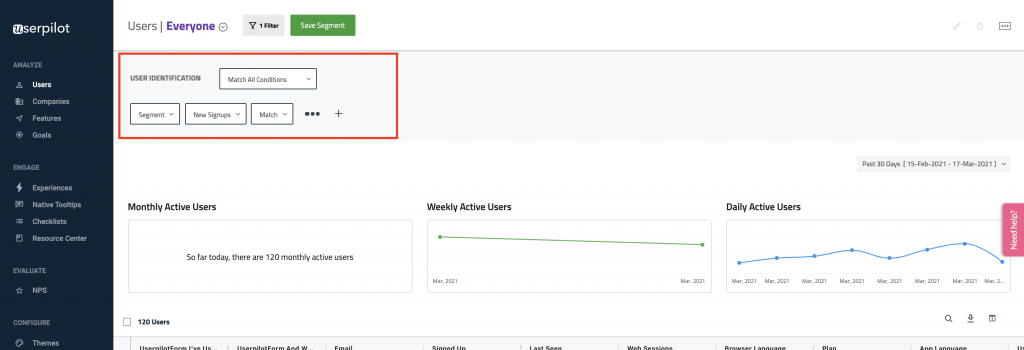
With tools like Userpilot, you can easily segment your users both by demographic and behavioural characteristics – e.g. by user attributes such as plan, or by the role in their organization, or by custom events such as e.g. performance of certain actions in app (and the number of such actions) or the use of certain features.
Make it timely
Time is also of essence. You don’t want to invite a user to an interview after they have just failed to complete a certain task, after they’ve contacted your support about a problem or a but that hasn’t been successfully resolved yet, or you have an indication that they are unhappy with your product or service based on their low NPS score.
In such a situation, the user will be very unlikely to respond to your invitation to an interview, and it may even frustrate them further (as the in-app invites inevitably interrupt their workflow).
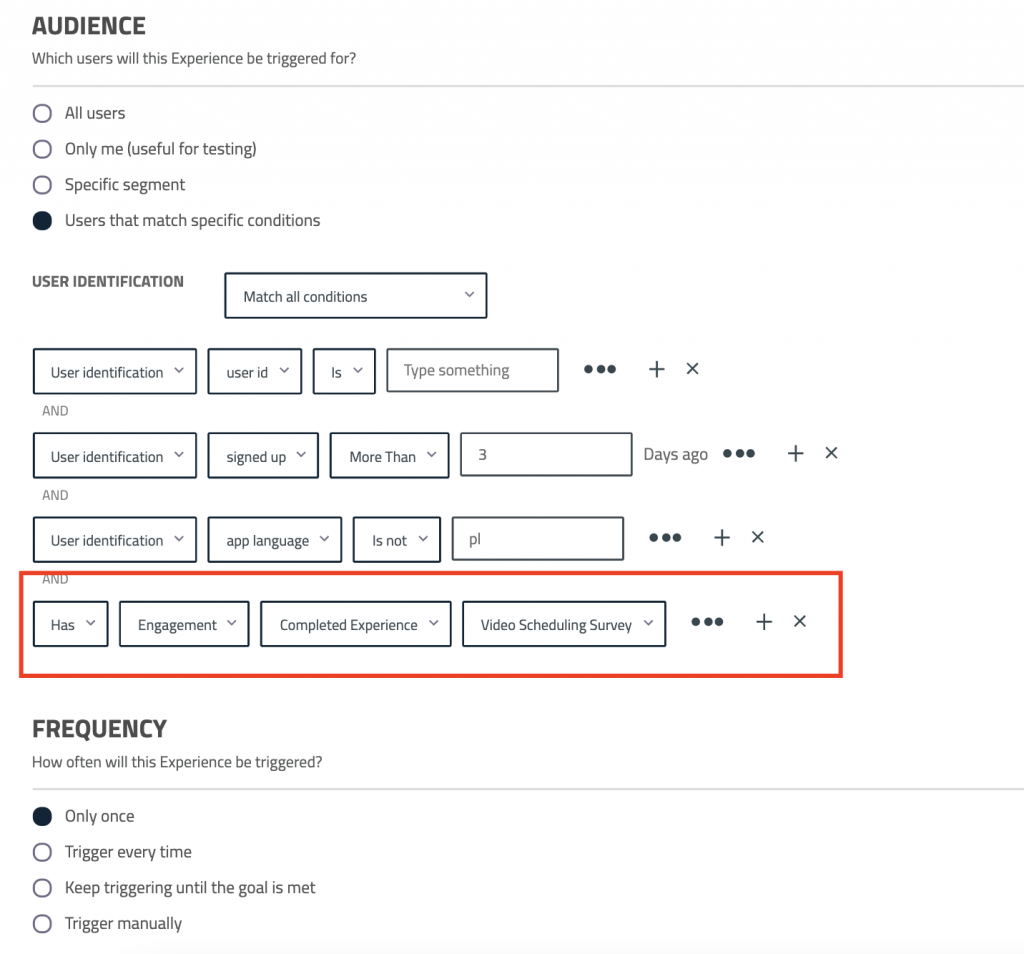
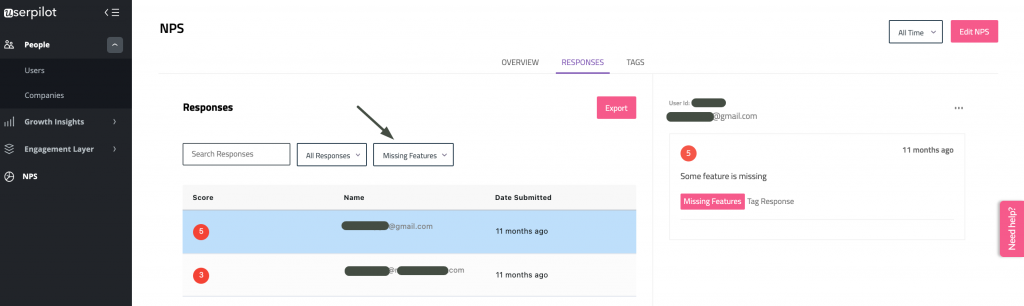
Hence: you should make sure you excluded these users from the audience you’re targeting with your in-app experiences, e.g. by excluding users who have not performed certain custom events, have contacted the support a certain number of times in a specific time period, or have a low NPS score:
You can use NPS as a triggering criterion in Userpilot.
Ways to invite users to a Continuous Discovery interview in-app
There are different UI patterns you can use to invite users to a continuous discovery interview.
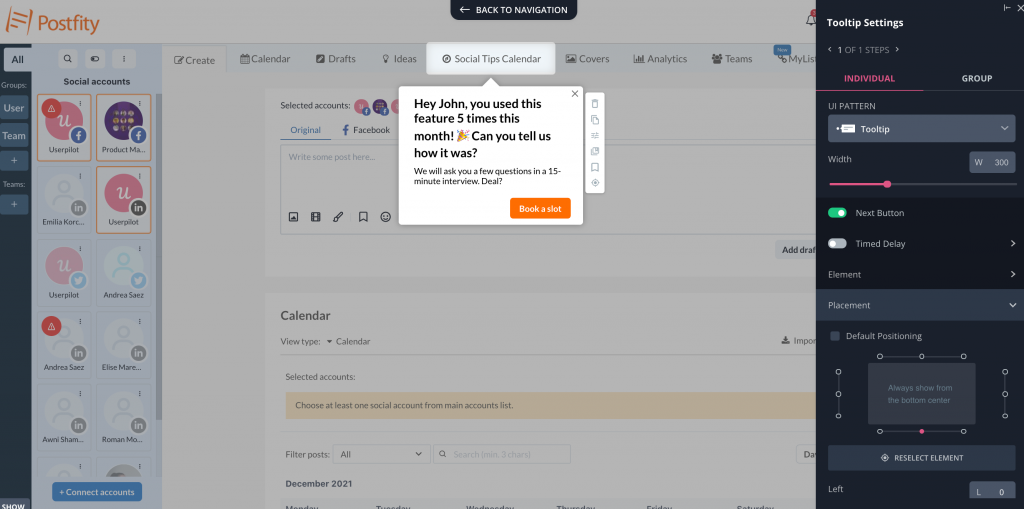
The one we showed above – called modal, is the most popular one, but you can also use a more subtle slideout:
Or a tooltip highlighting a specific element on the UI, if you want to collect feedback on a specific feature:
Or a banner sitting on top of your screen.
You can build these invites completely code free with several onboarding tools, like Userpilot or Appcues.
Best in-app Continuous Discovery tools
The banners, modals and tooltips inviting user to a discovery interview can be built without coding in Digital Adoption tools – however, some of these tools are more useful than others for Continuous Discovery.
For instance – some digital adoption tools such as Walkme or Whatfix are used for employee onboarding on third party apps such as Hubspot or Salesforce rather than building in-app experiences for the end users. This means they are more complex than necessary and have a significantly higher price tag than onboarding tools.
When it comes to value for money, the best product adoption tool for creating user discovery interviews is Userpilot, followed by a more expensive Appcues. Userpilot will be your best choice if you need to build in-app experiences code free in Responsive Web Apps, but if you need Salesforce integration, Appcues may be a better option.
For mobile apps – Pendo is currently the best option on the market.
Conclusion
Continuous Discovery can help you save a lot of time and resources in the process of building new product features. And it’s possible to recruit your users for discovery interviews on autopilot, using product adoption tools you may already have implemented for user onboarding.
With a little bit of foresight and segmentation, you can fill your calendar with user interviews automatically, and foster these good Continuous Discovery habits.
About the author
Emilia is Head of Marketing at Userpilot and a product marketing enthusiast. She has experience of working with several SaaS businesses as a marketer and a co-founder. Her passion for content marketing, SEO and SaaS products led her to build Userpilot’s whole content ops, hiring system, and documentation from ground up.
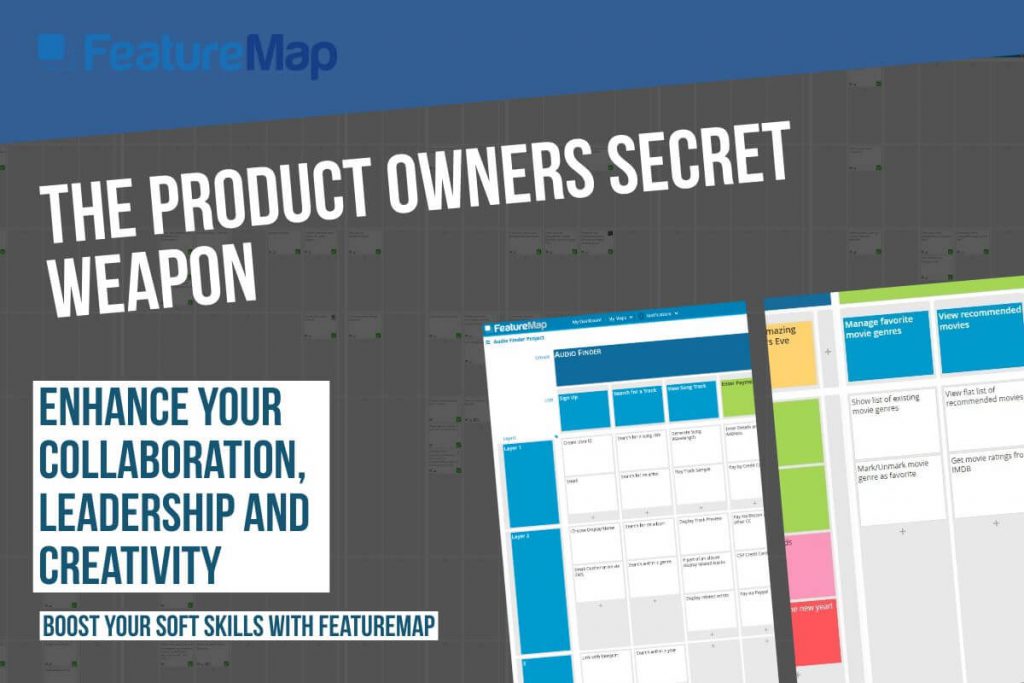
It is essential that Product Owners in 2021 have a wide variety of skills. Soft skills (skills that are hard to measure) and hard skills (easily defined and specific skills).
Soft skills (such as communication, leadership, and creativity) and hard skills (like sales, data handling, and proficiency with development tools) both help create the best Product Owner. Gaining experience and knowledge in both skills is challenging and rewarding, but the soft skills are naturally harder to define and therefore harder to measure improvement.
The role of a Product Owner is to lead, defines the work flow of the project, organize and prioritize the backlog of the team and streamline the project while maintaining the conceptual and technical integrity of the product. Heaps of hard skills, glued together with that all important management of individuals via soft skills.
A product owner can however help themselves with the use of Tools which complement and enhance those soft skills. User Story Mapping, and the use of creating a map and running a mapping session with the entire team, can really help boost and compliment your backlog management or project planning.
In LinkedIn’s ‘The Most In-Demand Hard and Soft Skills of 2020’, the top three soft skills are creativity, persuasion and collaboration. Three top skills that are required in Product Owners and Project Management.
With User Story Mapping and FeatureMap, you can give your creativity a boost as you create a map with ease, layout your product in easy organized cards, columns and utilizing the basic Agile design. Linking in immediately you can super up your collaboration as you bring your team members onto the board, and your entire broader team can fill in their own user story journeys, discussing and building a map together.
Seeing the bigger, larger, broader view of a project gives your decision-making and leadership a boost.
With the broader view, and bigger picture, you can give your persuasion and leadership that supported weight and sell your decisions to your team and stakeholders.
As a Digital Product Owner, you are at the helm of the product.
You will be the one responsible for ensuring the product is on track, and the product vision has been achieved.
In 2020 we saw the rise of Remote workers. In 2021 we saw businesses, that were ahead, embrace working from home and remote workers. With the shift, came the realisation that conversation is king when it comes to project management. Communication, communication, communication.
User Story Mapping is the tool for a team to build out, or embrace a project. It enables you and your wider team to come together and design your product in full.
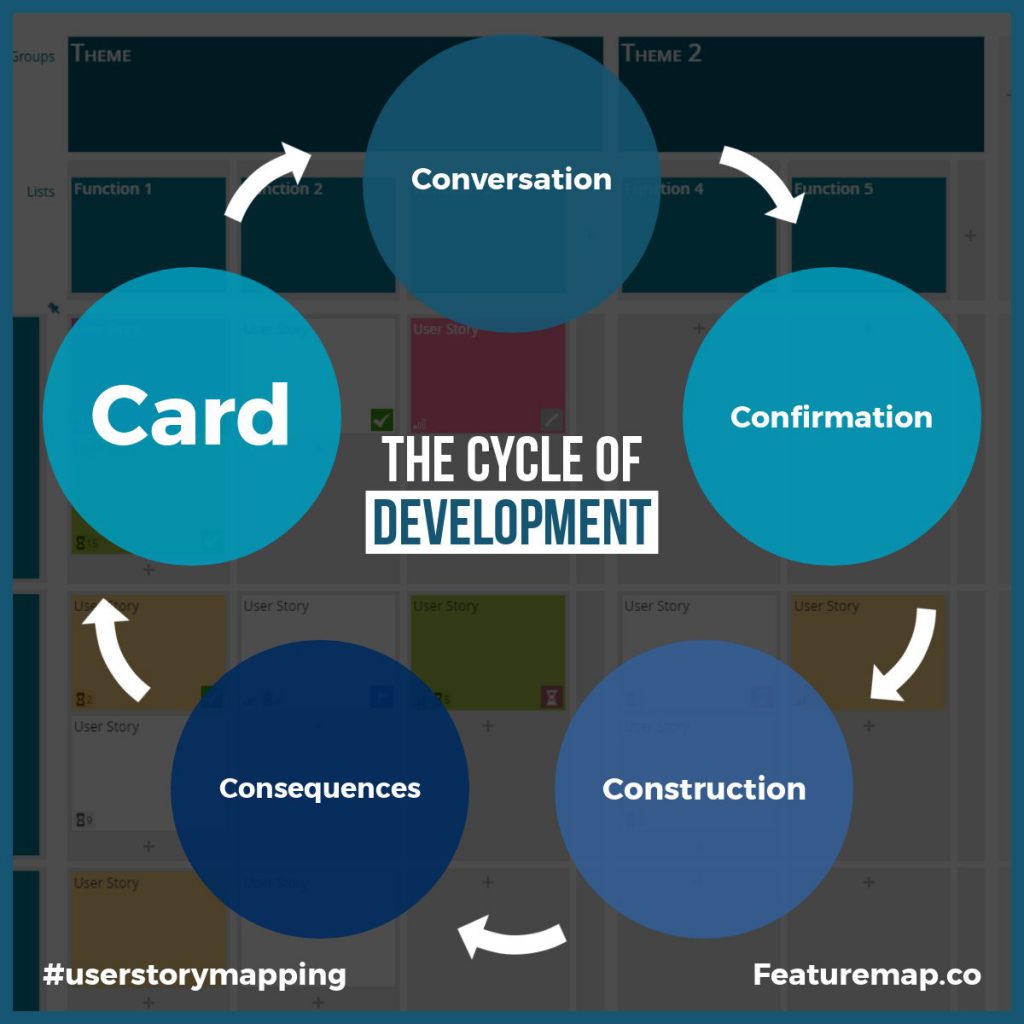
In essence, a simple story idea is; write something on a card, talk about it, converse and agree on what to build. -> Complete the build and move to the next.
It sounds simple, but in a working environment, it is normally vastly more complex. Stories end up going through multiple processes, cycles and conversations. Stories end being created with 3 main needs. A card for the business, a card for the user and a card for the developers. Luckily User Story Mapping is something that can absolutely lend itself to this process.
The Right Size for the Right Story
A tried and tested method to help develop your Map is utilising the “right size” method. Break down each part of the project/prodocut until it fits the “right size”.
For example, when writing a User Story Map with a team, you loosely fall into three categories:
The User.
The Business.
The Developer.
The user’s “right size” is a story or card that fulfills a need.
The businesses “right size” is a story which bundles features, outlines updates, themes or new products. First it is set-up as a Minimum Viable Product and following releases are the right size which helps a business achieve a business outcome.
The developer’s right size is the most efficient for designing, building and testing.
Really you can define these to your preferences, but if you are unsure, use the above outlines.
Big Stories Break Down to Smaller Stories
Big stories (or epics) can be broken down to smaller stories, and then again even smaller. Each sprint/epic/story/card can be defined for each group but no matter the size, they are still a story.
To break down larger stories, use conversation.
Conversation is one of the best tools for breaking down big stories.
Discuss and Discover
When you discuss with your team, break down each story until it fits the “right size”.
Each size will vary from business to business, and project to project, so don’t define too much. Use conversations to allow you to naturally identify the “right size”.
When you discuss, dig deep into:
Who the user will use your solution.
How the user meet their needs without your solution.
How it would change with your solution.
How your solution would look and function.
How long will your solution take to build.
Even after your discussed discovery session, don’t stop talking, don’t stop collaborating.
With each step, each conversation will have different teams and different conversations, in particular, the main three, so do note each evaluation will vary.
Yet with each conversation, each meeting, each get-together, this can lead to slow down, so be aware of how you plan your meetings.
With FeatureMap you are able to construct your maps and have constant, flowing conversation on each card, story or epic. Have your entire team chime in, discuss and do so remotely. Allow this process to be part of the working stage eliminating unnecessary meetings for all and saving time and money.
With each card, story and sprint you design and build, every single card will have consequences, re-explore these, discuss them, confirm them.
Conversation is King with User Story Mapping so get started, and save time and hours, Plug in your exisiting work, or start anew.
User story mapping is an agile methodology with a focus on product design/development. It doesn’t stop there, but in this article we’ll focus on product design. Designing with user story mapping is one of the secret weapons to create a user-centered product. The product design process always begins with first understanding the problem and the user’s goals. The power of this, is the ability to spec out multiple users, mulitple goals and clearly display our entire process whilst following a natural, narrative flow of the users journey.
User Story Mapping can be narrowed down to organising user goals, activities, and user stories. This can help your product flow or backlog and create an visual backlog, that everyone understands.
Why is it important to create a User Story Map for your project?
Your customers need a simple way to confirm product goals.
Your teammates benefit from such a straightforward platform.
Teammates can get access to the entire scope and see and add valuable ideas.
Developers can see the entire specification for the product.
To sum up, user story maps are the visual aid to building shared understanding between project members.
Creating a user story map can take time, but you can follow a pretty clear and logical process, with a good efficient start you’ll be ahead in no-time. This could be a solo task, but to the absolute advantage of a user story map is to use it as a tool to have discussions with your wider team team.
What you’ll need: Grab your team, your VOIP of choice, boot up a brand new Map (Create from scratch) and sit back with a meeting blocked out for the team.
Do note, this is not a presentation but an involved group activity, so be mindful of voip etiquette.
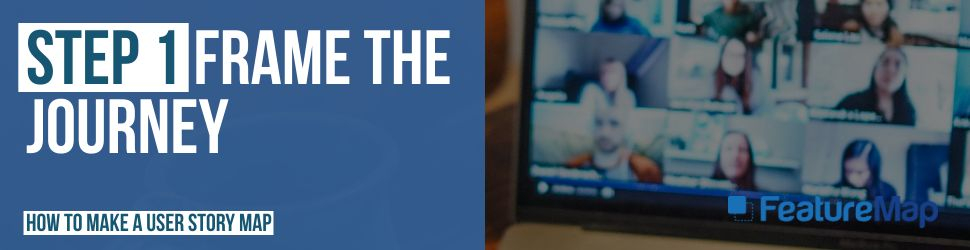
Step 1: Frame the journey
Before you start mapping, you want to frame the exercise around a common goal. This could be your product vision or the goal of a specific feature you’re mapping out.
One of the simplest ways to do this is just to ask: What does our product do?
If this feels too big or gets too unwieldy, think about some constraints you can add to your user story mapping session:
What? – What problem are you trying to solve? What product do you want to build or what feature do you want to add?
Who? – Is there a specific user or user group you’re building for? Who are your potential customers?
Why? – Why build this for the user? What is the benefit to your team and company for building this feature or product? How will giving users this add value to the bottom line?
Talk it through and make sure everyone understands the vision and overarching goal of the user story mapping session.
Be aware, you may find such varied views from each other this may outline some sticking points from the get go!
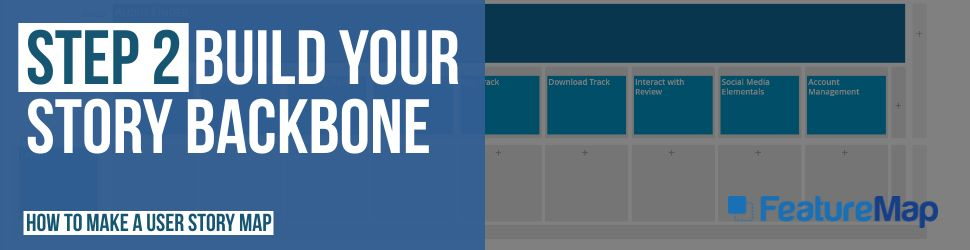
Step 2: Build your story backbone
The backone of your map covers the entire journey described in high-level tasks or steps from start to finish. Don’t get too detailed, that comes at a later task. Go wide, not tall. Discover your goals and map your journey.
As an example, let’s say we’re building a product that helps someone buy a record track. At the highest level, the steps they take are:
Sign up for an account
Search for the track by genre/year/artists/album
View/listen to the song track
Enter payment information
Buy track
Download track
Interact with social/stars/review of track.
Each feature or step can get more indepth later and expand out with sub headings, cards and individual descriptions.
Your product is probably a lot more complex. Here are few ways to help identify your backbone:
The expert details the journey: Ask one of the subject matter experts to walk through the problem step-by-step. How do they tackle this? What steps do they take and what tasks do they perform?
Everyone creates cards and inputs on the map: As you create cards on FeatureMap, get each familiar team member writing their own cards and detailing their journeys. Everyone can input the steps that need to be taken and add them to the map. Don’t worry about duplicates now, as this may highlight misunderstandings or merge tasks to a better project flow.
Brainstorm with your team to collect the most possible solutions and put all user stories under the related steps.
Once complete, think about the ideal user flow. The use case. Does the map fit and cover all steps for the journey?
What if you’re working with an existing backlog? If you have a backlog full of well-written user stories you can simply add them into your map. In some cases, this might even be the majority of your steps and you could utilise an API, or import features from JIRA or Trello.
Step 3: Identify and group your cards
As you look through the steps your user takes, you’ll start to notice some common groups, or activities that could be placed within groupings. In user story mapping, we call these activities.
Your activities (also known as user stories at this stage) are listed above the user steps (or epics) to make up your backbone.
As an example, lets return to our previous product of buying a record track. Here we can build out a step:
Search for a track by genre/year/artists/album
We can break this into individual cards of:
Search for a track
Search for an artist
Search for an album
Search within a genre
Search for a genre
Search tracks within a year, or a specific year.
You can see how these could all be individual tasks with a group of “Search for a track”. Here we can, with relative ease, start to identify user steps, user stories that all correlate to a user goal.
User Goal/Activity – Find a Track. User Step/Epic – Search User Story/Card – Search for an artist, then search for a track.
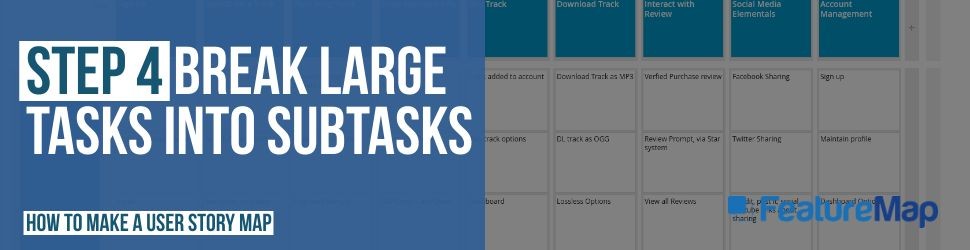
Step 4: Break large tasks into subtasks
It’s time to go a step deeper. The cards in your backbone are most likely too big to be tackled in a realistic single sprint. This step covers breaking down those cards and activities into smaller groupings and user stories.
Step 4 involves your team editing cards, splitting them into two, rewriting and reorganising them. Cards here could be reorganised and moved around the map. Placing cards into activities/sections/groupings will making it clearer for all involved promoting that shared understanding.
One key point of advice – Do Not Get Bogged Down!
FeatureMaps and User Story Maps are living, breathing things, cards get developed, edited, added to and when first mapping out the entire user story aim to cover it all at a higher level scope first.
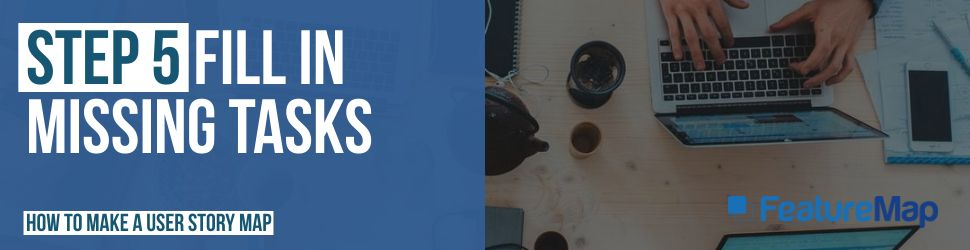
Step 5: Fill in missing tasks.
This step has you expanding, checking for missing task, filling in the blanks.
Ask your teams if they are covered and user story is represented no the map.
One simple and effective test is to have someone walk through the scenario from a different user perspective. This is what is called utilising Personas. Act out the steps as your user and allow the team to highlight when missing steps/cards/goals are not on the map and have them add them.
Each department will see this differently, for example the graphics and UX design team may differ on presentation while the coders are thinking about stacks and the sales team are thinking about pain points and upselling.
If a team member states “Ah ha, this is missing or may cause problems…” then this stage is doing well.
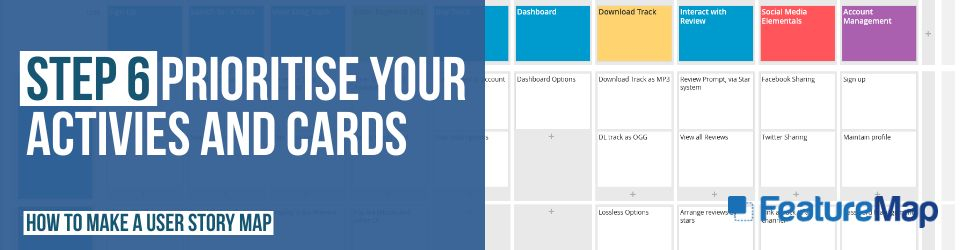
Step 6: Prioritise your activities and cards.
Your Map and backbone is how your users move through your product. Each section at this high level are equally important, building blocks to the entire product/project.
Here you can easily see the whole picture and work with your team to find the best minimal viable product. This stage is ideal to figure out what has the highest priority, while allowing other sections to be put aside.. for now.
Now that you have the user map prioritised vertically, you can create horizontal “layers” that represent your MVP to Full release.
A good practice is to ensure that each layer should be creating value across each user and activity.
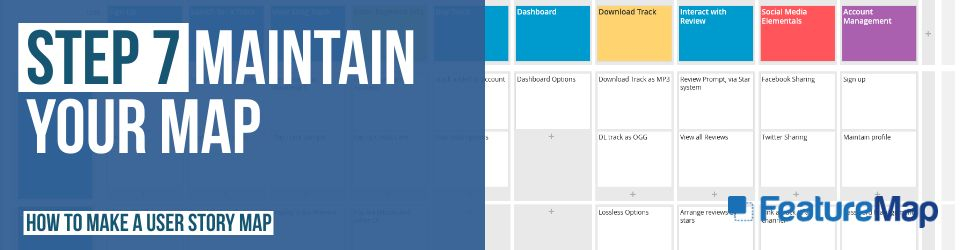
Step 7: Maintain your Map.
The last step covers using your living, breathing, evolving map.
Checking up your progress, see quickly the wider picture of your team.
Ensuring cards and tasks stay on track, assign deadlines to individual tasks and adjust work flow carefully.
In FeatureMap you can assign dates to tasks, cards or groups to keep track of progress.
You can assign cards to individual team members, and add progress status to each card, such as “todo, progress, done, etc”
You can expand and add timings or costings, or other custom metrics and utilise the aggregation tool which allows you to see the combined time within each sprint, grouping, or the larger map.
Audio Finder – A Fictitious Project about finding audio tracks and downloading them. Viewed as a User Story Mapping Board on FeatureMap.co
When working with a large organisation it is not uncommon for everyone to picture the product from different angles, resulting in an understanding of the project or product in different ways. Story Mapping can help your team understand, bring those meetings to the digital and allow your remote working team to gain that shared understanding.
When you have multiple smaller teams come together to create a product, each team can have different requirements. This can clog up development and in some instances waste time, building the same features or two different features due to a bad understanding of the spec. These teams could be in the same office, or spread across the world. The challenge and solution is the same.
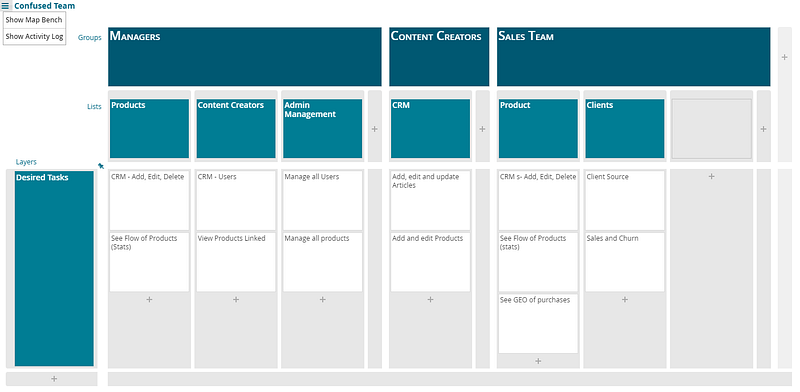
A few years ago I was assisting in the development of a now-popular mobile app. The team of designers all had different ideas on the end goal and it wasn’t until we mapped the entire user story that this was realised.
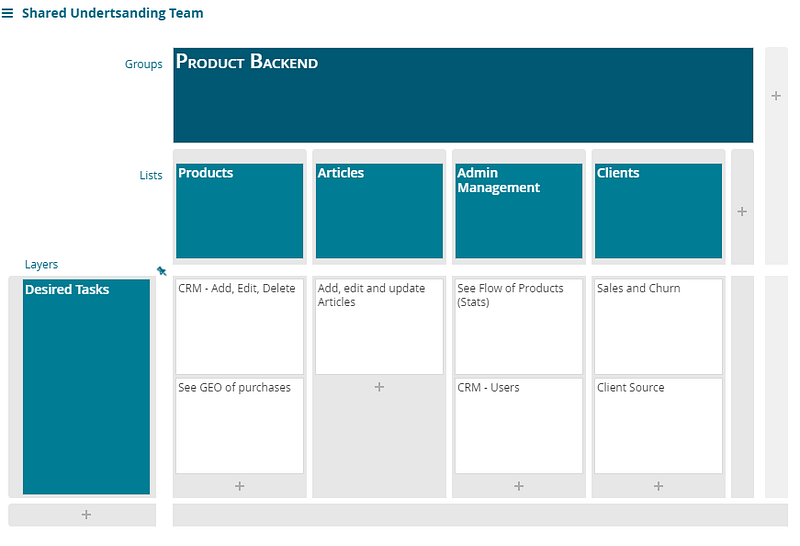
Confused Team Mapping Out Individual Requirements
The managers wanted to see a CRM in the backend that would allow them to see the flow of products and users and to manage the support workers and content creators.
The content creators wanted to have a CRM in the backend that allowed them to edit, create and update articles and products.
The sales team wanted to have a map system that would allow users to find a product based on location.
Shared Understanding with a Shared Vision
When we put all three together we could see an conflict of understanding. Two different CRM systems and a product completely overlooked by the other teams, with overlapping cards.
Without using a FeatureMap Board, this error may have gone unnoticed for an unspecified amount of time.
Cut down your time and mismanagement, introduce a macro level understanding and make your job easier managing your team. If you are a team member, you can understand the entire project/product and figure exactly how best to utilise all talents and input.
Mapping your story helps you find holes in your thinking.
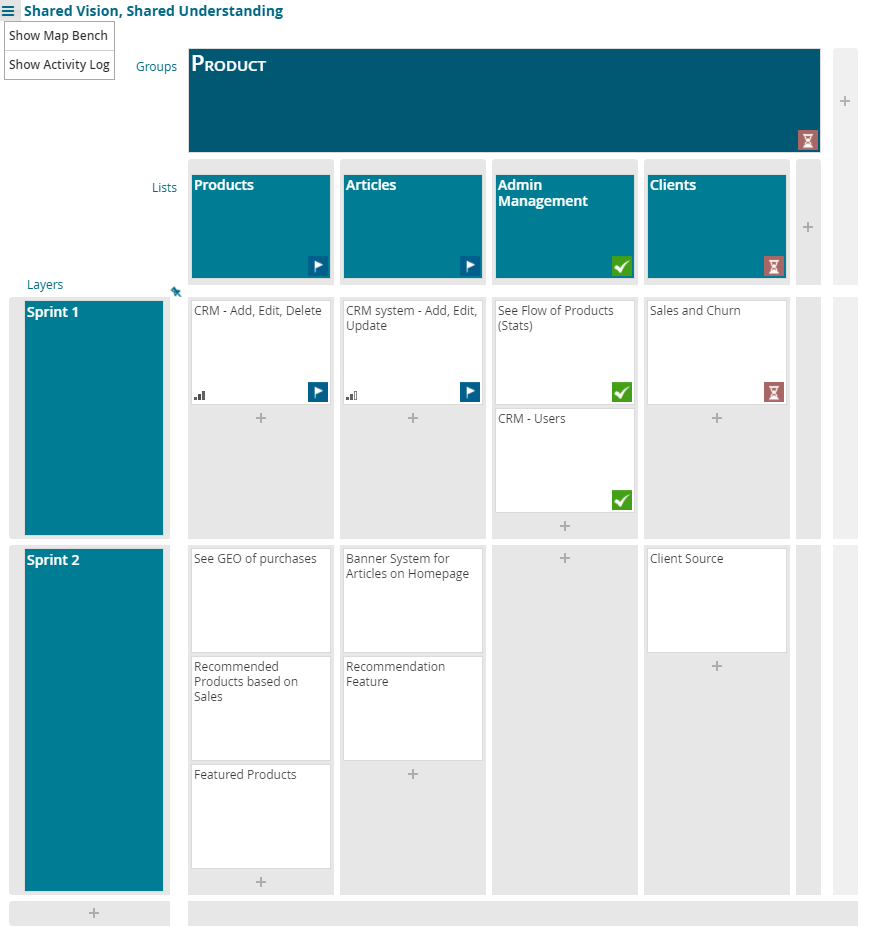
When we set out and built an entire map, it was clear that each team had a different idea. Once they were able to list each card across the map, teams merged ideas, worked on the initial idea and framed the entire product.
Once the ideas had been merged, expanded and realised, the team was able to expand their understanding to a shared understanding.
Shared MVP Achieved With Understanding
The team were then able to split up their design into a minimum viable product that successfully achieved the desired outcome.
Sadly, it was realised that months had been wasted on planning features of a project with no compatiblity with the rest of the team.
Fortunately, when creating their product on FeatureMap (even linking with remote team members across the world) they were able to hash out a new plan and deliever well within time.
Mapping your story helps with shared understanding.
When starting with FeatureMap, it doesn’t matter if you are mid project, or at the start of a new journey.
Mapping out the entire product, even at a high level macro level will help your entire team progress forward.
You can start with FeatureMap today for free, with an instant 2 week trial to access all the extra features such as aggregation, import, export, enhanced status cards and alike.