An existing project can slow to a crawl when slowed down by bloat of additional features, the expanding set of criteria or a huge mass of
The ever-growing sprint list can spiral out of control and stall a project with a seemingly huge backlog of tasks.
Product development, and projects can stall when the process flows from between the client, the design thinking process and the development team.
So, how can you improve your backlog?
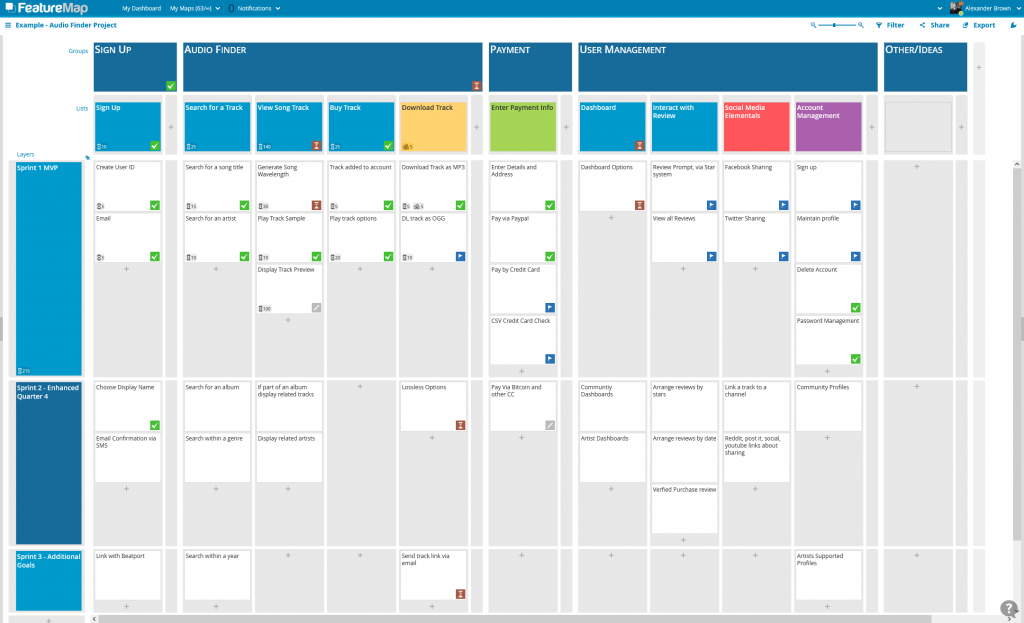
A User Story map is a perfect tool to visualise product roadmaps for non-technical stakeholders. Feature Map allows you to create your entire product and give an incredibly rich overview.
This allows you to visualise the whole user journey and how it maps its features into the product.
How to save a project with User Story Mapping.
A completed user story map is the perfect centrepiece of any product discussion with stakeholders.
How it works is simple.

First, identify your personas.
They capture your goals, your behaviours and the needs for the end user.
They help you build your story map and give it life.
The personas should always be kept in mind when you add features to your board. Personas can naturally be real people or groups and made up.
The next step is simple.
Understand the user journey.
Take those personas and map out your product with each feature identified as a goal.
Break down each goal into a set of consecutive activities. It can help if you line up these personas to each of these goals.
Then capture each requirement to help achieve that user goal with the help of the stakeholders.
You should be able to formulate all the user stories and the acceptance criteria of what you want to build. Add as many details as you wish to each feature for your team to fully understand the goal.
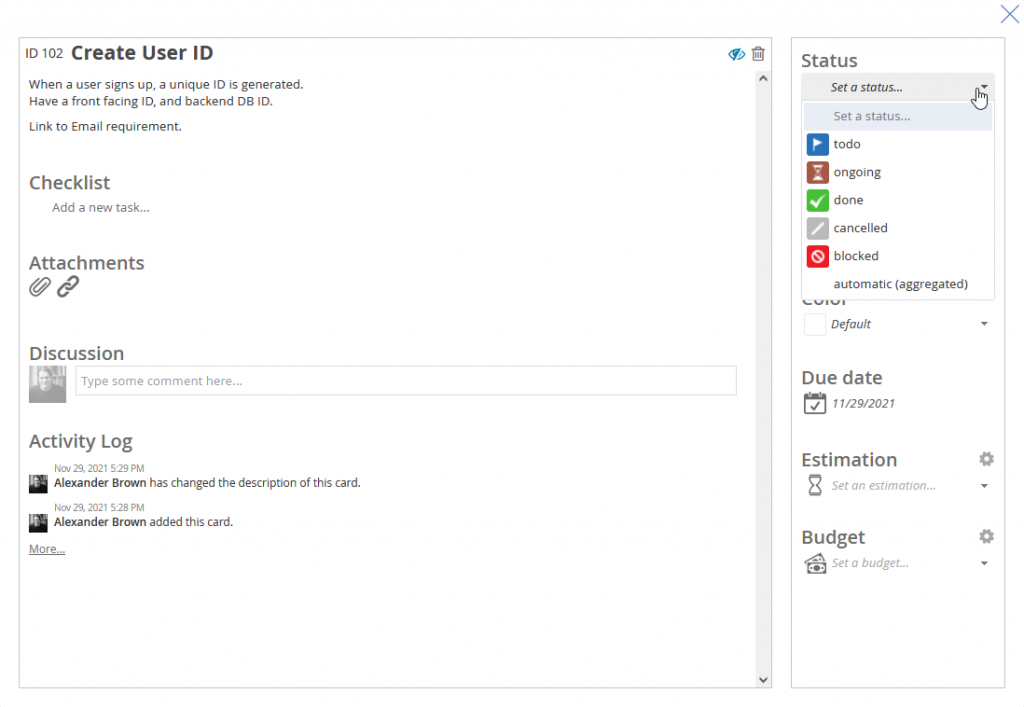
Control your map, add details, add status, aggregate and take control of your backlog.
You can add with future map annotations and estimate your features, time, budget or any other custom status.
Your team can collaborate on each feature by adding comments and tagging one another.
You can also add a set of different colours to help organise your map.
Once you have completed mapping your user stories journey, you will then be able to prioritise your backlog.
Each feature needs to be mapped to release, and the Golden Rule is that each release needs to be a valuable product slice across the user journey.

Finally, do your last steps.
The most important features are placed at the top.
You’ll wish to start out simple and expand on the functionality of your product by adding new product slices.
These product slices can be converted into MVP’s or Sprint’s. With Feature Map, your product can evolve constantly and cards can be moved around by simply dragging and dropping.
You can also aggregate the values of each task on your map and be able to see how long in time or how much in budget each slice and goal may cost.
You can finally eradicate your long list of features, your overwhelming sprint lists, and your misleading Gantt charts.

A story map is the perfect tool to communicate your product vision with the members of your team and non-technical stakeholders. It beautifully pulls together the big picture and allows you to prioritise your product and progress while not forgetting the details.
Once you are happy, you can share your feature map board to anyone. Or you can invite your own team to collaborate further. Additionally, you can integrate with JIRA.
You can get started now, check out our templates, and sign up to FeatureMap and start your free trial.