User Story vs User Journey

What are the main differences between a user story and a user journey?

A user story is a brief, concise description of a task from the perspective of the user.

For example: “As a ‘type of user‘, I want ‘some goal’ so that ‘some reason’.”

A user journey is a described series of steps that show how a typical user would interact with the web app that is being designed.

The main difference between the two, is that a user story is based on a specific user and caters to a particular type of user to answer a specific problem. A user journey can follow a “random user” that may using the tool. This also includes dynamic user journey scenarios.

How best to plan your product development

How can User Story Mapping help integrate both a user story and a user journey?

User Story Mapping has been described as a tool that can be used for many purposes, including product development, feature definition, version improvement, and project management.

In short, you are able to create a map, highlighting the user story, as a persona, whilst building the map for a user journey. Placing cards and tasks and building out the entire epic.

You can get started straight away, and intuitively you’ll be building maps that remove the debate between user story and user journey. Just head over to FeatureMap.co to get started.

Otherwise, read on to get the steps to get started.

We are looking at the steps to create answers that fulfil both requirements for a user story, whilst also catering to the user journey.

Here, we explore how best to utilise the User Story Mapping methodology to help define your path. We also have the added bonus that the first two steps instantly reward in their own right.

The first two steps can be very rewarding. Firstly, planning the map will give you a pathway to the point where you can start writing user stories or journeys.

Secondly, the end result is a visual chart showing the structure of your stories. This will give you the steps you need to take for development.

Here is another way to approach User Story Mapping in three steps.

This is a relatively quick way of getting to a point where you can start development work.

The start of a user story map on FeatureMap

Hosting your Story Mapping Session

Because User Story Mapping can be complex, it is important to have a framework for the session. It is also important to explain what User Story Mapping is and describe the process.

Start with tasks where the team thinks about the product, users, development, and personas.

Step One

We start by brainstorming every task that users will want to address when using the product.

Silent Brainstorming.

Task each participant to write down steps in your cards, every step will need to cover from the users first engagement to the conclusion of the users interaction. Encourage the team to think of these as actions not features.

It’s okay for each individual on the team to focus on other user journeys. For example if we take an app, someone may do a customer, and another may write about a copywriter, whilst the developers may think from the perspective of the administrators.

Top Tip: Writing them so they start with a verb is a good technique.

Encourage people to be creative and try to cover tasks and steps wide, but not deep. This part of User Story Mapping is about breadth not depth.

Start posting all cards and tasks in one large map.

That’s fine if you have duplicates. Just group them together, and these should sit beside each other on the line (not above or below).

As you expand and get into the swing of it you can easily drag and drop and delete if needed.

The beauty of using digital software for large collaboration tasks such as this allows you and you and your team to easily edit, expand and develop your map all at the same time.

This first line is the user tasks, and they form the backbone of your story map.

Creating the backbone of your user story map

Step Two

Then we organise these tasks into wider goals, and arrange them in order of completion.

These groups are known as “epics” or “activities”.

As facilitator, you can walk along the line of tasks and ask where the team think the splits are between each group of tasks, and what each group should be called.

For example, if you were building an app for an app to arrange your movies, you might group user tasks into epics like this:

  • Browse DVDs in collection – epic
  • View flat list of all DVDs – user task
  • View DVD cover thumbnails in results – user task
  • DVD Spec Call – user task
Adding your epics and activities to your use story mapping

Step Three

We can then move into the Prioritisation exercise, further developing the user story map.

This is the stage where you start writing in the details, building up the tasks and redefining tasks.

This may include adding tasks, merging tasks or separating tasks.

It is important to detail the tasks enough to remember in the future. After writing all the tasks, you should have a comprehensive map by this stage. Task your team to go over each line (now defined as Epics/activities) and ensure you have everything charted. This is where the User Story Map will become easier, as you will now have a visual chart of a defined product. Here you can move to the next steps.

Project Development is aided by this full user story map

Next Steps

Now you are ready to start prioritising the user stories on your map. You can start adapting and moving your tasks to sprints, also known as versions for your product.

You can check out the Movie Buddy Public Board here at FeatureMap.

You could do an entire User Story session with Post-It notes with your in-house team, but better yet digitally, remotely or supporting your in person meeting using FeatureMap.co.

Check out FeatureMap.co and sign up to try for free.

Scrumban, Kanban, Scrum, Agile, You can do it all.

Over the last 10 years (probably more) the boom of Agile methodology has continued to rise with the need to harness a high performing, high impacting workforce. Project nanagers, teams and companies have adapted its methodologies and the search and battle of Scrum Vs Kanban has become a well known and familiar comparison.

Scrum, and Kanban are two methodologies that come under the wide umbrella of Agile Methodology, both have benefits and drawbacks, but combining the pair has led to some success but still retains its overall pitfalls. Over the last year the move to remote working has become a necessity for many work forces.

Scrumban involves applying Kanban principles to a team’s Scrum framework. Scrumban removes some of the more rigid aspects of Scrum and leaves teams to develop their own adaptation which can give a huge varied experience.

So what do the two methodology bring?

Scrum

  • Fixed requirement.
  • Improves team involvement.
  • Allows to track project workflow.
  • Repeated work cycles.
  • Deadline.

Scrum is an Agile framework that is designed to focus on maximizing the team’s ability to deliver quickly, to respond to emerging requirements. Common practice is to explore and set a fixed requirement to tie in with the fixed deadline. The Scrum process requires the use of fixed-length development cycles called sprints, which usually last between 1-4 weeks.

Scrum came about in the late 1980s, as a commercial product, self described as “a new approach to commercial product development to increase speed and flexibility”.

Scrum teams are designed to be small, cross-functional, and self-organizing. Teams split work into small, shippable product increments, and sort the work by priority and relative effort. The product owner selects all work to be done in a sprint at one time, then the team spends each sprint completing the work.

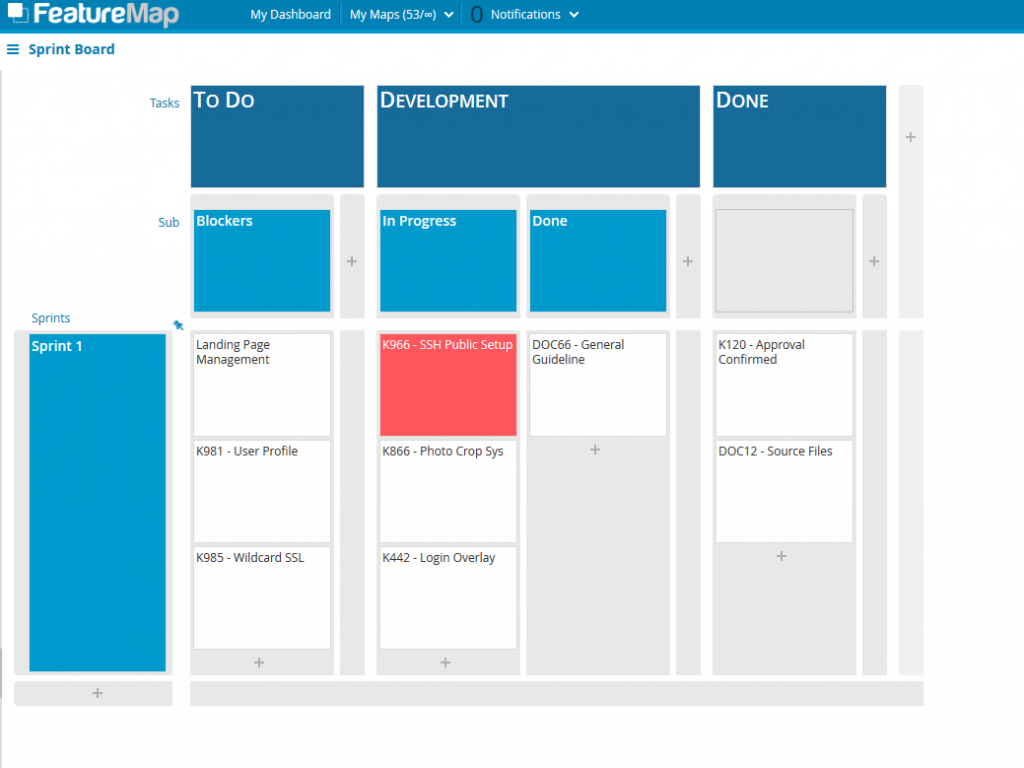
How a typical Scrum board looks in FeatureMap.co

Scrum Board at FeatureMap
Using the basic features of FeatureMap as a Scrum Sprint Board.

Kanban

  • No overproduction of tasks.
  • Flexibility.
  • Limit Work in Progress (eliminate waste and people focus).

Kanban was introduced by Toyota in the 1940s, and was largely used in the manufacturing world as a visual workflow management methodology. Work items are represented by cards on a board, with rows that represent process steps. Boards are used by teams to manage the collective work of the team. They minimize chaos and promote focus by explicitly limiting how many items are in process at any given time, using a tool called WIP (work-in-process) limits.

Teams practicing Kanban measure lead time (average time from when work is requested to when it is finished) and optimize their processes to improve lead time, with the goal of achieving a continuous, predictable flow of value to their customers.

The downside of Kanban is how it is based around manufacturing, and as such has strict and inflexible method of change as it assumes a stable product flow.

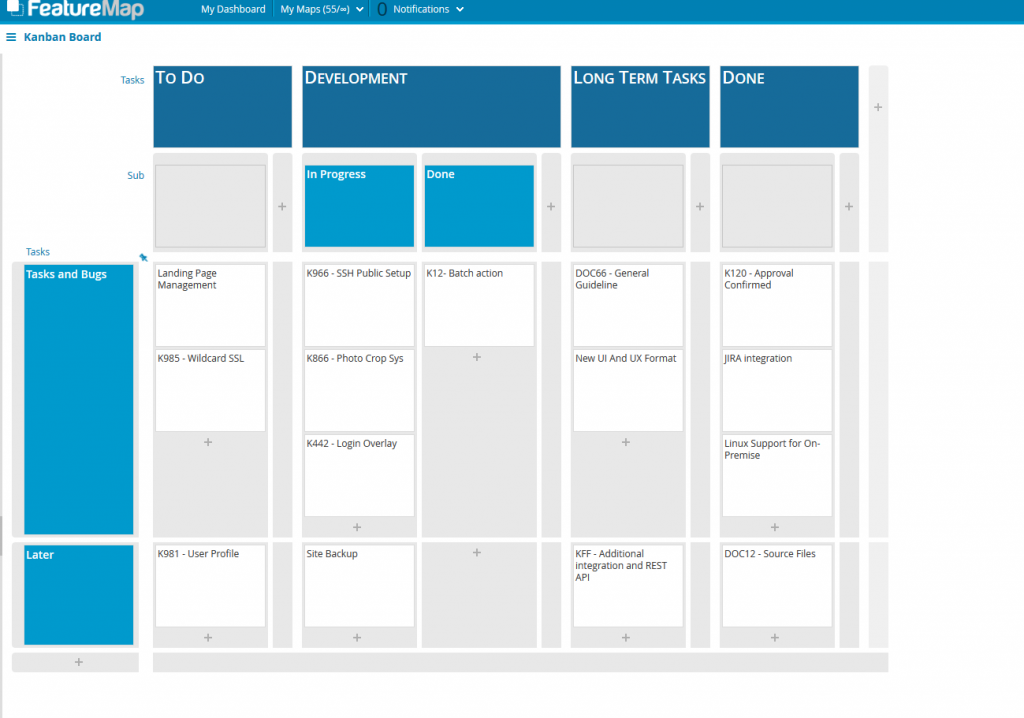
How a board of Kanban looks in FeatureMap.co

Using the basic features of FeatureMap as a Kanban Production Board.

So why would you be interested in Scrumban?

Scrum + Kanban

Scrumban combines the structure of Scrum with the flow-based methods of Kanban. So what of Scrum is incorporated into the Scrumban method:

  • Iteration planning at regular intervals.
  • Decide work load in each sprint based on the complexity of the work and the length of the sprint
  • Extended Board
  • Prioritization on demand
  • Use “Next/Ready” column to help organise.
  • A fixed deadline helps identify and focus work flow.

Kanban adds visualization, process, and flow. These are the elements of Kanban that are used by Scrumban teams:

  • Pull items into Doing adapting to the teams capacity
  • Individual roles are flexible.
  • WIP limits: Limits on how many items are in the backlog and progress.
  • Short lead times – just-in-time in stead of batches.
  • Focus more on deadline adaptability to the WIP and MVP.
  • Clearer step transitions

In a Scrumban Board you can see the merger of both Scrum and Kanban headers:

Backlog (Queue)On the Deck (This Spring)Next (Ready)SpecifySpecifiedDoing (Development/Active)Pending Testing (Approval)Testing (QA)DeploymentDone
An example merge of the kanban and scrum headers to make the ideal scrumban.

Scrumban boards are taking the best bits of Kanban and Scrumban, but is this enough?

The FeatureMap solution

A Scrumban board can hit some of your goals, and if you are looking and wanting more, FeatureMap offers a hybrid solution of Kanban, Scrum, and User Story Mapping. The tool can hit all the marks and is entirely flexible. In fact in some scenarios so flexible it can be daunting to the unprepared how best to utilise this powerful tool.

Scrumban is useful when it is difficult to predict the amount of work. It is useful with combining flexibility, adaptability and monitoring tools of Scrum, and a Kanban board.

FeatureMap adds that extra tool, how to map the entire product with your team, online and with tools and access to Kanban, Scrum, Scrumban or your own hybrid method.

You can combine the best of both worlds, with a scrum board and carefully not mixing the cards, but at the same time using layers to retain a sense of roadmap, listing prioirites. An enhanced scrumban board with more dimensions.

Want a card to have tasks? – Done
Want a card to be assigned to an individual to track? – Done
Want to have priorities, colours and custom status tracking on all cards? – Done
Want to assign an entire row, column or grouping to an individual to team? – Done
Want to change the entire map on the fly for a better solution? – Done
Want an aggregation feature to show pricing, timing or estimations on cards below and groupings above? – Done
Integration? On-Premise? REST API? – Done

FeatureMap is not limited to a scrum, or column only approach. It is not limited to a kanban outline. It was originally designed by engineers for their own products. It later took off and became its own self sustaining application based on Jeff Patton’s User Story Mapping methodology. Taking the persona of the target individual, audience, market, requirement and building the demand of a project/map/product around that.

But lets keep to the Scrumban design and restrict ourselves to the standard flow.

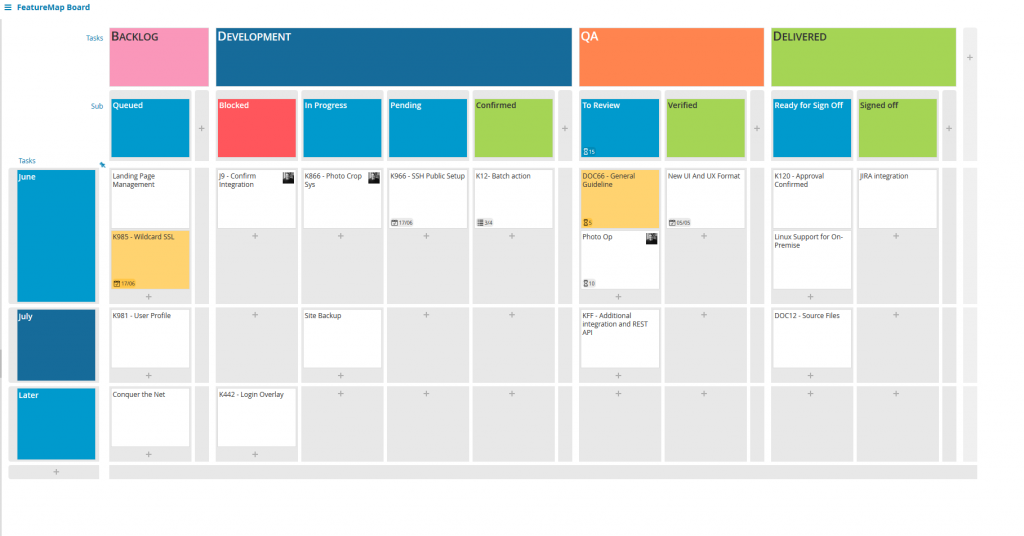
FeatureMap utilising the hybrid approach of Scrumban, Kanban and Scrum

On this board we have split the flow of the transition from left to right into 4 main columns.

Within each column:

First the backlog, set tasks that are known or in discussion, set here and at a high level, placed in a loose month set. The queue of tasks to be arranged.

Secondly the Development column is split into 4 different states – blocked, progress, pending and confirmed. These represent the flow of coding, or manufacturing. You can see in these cards two icons of myself, a little face which represents the card being assigned to me, so I receive notifications of comments, checklists, dates and status updates.

Third, the QA section is simply split to “To review” and “Verified”, so tasks can flow from developed, to quality assurance. and ready to be reviewed. In the screenshot above, you can see one card highlighted in yellow. With FeatureMap any card can be highlighted a variety of colours, easy to draw attention or to be set for a predetermined meanings.

Fourth and finally, the last section lists “Delivered” an area for final review from the project lead, to accept and sign off completion.

As well as the main “June” horizontal layer, we can see multiple layers of dates, June, July, and “Later” which can also be adjusted on the fly by various teams to move cards up and down, dynamically with their expected

FeatureMap can be utilised as a tool for more than User Story Mapping. It can be a tool for bringing your project and tool under control, and with an advantage.

FeatureMap offers multiple solutions, but for this case. It’s the perfect Scrumban solution.