What are the main differences between a user story and a user journey?
A user story is a brief, concise description of a task from the perspective of the user.
For example: “As a ‘type of user‘, I want ‘some goal’ so that ‘some reason’.”
A user journey is a described series of steps that show how a typical user would interact with the web app that is being designed.
The main difference between the two, is that a user story is based on a specific user and caters to a particular type of user to answer a specific problem. A user journey can follow a “random user” that may using the tool. This also includes dynamic user journey scenarios.
How can User Story Mapping help integrate both a user story and a user journey?
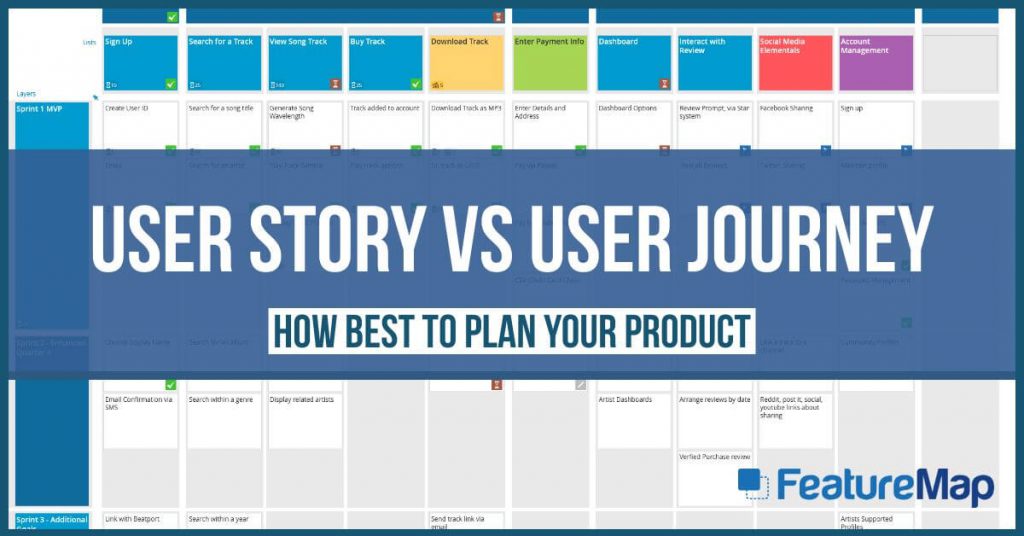
User Story Mapping has been described as a tool that can be used for many purposes, including product development, feature definition, version improvement, and project management.
In short, you are able to create a map, highlighting the user story, as a persona, whilst building the map for a user journey. Placing cards and tasks and building out the entire epic.
You can get started straight away, and intuitively you’ll be building maps that remove the debate between user story and user journey. Just head over to FeatureMap.co to get started.
Otherwise, read on to get the steps to get started.
We are looking at the steps to create answers that fulfil both requirements for a user story, whilst also catering to the user journey.
Here, we explore how best to utilise the User Story Mapping methodology to help define your path. We also have the added bonus that the first two steps instantly reward in their own right.
The first two steps can be very rewarding. Firstly, planning the map will give you a pathway to the point where you can start writing user stories or journeys.
Secondly, the end result is a visual chart showing the structure of your stories. This will give you the steps you need to take for development.
Here is another way to approach User Story Mapping in three steps.
This is a relatively quick way of getting to a point where you can start development work.
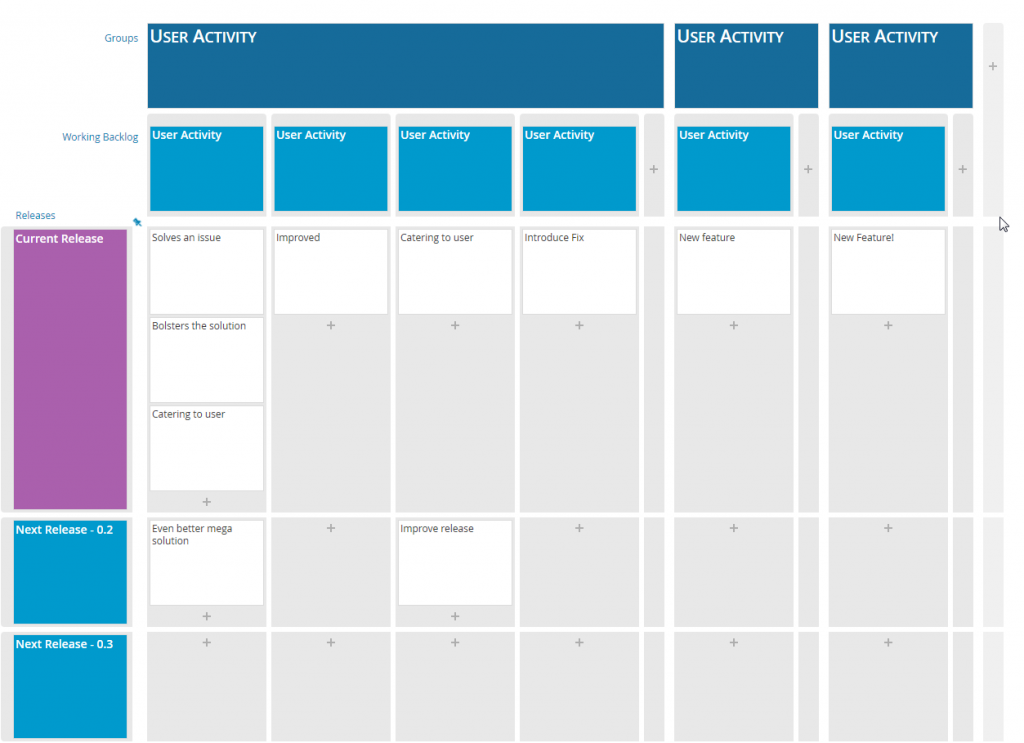
The start of a user story map on FeatureMap
Hosting your Story Mapping Session
Because User Story Mapping can be complex, it is important to have a framework for the session. It is also important to explain what User Story Mapping is and describe the process.
Start with tasks where the team thinks about the product, users, development, and personas.
Step One
We start by brainstorming every task that users will want to address when using the product.
Silent Brainstorming.
Task each participant to write down steps in your cards, every step will need to cover from the users first engagement to the conclusion of the users interaction. Encourage the team to think of these as actions not features.
It’s okay for each individual on the team to focus on other user journeys. For example if we take an app, someone may do a customer, and another may write about a copywriter, whilst the developers may think from the perspective of the administrators.
Top Tip: Writing them so they start with a verb is a good technique.
Encourage people to be creative and try to cover tasks and steps wide, but not deep. This part of User Story Mapping is about breadth not depth.
Start posting all cards and tasks in one large map.
That’s fine if you have duplicates. Just group them together, and these should sit beside each other on the line (not above or below).
As you expand and get into the swing of it you can easily drag and drop and delete if needed.
The beauty of using digital software for large collaboration tasks such as this allows you and you and your team to easily edit, expand and develop your map all at the same time.
This first line is the user tasks, and they form the backbone of your story map.
Step Two
Then we organise these tasks into wider goals, and arrange them in order of completion.
These groups are known as “epics” or “activities”.
As facilitator, you can walk along the line of tasks and ask where the team think the splits are between each group of tasks, and what each group should be called.
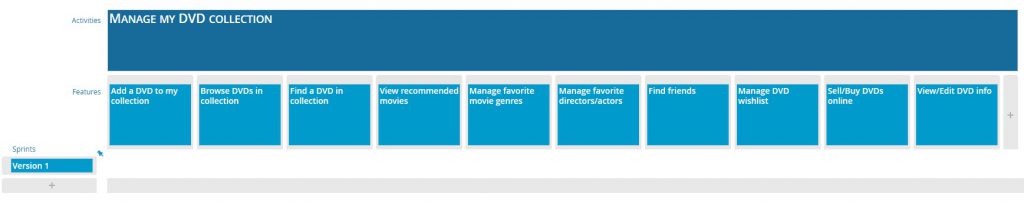
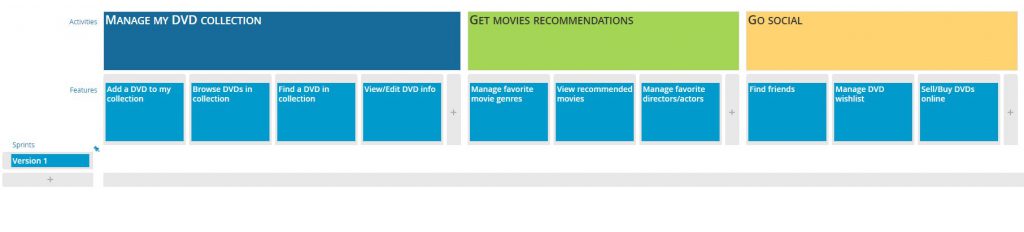
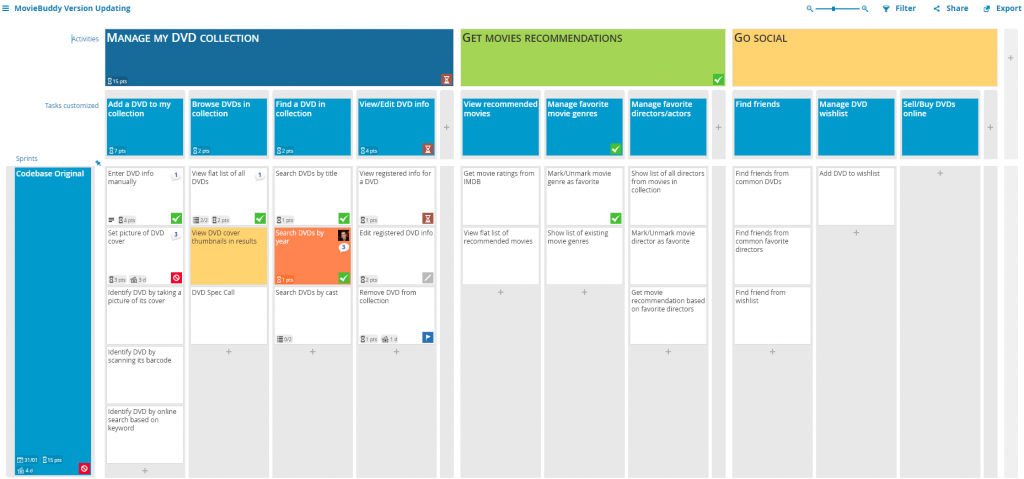
For example, if you were building an app for an app to arrange your movies, you might group user tasks into epics like this:
- Browse DVDs in collection – epic
- View flat list of all DVDs – user task
- View DVD cover thumbnails in results – user task
- DVD Spec Call – user task
Step Three
We can then move into the Prioritisation exercise, further developing the user story map.
This is the stage where you start writing in the details, building up the tasks and redefining tasks.
This may include adding tasks, merging tasks or separating tasks.
It is important to detail the tasks enough to remember in the future. After writing all the tasks, you should have a comprehensive map by this stage. Task your team to go over each line (now defined as Epics/activities) and ensure you have everything charted. This is where the User Story Map will become easier, as you will now have a visual chart of a defined product. Here you can move to the next steps.
Next Steps
Now you are ready to start prioritising the user stories on your map. You can start adapting and moving your tasks to sprints, also known as versions for your product.
You can check out the Movie Buddy Public Board here at FeatureMap.
You could do an entire User Story session with Post-It notes with your in-house team, but better yet digitally, remotely or supporting your in person meeting using FeatureMap.co.