When working with a large organisation it is not uncommon for everyone to picture the product from different angles, resulting in an understanding of the project or product in different ways. Story Mapping can help your team understand, bring those meetings to the digital and allow your remote working team to gain that shared understanding.
When you have multiple smaller teams come together to create a product, each team can have different requirements. This can clog up development and in some instances waste time, building the same features or two different features due to a bad understanding of the spec. These teams could be in the same office, or spread across the world. The challenge and solution is the same.
A few years ago I was assisting in the development of a now-popular mobile app. The team of designers all had different ideas on the end goal and it wasn’t until we mapped the entire user story that this was realised.
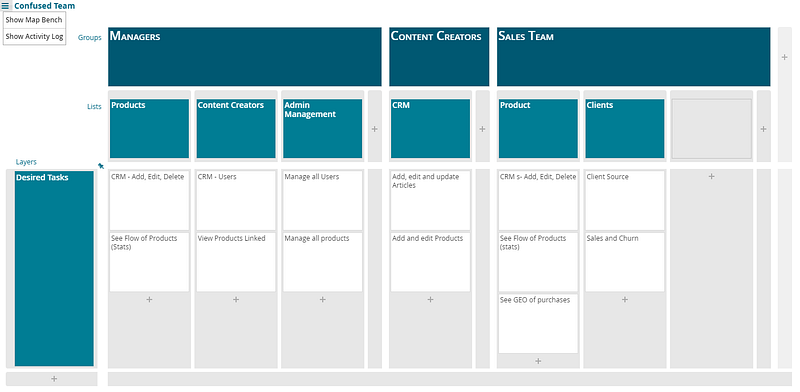
Confused Team Mapping Out Individual Requirements
The managers wanted to see a CRM in the backend that would allow them to see the flow of products and users and to manage the support workers and content creators.
The content creators wanted to have a CRM in the backend that allowed them to edit, create and update articles and products.
The sales team wanted to have a map system that would allow users to find a product based on location.
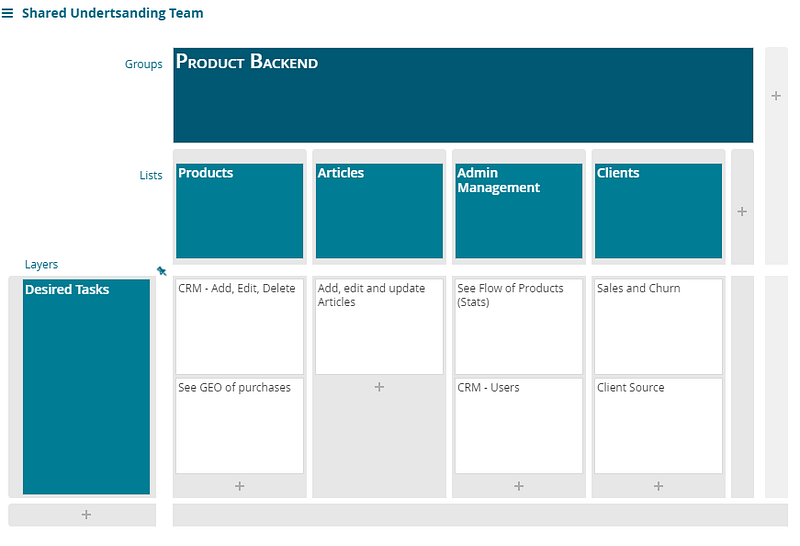
Shared Understanding with a Shared Vision
When we put all three together we could see an conflict of understanding. Two different CRM systems and a product completely overlooked by the other teams, with overlapping cards.
Without using a FeatureMap Board, this error may have gone unnoticed for an unspecified amount of time.
Cut down your time and mismanagement, introduce a macro level understanding and make your job easier managing your team. If you are a team member, you can understand the entire project/product and figure exactly how best to utilise all talents and input.
Mapping your story helps you find holes in your thinking.
When we set out and built an entire map, it was clear that each team had a different idea. Once they were able to list each card across the map, teams merged ideas, worked on the initial idea and framed the entire product.
Once the ideas had been merged, expanded and realised, the team was able to expand their understanding to a shared understanding.
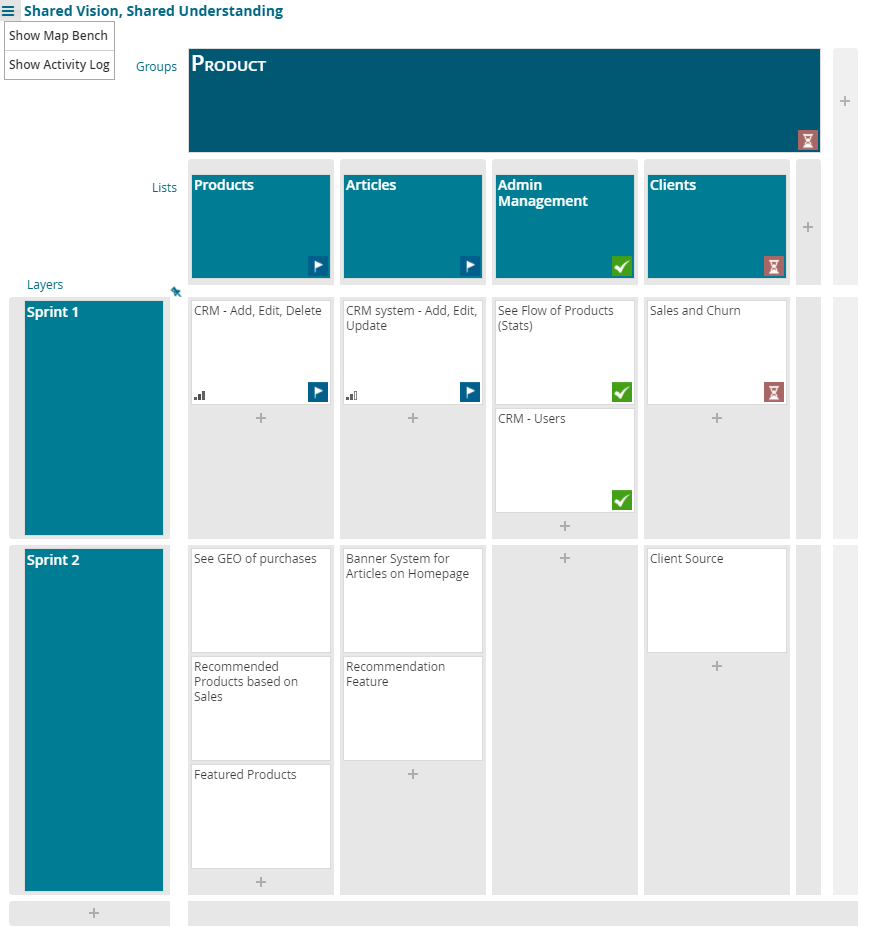
Shared MVP Achieved With Understanding
The team were then able to split up their design into a minimum viable product that successfully achieved the desired outcome.
Sadly, it was realised that months had been wasted on planning features of a project with no compatiblity with the rest of the team.
Fortunately, when creating their product on FeatureMap (even linking with remote team members across the world) they were able to hash out a new plan and deliever well within time.
Mapping your story helps with shared understanding.
When starting with FeatureMap, it doesn’t matter if you are mid project, or at the start of a new journey.
Mapping out the entire product, even at a high level macro level will help your entire team progress forward.
You can start with FeatureMap today for free, with an instant 2 week trial to access all the extra features such as aggregation, import, export, enhanced status cards and alike.
Over the last 10 years (probably more) the boom of Agile methodology has continued to rise with the need to harness a high performing, high impacting workforce. Project nanagers, teams and companies have adapted its methodologies and the search and battle of Scrum Vs Kanban has become a well known and familiar comparison.
Scrum, and Kanban are two methodologies that come under the wide umbrella of Agile Methodology, both have benefits and drawbacks, but combining the pair has led to some success but still retains its overall pitfalls. Over the last year the move to remote working has become a necessity for many work forces.
Scrumban involves applying Kanban principles to a team’s Scrum framework. Scrumban removes some of the more rigid aspects of Scrum and leaves teams to develop their own adaptation which can give a huge varied experience.
So what do the two methodology bring?
Scrum
Fixed requirement.
Improves team involvement.
Allows to track project workflow.
Repeated work cycles.
Deadline.
Scrum is an Agile framework that is designed to focus on maximizing the team’s ability to deliver quickly, to respond to emerging requirements. Common practice is to explore and set a fixed requirement to tie in with the fixed deadline. The Scrum process requires the use of fixed-length development cycles called sprints, which usually last between 1-4 weeks.
Scrum came about in the late 1980s, as a commercial product, self described as “a new approach to commercial product development to increase speed and flexibility”.
Scrum teams are designed to be small, cross-functional, and self-organizing. Teams split work into small, shippable product increments, and sort the work by priority and relative effort. The product owner selects all work to be done in a sprint at one time, then the team spends each sprint completing the work.
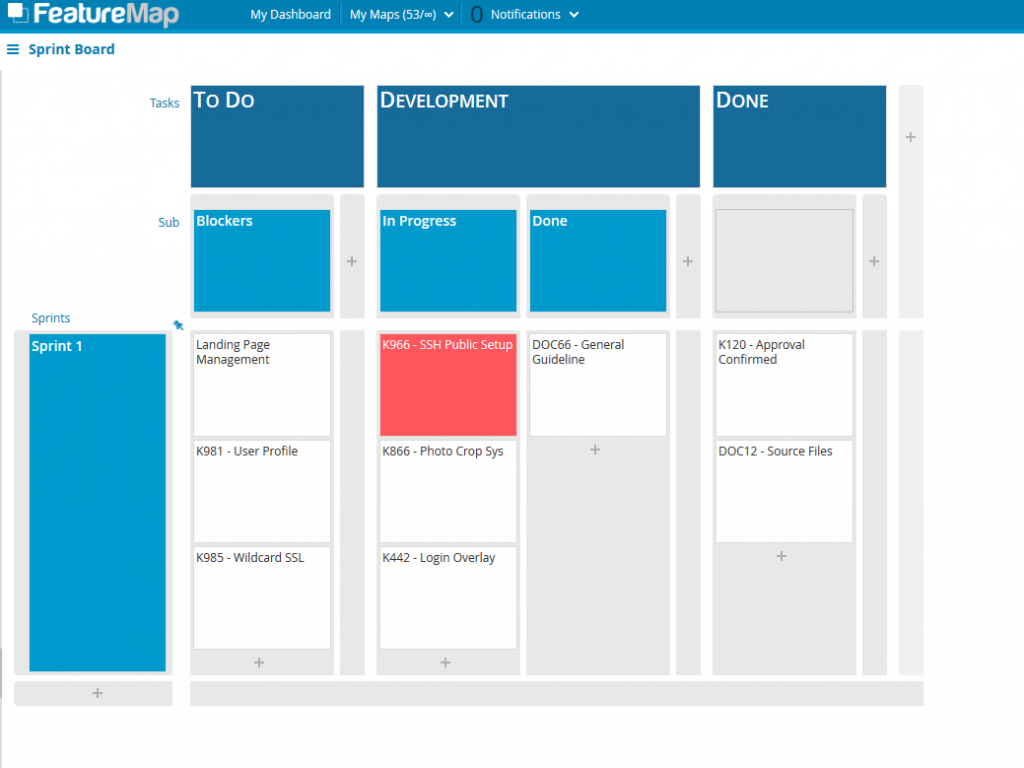
How a typical Scrum board looks in FeatureMap.co
Using the basic features of FeatureMap as a Scrum Sprint Board.
Kanban
No overproduction of tasks.
Flexibility.
Limit Work in Progress (eliminate waste and people focus).
Kanban was introduced by Toyota in the 1940s, and was largely used in the manufacturing world as a visual workflow management methodology. Work items are represented by cards on a board, with rows that represent process steps. Boards are used by teams to manage the collective work of the team. They minimize chaos and promote focus by explicitly limiting how many items are in process at any given time, using a tool called WIP (work-in-process) limits.
Teams practicing Kanban measure lead time (average time from when work is requested to when it is finished) and optimize their processes to improve lead time, with the goal of achieving a continuous, predictable flow of value to their customers.
The downside of Kanban is how it is based around manufacturing, and as such has strict and inflexible method of change as it assumes a stable product flow.
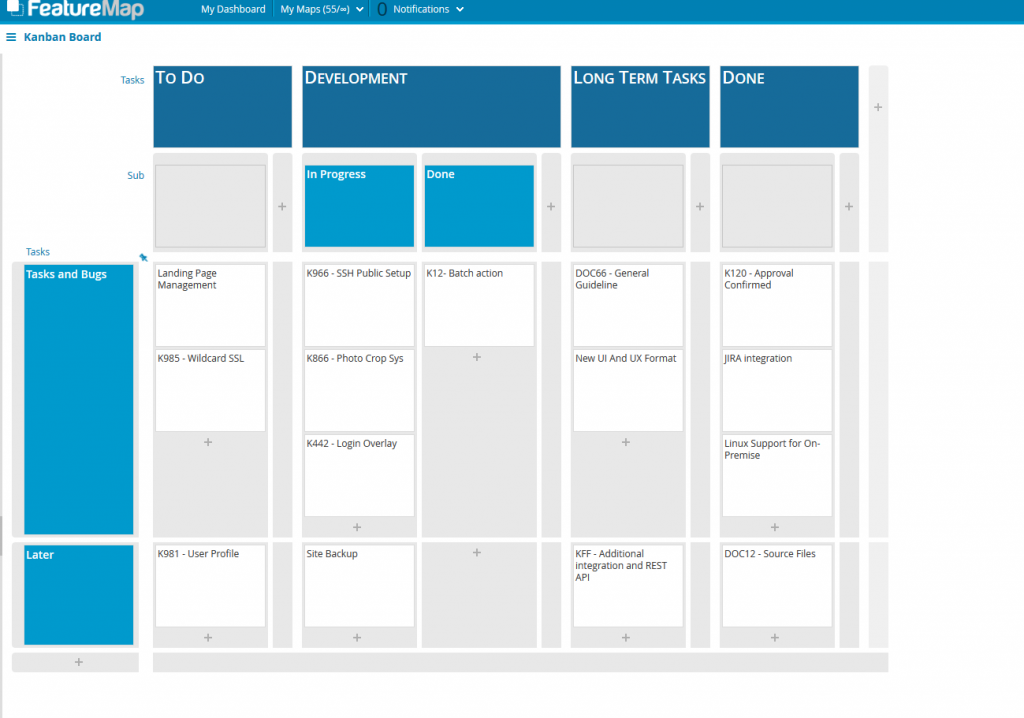
How a board of Kanban looks in FeatureMap.co
Using the basic features of FeatureMap as a Kanban Production Board.
So why would you be interested in Scrumban?
Scrum + Kanban
Scrumban combines the structure of Scrum with the flow-based methods of Kanban. So what of Scrum is incorporated into the Scrumban method:
Iteration planning at regular intervals.
Decide work load in each sprint based on the complexity of the work and the length of the sprint
Extended Board
Prioritization on demand
Use “Next/Ready” column to help organise.
A fixed deadline helps identify and focus work flow.
Kanban adds visualization, process, and flow. These are the elements of Kanban that are used by Scrumban teams:
Pull items into Doing adapting to the teams capacity
Individual roles are flexible.
WIP limits: Limits on how many items are in the backlog and progress.
Short lead times – just-in-time in stead of batches.
Focus more on deadline adaptability to the WIP and MVP.
Clearer step transitions
In a Scrumban Board you can see the merger of both Scrum and Kanban headers:
Backlog (Queue)
On the Deck (This Spring)
Next (Ready)
Specify
Specified
Doing (Development/Active)
Pending Testing (Approval)
Testing (QA)
Deployment
Done
An example merge of the kanban and scrum headers to make the ideal scrumban.
Scrumban boards are taking the best bits of Kanban and Scrumban, but is this enough?
The FeatureMap solution
A Scrumban board can hit some of your goals, and if you are looking and wanting more, FeatureMap offers a hybrid solution of Kanban, Scrum, and User Story Mapping. The tool can hit all the marks and is entirely flexible. In fact in some scenarios so flexible it can be daunting to the unprepared how best to utilise this powerful tool.
Scrumban is useful when it is difficult to predict the amount of work. It is useful with combining flexibility, adaptability and monitoring tools of Scrum, and a Kanban board.
FeatureMap adds that extra tool, how to map the entire product with your team, online and with tools and access to Kanban, Scrum, Scrumban or your own hybrid method.
You can combine the best of both worlds, with a scrum board and carefully not mixing the cards, but at the same time using layers to retain a sense of roadmap, listing prioirites. An enhanced scrumban board with more dimensions.
Want a card to have tasks? – Done Want a card to be assigned to an individual to track? – Done Want to have priorities, colours and custom status tracking on all cards? – Done Want to assign an entire row, column or grouping to an individual to team? – Done Want to change the entire map on the fly for a better solution? – Done Want an aggregation feature to show pricing, timing or estimations on cards below and groupings above? – Done Integration? On-Premise? REST API? – Done
FeatureMap is not limited to a scrum, or column only approach. It is not limited to a kanban outline. It was originally designed by engineers for their own products. It later took off and became its own self sustaining application based on Jeff Patton’s User Story Mapping methodology. Taking the persona of the target individual, audience, market, requirement and building the demand of a project/map/product around that.
But lets keep to the Scrumban design and restrict ourselves to the standard flow.
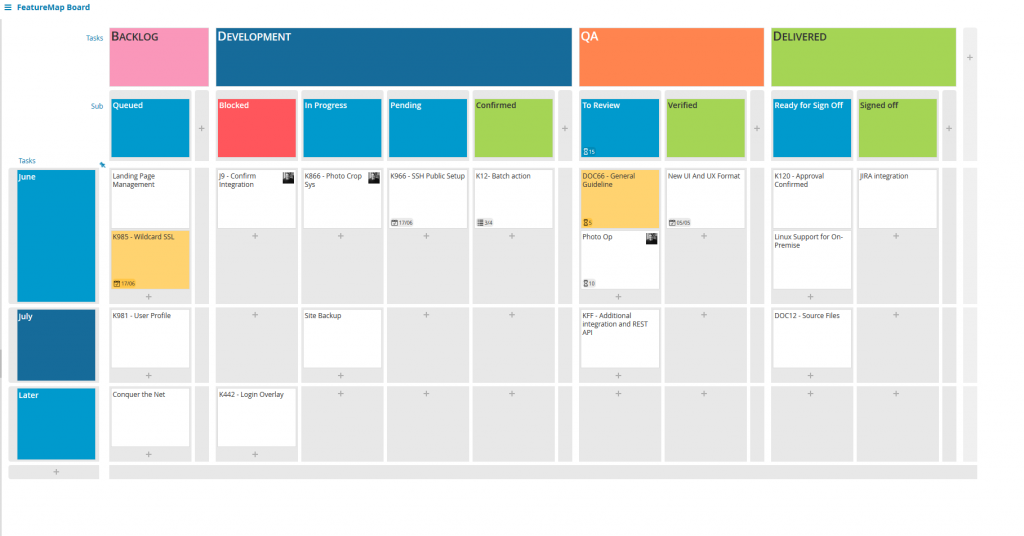
FeatureMap utilising the hybrid approach of Scrumban, Kanban and Scrum
On this board we have split the flow of the transition from left to right into 4 main columns.
Within each column:
First the backlog, set tasks that are known or in discussion, set here and at a high level, placed in a loose month set. The queue of tasks to be arranged.
Secondly the Development column is split into 4 different states – blocked, progress, pending and confirmed. These represent the flow of coding, or manufacturing. You can see in these cards two icons of myself, a little face which represents the card being assigned to me, so I receive notifications of comments, checklists, dates and status updates.
Third, the QA section is simply split to “To review” and “Verified”, so tasks can flow from developed, to quality assurance. and ready to be reviewed. In the screenshot above, you can see one card highlighted in yellow. With FeatureMap any card can be highlighted a variety of colours, easy to draw attention or to be set for a predetermined meanings.
Fourth and finally, the last section lists “Delivered” an area for final review from the project lead, to accept and sign off completion.
As well as the main “June” horizontal layer, we can see multiple layers of dates, June, July, and “Later” which can also be adjusted on the fly by various teams to move cards up and down, dynamically with their expected
FeatureMap can be utilised as a tool for more than User Story Mapping. It can be a tool for bringing your project and tool under control, and with an advantage.
FeatureMap offers multiple solutions, but for this case. It’s the perfect Scrumban solution.
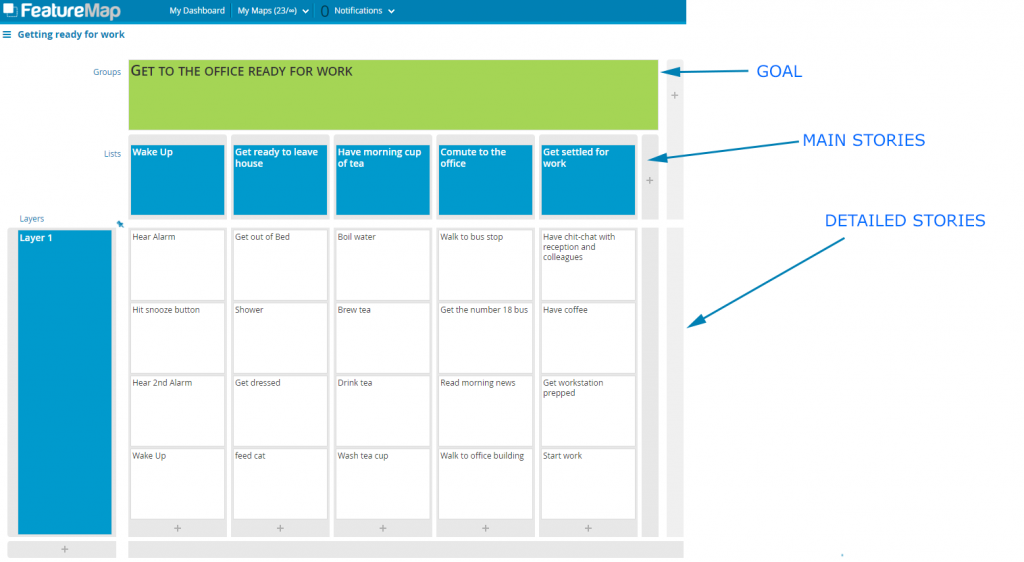
Managing a project can be approached in a multitude of ways, and in 2021, with remote working and offices on the rise. User Story Mapping has rapidly stood out amongst the many agile methods. In one sentence, it can be easily explained as ordering a project (or product) into tasks and organising by priority and sophistication.
Let’s start with a brand new project, or we can take an existing project backlog. When it comes to backlogs it can be overwhelming, at times difficult to grasp, or what you should prioritise. At times projects are entirely sidetracked by mismanagement of priorities but user story mapping can resolve this.
Story Mapping can be utilised to reduce the backlog, refocus the project and remind the entire team of the end goal.
When designing a Story Map you must look at the bigger picture. It is often sensible to set aside a period of time (hours or days) to effectively cover exploring your vision.
You will need to set out the goals of the entire product, the ideals, the dreams, think big. To best utilise Story Mapping is the big picture, not just a sprint. Do not fall into the trap of a niche narrow sprint at this stage.
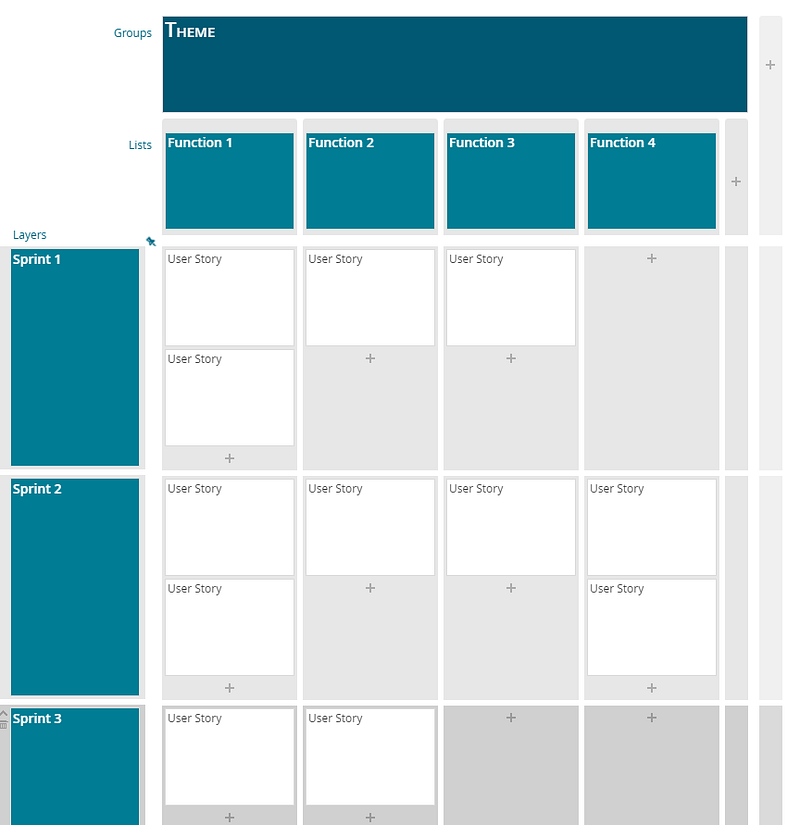
First write out the user stories by setting out functions.
Step 1 — Functions and user stories set out in a grid.
Horizontally, set out the title and set the user story under each function. Vertically, set out the main stories or issues related to each other.
At this stage you can then prioritise importance from left to right, and from up to down. This creates a format of the top left card, being the most important.
Slicing the list.
Once the stories are organised into groups and themes. You can start with slicing the list into sprints of what is the Minimum Viable Spec, or as Jeff Patton puts it — “The minimum viable product in the smallest product releases that successfully achieves its desired outcomes”.
Step 2 — You can see the sprints have seperated, clearly, what functions are required in each layer.
You can set sprints into what you need to achieve. The trick of utilising story mapping is by setting out the entire dream product, then breaking your product/project into sections of achievable, working, and required sprints.
Next Steps.
Do remember, the story map is not a static beast, it can be adjusted, amended with feedback, changed and adapted to suit the needs of each sprint.
With multiple team members working on it, as a team, you can start to see the end goal. The ideal product starts to form and when working as a group you will be able to clearly define what each task, and part of the project needs.
Set status of a card
You can set time estimations
Set importance of cards
Use colours to set a custom identifier, such as challenge or complexity.
Use extra columns and set sections
The use of a story map will grow with each iteration, and with each demand.
Step 3 — Expanded map with colours, rags, and time estimations.
One thing is to ensure you are always planning the entire project, clearing backlog and not focusing on individual sprints.
If you want to see the tool we used for the images, check out FeatureMap.co
It can be tricky to see and prioritise hundreds of Jira entries, you need to know which of them are the highest valued features so that you can build them in an effective agile order. One easily adopted method is using Story Mapping and over a messy product backlog. Here I write how it is easier to create a quick User Story Map with the JIRA integration tool at FeatureMap.co
User Story Map is invented by Jeff Patton, he wrote a book (User Story Mapping) to explain about the concept and its practice, it is highly recommended to read the book to use story map more efficiently.
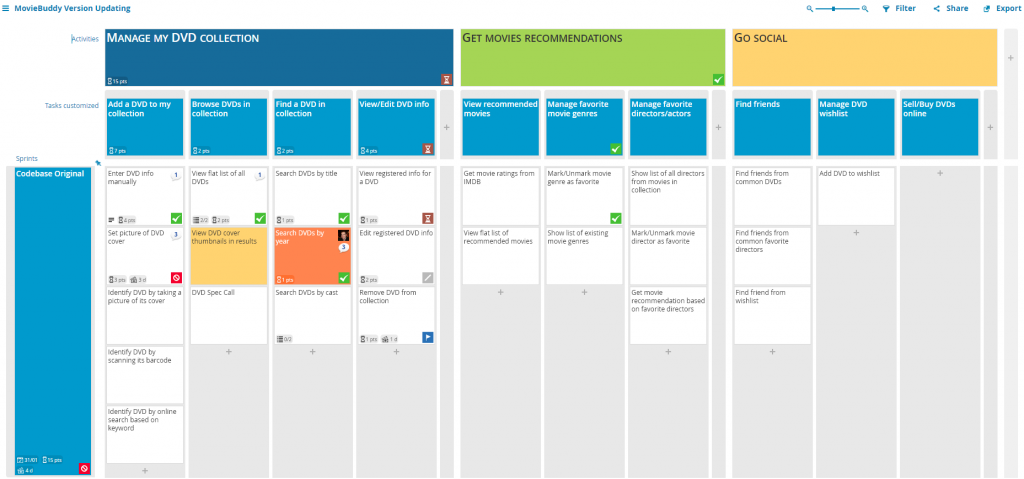
The Moviebuddy Current Version
Story mapping visualises the user’s journey in a step by step flow. These steps create a clear visual display of the requirements and help define your backlog. Compared to a flat backlog a user story map has added dimensions of position and movement through all verticals of your product. This allows you to first map and then navigate the entire user space of your product. With a user story map, you can then see you entire product, the full range of features and steps and gain a better understanding overall.
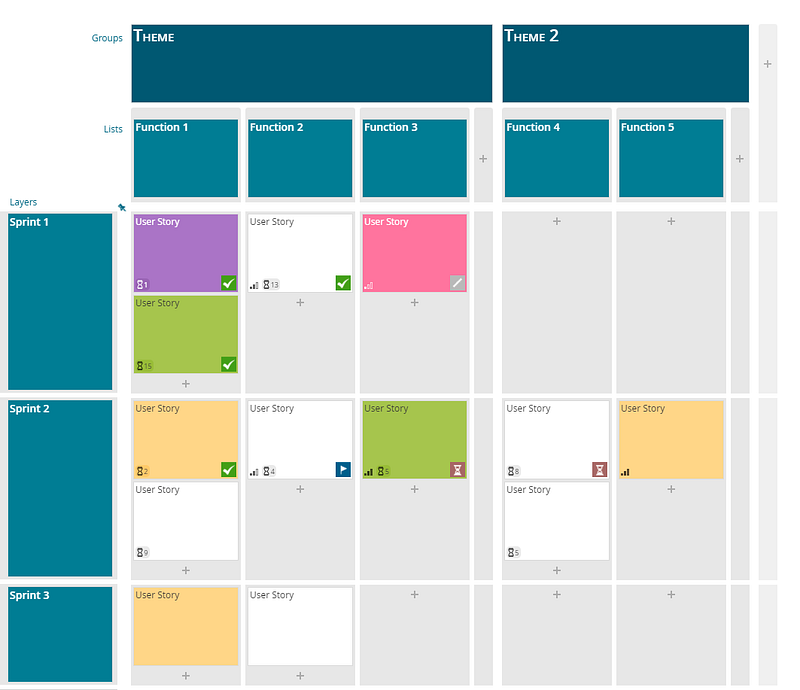
How a Story Map works
The StoryMap of Alex’s Morning
Groups: The broad actions that users take in order to reach their larger goals.
Lists: lower level under Groups, create the backbone of the map by telling the story or narrative of the user’s journey.
Stories: Basic building blocks of a map which describe something you can delivery and evaluate. Each block can be viewed for deeper detail.
Layers: Horizontal layers which split the story map to show what is in and out of each release.
Benefits of using Story Map
Here are few benefits of using story map as a user story tool:
Manage backlog with an overview and leveled structure
Brainstorm, discuss and prioritize user needs in a collaborative approach
Manage activities and tasks, and divide them into epics or user stories systematically
Arrangement and prioritization of user activities and user tasks, or drill down to refine them into related epics or user stories
Manage user stories in the online for both remote and co-location environments collaboratively for keeping everyone in your team the same page.
User Story Mapping is often described as an easy process and maps are created by simply working through the user’s journey.
Sometimes it can sound simple, but at times you need to define the user’s journey.
Occasionally you’ve had a developer, or project manager who has already defined stories and just wants to regurgitate this journey onto a plan and have everyone agree. This sometimes works, but more often than not other team members are left wondering about more details and features, problems, and most importantly, better solutions are missed.
User Story Mapping is not just creating a map for the purpose of a great visual understanding, but it is also a great time to go over questions and really expose the plan.
Just as your first bunch of questions:
Who for?
Why?
What?
Critical thinking can be applied with great b0ons to any endevour and User Story Mapping is no different.
Who for?
Those working on the map should have a clear defined understanding who the users are.
Who is the user that mapped this journey?
How is this user different to other users?
Do we need to expand our user scope at this stage?
Understanding who the users are will provide that focus for complex design and if the user is an actual real user, then knowing this person will help with focusing the team to provide something for someone real.
What?
Defining what the user is doing with your project, app or endevour will be the main crux and defining question for all over User Story Mapping.
What are the users trying to achieve?
What do the users benefit over using your solution?
What other solutions are available?
What needs to defined?
Why?
Starting with an understanding of not only who the user is, but why this story needs to be mapped is crucial to have a worthwhile map.
Asking questions to help the entire mapping team directs.
Why does the story need to be created?
Why does it need to be defined?
Why would this information help decide scale and stability?
Once you have the ideal persona, and the ideal customer or user you can create an epic from the persona.
Label all your epics necessary to meet your users goals, but it is okay to keep them rough as you’ll be able to quick edit the table, adjust, delete and add more columns as needed.
Turn the users functions into rough epics
Turn the products functionality into rough epics
Capture the interaction and sequences
The StoryMap of Alex’s Morning with the Goals, Then Epics, then Cards.
Then go deeper and refine each Epic into the cards.
It is normal to be challenged with your first iterations with a User Story Map and it’s okay to continually develop them.
Keep the users entire journey and story in mind, and don’t stop asking the questions, who, what , why?
Take the product and ask yourself and your team these questions:
What is the overall idea?
Who are the customers?
Who are the end users?
Why would they want it?
Why are we building it?
Find out what the project and product is for, validate your reasoning, search for problems, take the steps now to refine your idea.
Build to Learn
With the initial idea fleshed out, first build your product with the aim to learn. A less than MVP (Minimum Viable Product), a product that covers the simple basis for your users.
With this stage you do not want to market, push or give out the product as “The product” but to a small group of users. Ideally users you spoke to initally that may have sparked the idea of the product.
As part of this step you need to harvest the feedback, and constantly refine your idea. Build wants but be care ful to actually listen to what the user wants.
At this stage metrics will help as it is common people will fall into a loose three categories:
The Polite Enabler. — The user who says everything is great, but doesnt use the product.
The Complainer. — The user who sends in lists of feedback and demands, but actually uses the product.
The Mute. — The user who uses the product and says nothing.
The polite user is probably the worst for building to learn, with the complainer being your favourite user. However be careful the complainer is not just demanding features that detract or do nothing.
The Mute you’ll need to reach out, engage and ask for feedback with offered incentives. The mute can be valuable.
Applying to Story Mapped Backlog
You now have your project released, some feedback and ideas of how to take it from big idea to big success.
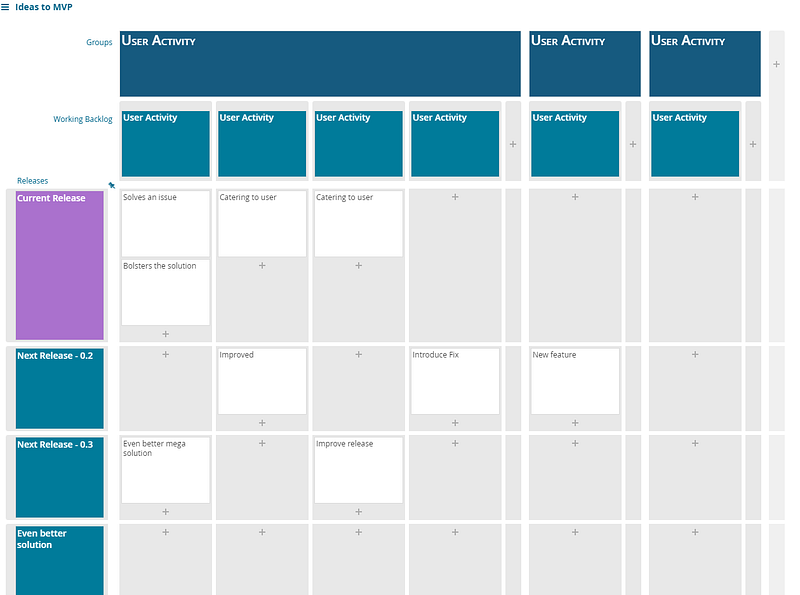
We recommend organising a horizontal strip of User Actitives. You will have this from the first step, and the questions. This will form the backbone and be the foundation of your map.
Below in vertical strips arrange into three tiers:
Current Relase
Next Release(s)
Future Ideas
Each card will have indepth details about the feature.
Example Layout in FeatureMap.co
Then when organised, take the highest priority stories or layers and move into the current sprint.
This is one great way to take Idea to MVP.
Common Pitfalls
I might write a piece entirely about the pitfalls I see new projects and products fall to when designing their story map and MVP.
Perfection — When designing a product do not focus and lose yourself to the “Just one more feature” which adds time and bloat to inital ideas.
Make a skateboard first — When making a car, first design a skateboard that allows the user to at least get somewhere. Do not fall into the trap of building car parts with no method to go.
To illustrate this Henrik Kniberg wrote an article talking about how he prefers “Earliest Testable/Usable/Lovable” over MVP.
When designing your product, each sprint sent to product should be reviewed, measured and with feedback and data — learn.
With that learn knowledge refine your idea.
With that refined idea, revamp your MVP and build.
Build — MVP
Measure — Get feedback and data
Refine — Improve with better ideas
Repeat — Back to Build.
With User Story Mapping this is easy, especially when using a tool like FeatureMap.co as the ease and flow of a team all working, moving and adjusting cards on the fly makes it invaluable.
When working with a large organisation it is not uncommon for everyone to picture the product in different ways.
When you have multiple smaller teams come together to create a product, each team can have different requirements. This can clog up development and in some instances waste time, building the same features in multiple different ways.
A few years ago I was assisting in the development of a now-popular mobile app. The team of designers all had different ideas on the end goal and it wasn’t until we mapped the entire user story that this was realised.
Confused Team Mapping Out Individual Requirements
The managers wanted to see a CRM in the backend that would allow them to see the flow of products and users and to manage the support workers and content creators.
The content creators wanted to have a CRM in the backend that allowed them to edit, create and update articles and products.
The sales team wanted to have a map system that would allow users to find a product based on location.
Shared Understanding with a Shared Vision
When we put all three together we could see an overlap of two different CRM systems and a product completely overlooked by the other teams.
Mapping your story helps you find holes in your thinking.
When we set out and built an entire wall, it was clear that each team had a different idea. Once they were able to list each card across the map, teams merged ideas, worked on the initial idea and framed the entire product.
Once the ideas had been merged, expanded and realised, the team was able to expand their understanding to a shared understanding.
Shared MVP Achieved With Understanding
The team were then able to split up their design into a minimum viable product that successfully achieved the desired outcome.
Sadly, it was realised that months had been wasted on planning features of a project with no compatiblity with the rest of the team.
Fortunately, when creating their product on FeatureMap (even linking with remote team members across the world) they were able to hash out a new plan and deliever well within time.
Mapping your story helps with shared understanding.