We have an important update about JIRA Integration which will affect your workflow and connection.
You should take action now to re-enable your connection to JIRA.
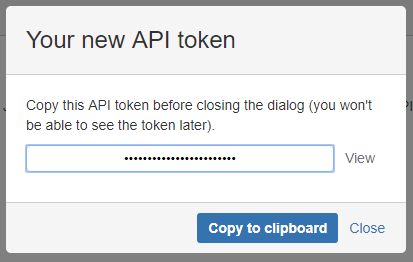
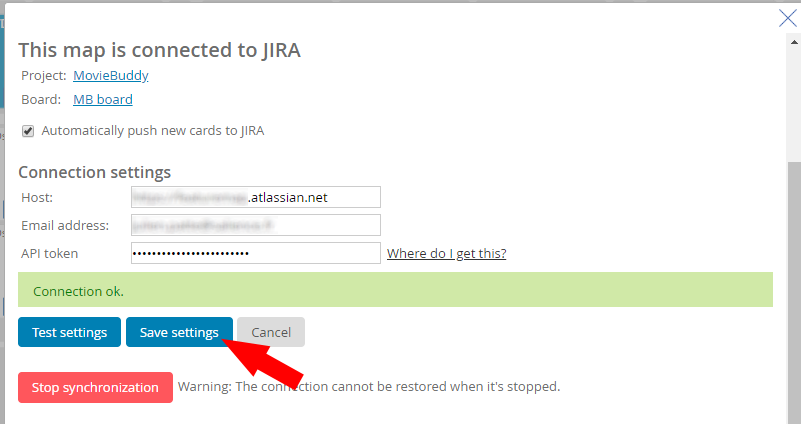
Earlier in the year Atlassian announced an upcoming change in the way usernames work in JIRA and third party applications. Today 17/4/2019 the support for usernames was removed and now requires a API Token to connect to your FeatureMap.
From today FeatureMap will NOT connect to JIRA using the old username and password. This will disable automatic sync and a new Token will need to be generated to continue using JIRA integration.
The new API tokens offer more security and can be revoked at anytime. An active token is required for synchronization.
Generate your new API token:
To create an API token from your Atlassian account:
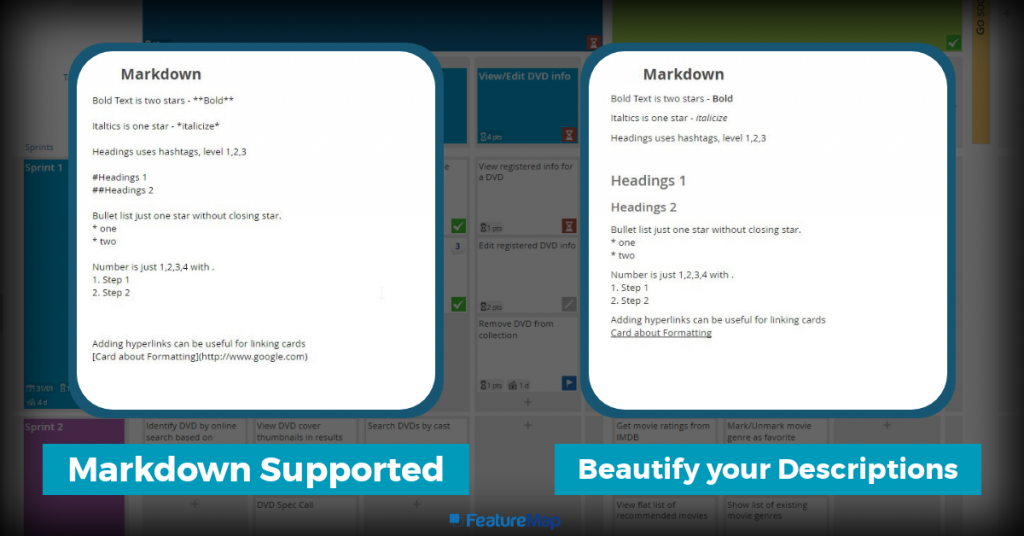
FeatureMap allows Markdown in the description of each card. Markdown is intended to be as easy-to-read and easy-to-write as is feasible.
Markdown is a simple markdown language you can use to easily add formatting to your cards. We do not support images or HR from Markdown at this time, you can see below the list of supported Markdown Text that can help you get your descriptions on cards:
Bold
Italics
Bulleted lists
Numbered lists
Headings
Links
Adding Markdown to text
Formatting
Entered text
Published text
Bold
This is how you **bold** text.
This is how you bold text
Italics
This is how you *italicize* text.
This is how you Italicize text
Bulleted lists
* Bullet one (don’t forget a space after the asterisk)
* Bullet two
Note: You must type a line break before and after the list.
Bullet one (don’t forget a space after the asterisk)
Bullet two
Numbered lists
1. Step one
2. Step two
Note: Do not use a hashtag (#) when creating numbered lists in Markdown, as the symbol is used for other formatting.
Markdown is used for writing in the web, currently we are experimenting with upgrading our interface to allow an option to use alternative formatting systems.
If you have any questions about our Markdown syntax feel free to drop an email over to support@featuremap.co
User Story Mapping is often described as an easy process and maps are created by simply working through the user’s journey.
Sometimes it can sound simple, but at times you need to define the user’s journey.
Occasionally you’ve had a developer, or project manager who has already defined stories and just wants to regurgitate this journey onto a plan and have everyone agree. This sometimes works, but more often than not other team members are left wondering about more details and features, problems, and most importantly, better solutions are missed.
User Story Mapping is not just creating a map for the purpose of a great visual understanding, but it is also a great time to go over questions and really expose the plan.
Just as your first bunch of questions:
Who for?
Why?
What?
Critical thinking can be applied with great b0ons to any endevour and User Story Mapping is no different.
Who for?
Those working on the map should have a clear defined understanding who the users are.
Who is the user that mapped this journey?
How is this user different to other users?
Do we need to expand our user scope at this stage?
Understanding who the users are will provide that focus for complex design and if the user is an actual real user, then knowing this person will help with focusing the team to provide something for someone real.
What?
Defining what the user is doing with your project, app or endevour will be the main crux and defining question for all over User Story Mapping.
What are the users trying to achieve?
What do the users benefit over using your solution?
What other solutions are available?
What needs to defined?
Why?
Starting with an understanding of not only who the user is, but why this story needs to be mapped is crucial to have a worthwhile map.
Asking questions to help the entire mapping team directs.
Why does the story need to be created?
Why does it need to be defined?
Why would this information help decide scale and stability?
Once you have the ideal persona, and the ideal customer or user you can create an epic from the persona.
Label all your epics necessary to meet your users goals, but it is okay to keep them rough as you’ll be able to quick edit the table, adjust, delete and add more columns as needed.
Turn the users functions into rough epics
Turn the products functionality into rough epics
Capture the interaction and sequences
The StoryMap of Alex’s Morning with the Goals, Then Epics, then Cards.
Then go deeper and refine each Epic into the cards.
It is normal to be challenged with your first iterations with a User Story Map and it’s okay to continually develop them.
Keep the users entire journey and story in mind, and don’t stop asking the questions, who, what , why?
User Story Mapping is normally a technique for Product Development, but you need not limit yourself for just one task or function.
Here we explore outside the box and look at applying User Story Mapping to product lessons, customer feedback, marketing strategies and even Christmas lists.
Software Development
User Story Mapping is most commonly used for software development. You are able to outline and see the bigger picture of your product. You can prioritise the user stories, identify the journey of your users and involve all team members to have a shared understanding.
It is not just a tool that you use to outline the project, it is a technique applied to every step of the way. You can change, adapt, reprioritise, add further tasks, scrap old tasks, and so on. While ideal to sit on a wall in the office with post-it notes one large company has a large 75″ display in the office with their FeatureMap on display for all offices and departments.
Moving to the digital has its benefits and allows all departments and those remote to the office to collaborate. In addition, you can allow your shareholders and in some cases, even your customers to get involved.
Movie Buddy first MVP
Product Lessons
Occasionally after a campaign, season, or annual review you look back at your product and hold a session of “product lessons learnt”:
Promote the recurrence of desirable outcomes
Preclude the recurrence of undesirable outcomes
Using User Story Mapping here can help you outline the user journey. Define each step which worked, and highlight what should be removed or revised.
Using layers you are able to prioritise your learnings by the impact on the user using analytics data, internal comments and observations, incident reports, and any further data or knowledge that can build a picture about your product and its presence.
Your goal is not to create a product but to highlight the users experience to learn.
Customer Feedback
Developing your map can involve the customer, allowing a public-facing map and open process you can get feedback direct from the customer.
Taking suggestions, feedback and ideas from customers is the golden goose.
We’ve all had the occasional user when you open up your ticket support system or email and in the inbox sits 10 emails all from the same person hammering feedback after feedback. These users are my favourite, and while initially a shock to the system, they offer the best value.
Taking all feedback to build your User Story Map and highlight the pain points reported.
Set columns for feedback, suggestions, bug reports and crashes.
Again, do not set this as a product development map but a feedback map and this can help you prioritise your next steps for development and also feed directly into Product Lessons.
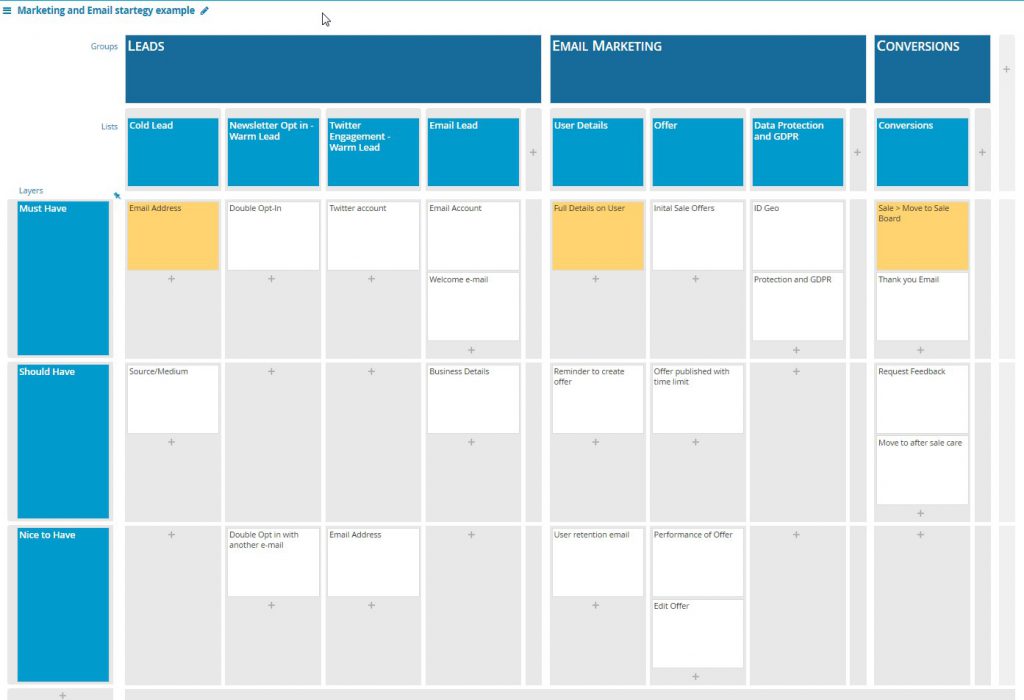
Marketing and email strategy
When defining the user flow from a cold lead to a warm lead, add in tracking, and stages you’ll soon hit a complicated process. User Story Mapping, the super-hero of project management is here again.
Setting our a User Flow from cold lead, to warm lead, to sign-up, to conversion can all be done with a FeatureMap.
While mailing systems, like mail-chimp, can work exceptionally defining a campaign, following a user along a sales process (especially when plugged into marketing) is broader than MailChimp.
Below I have defined a map in FeatureMap to give you an example of a marketing process. Click the image to see the Map on FeatureMap.co:
A Marketing and Email example for a fictional product.
Christmas Lists
Happy Holidays to you all, and time for a bit of fun, but an entirely function one.
This year I was planning out what to buy my friends, family and fellow office workers and wanted a way to track what I had purchased. In some cases, I have commissioned artwork and needed picture frames and had presents that became a multi-stage process. I turned to User Story Mapping and whipped up a FeatureMap to help manage who was getting what!
User Story Mapping has been described as a niche tool to achieve much. Tools for product development, feature definition, version improvement and project management just to name a few.
In this case we are looking at the steps to success, utilising User Story Mapping methodology to help define your path. The first two steps instantly reward.
Firstly, planning the map rewards you a pathway to the point so that you can start writing user stories (a user story is a short description of something your customer will do when using your product).
Secondly, the end result is a visual chart showing the structure of your stories which gives you the steps to development.
Here is another way to approach User Story Mapping in three steps and this is a relatively quick way of getting to a point to start development work.
A finished User Story Map example.
Hosting your Story Mapping Session
Because User Story Mapping can come across as complex it is important that management of the session is approached with a framework. Needless to say that User Story Mapping can be a new tool for most people so outlining what it is all about and describing the process is important.
Start with tasks where the team thinks about the product, users, development and personas.
Step One
We start by brainstorming every task that users will want to address when using the product.
Silent Brainstorming. Task each participant to write down steps in your cards, every step will need to cover from the users first engagement to the conclusion of the users interaction. Encourage the team to think of these as actions not features.
Top Tip: Writing them so they start with a verb is a good technique.
Encourage people to be creative and try to cover tasks and steps wide, but not deep. This part of User Story Mapping is about breadth not depth.
Start posting all cards and tasks in one large map. Thats fine, you’ll have duplicates, and these should sit beside each other on the line (not above or below). As you expand and learn you can easily drag and drop and delete if needed. The beauty of using digital software for large collaberation tasks such as this allows you and you and your team to easily edit, expand and develop your map.
This first line is the user tasks and they form the backbone of your story map.
Step Two
Then we organise these tasks into wider goals, and arrange them in order of completion.
These groups are known as “epics” or “activities”.
As facilitator you can walk along the line of tasks and ask where the team think the splits are between each group of tasks, and what each group should be called.
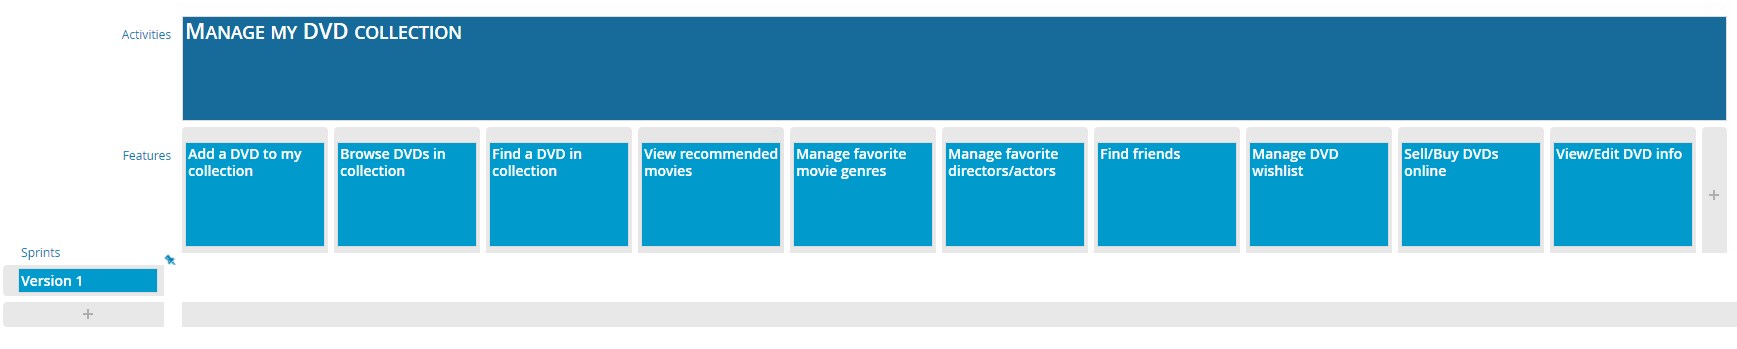
For example, if you were building an app for an app to arrange your movies you might group user tasks into epics like this:
Browse DVDs in collection – epic
View flat list of all DVDs – user task
View DVD cover thumbnails in results – user task
DVD Spec Call – user task
Step Three
We can then move into the Prioritisation exercise, further developing the user story map.
This is the stage where you start writing in the details, building up the tasks and redifining tasks. This may include adding tasks, merging tasks or seperating tasks.
It is important to detail the tasks enough to remember in the future.
After writing all the tasks, you should have a comprehensive map by this stage.
Task your team to go over each line (now defined as Epics/actitives) and ensure you have everything charted. This is where the User Story Map will become easier as you will now have a visual chart of a defined product. Here you can move to the next steps.
The Moviebuddy Current Version
Next Steps
Now you are ready to start prioritising the user stories on your map. You can start adapting and moving your tasks to sprints, also known as versions for your product.
5 Reasons to use User Story Mapping for Project management.
It can be a nightmare when planning out a project or joining a team to plan the project and you are met with Word documents. It is even worse when the customer and your team are expected to settle on the design outline of a word document with no future changes.
Requirements always change as customers and teams discover more about their project as it progresses. Expectations change, development requirements are adjusted, improved upon and developed and tracking all these changes in a Word document leads to madness.
User Story Mapping is a clear-cut methodology that let teams plan software releases that create visual maps of customer requirements. User stories are typically written on sticky notes or developed on a virtual map with absolute collaboration. (FeatureMap).
Here are five reasons why you should utilise User Story Mapping for your next project.
1. Prioritize the most important requirements.
Story maps let teams identify the really important reuqirements, and then allows the team to real-time amend and edit the map with development and feedback. While doable with sticky notes, the interactive collaboration of FeatureMap allows on the fly editing and at a glance live progress. With a story map, teams can prioritize the most important features first and deliver code based on the prioritized features.
Built in sprints allowing a basic MVP program to be released before moving into sprint 2 and building the next product.
Features can be identify and built in sprints in multiple MVP states with ease, rather than developing one function in its entirety. It allows you to build your function, then at a later stage refines the features across with each iteration. You can easily identify what is most important and what is a core feature. Splits large requirements into small slices
2. Enforces task separation to encourage smaller sprints.
Cards and Post-it notes have literal maximum space. A good habit is born and can be utilised for your User Story Map creation. You have to be brief in the requirement description. If the requirement description is too complex to be stated on a single card, simply break it up into two cards. Create to functions, two tasks which can be split (if required) into multiple sprints.
This again allows the project to be refined and delivered on time with clarity and simplicity.
No more twenty page documents!
3. Communication with the stakeholder.
User Story maps aid with communication with the customer/stakeholder. Each customer requirement is then aligned with a task or card, the customer can understand at a glance what functionality will be delivered with each sprint and release.
With FeatureMap you can create a map for your development team, and share it publically to those with the URL link, the customer will see, real-time of your development map. Alternatively, you can create a map from a map (like cloning) and then share that map as a “snapshot” of the progress. And of course, you can export the map in a multitude of ways.
If the customer wants a feature delivered earlier, the customer can see which stage the feature or card is in and if involved in the process can adjust the map.
4. Communication with the team to help define and manage trade-offs and objectives.
Potentially the most important benefit. Using a User Story Mapping map will boost communication and discussion. Visual thinking is common in approximately 60%–65% of the general population, leaning on statistically your team will benefit too.
Having this visual aid and 2D map will reveal questions of all participants in the early phases of the project, which will lead to more quality and faster product backlog creation.
This will allow you as a Project Manager to keep on top of trade-offs and manage features and the project objective.
Communication helps define projects with ease
5. Visualisation of the entire Roadmap
A story map can focus the stakeholder and team to see a snippet. It can reduce that 200-page word document of completed tasks, or charts of completed tasks to a visual map of completed sprints and planned development.
The focus is smaller and the stakeholder can visually understand the requirements being delivered in the first release, second release and subsequent releases. The stakeholder can pay more attention to the relevant requirements (and requirements always change).
The customer can see the first release and following releases at a glance
The customer here can see the current release and the solving of an issue, but can also tell at a simple glance that the “even better mega solution” is in the next release.
User Story Mapping can be utilised in a multitude of ways. Project Managers can step in and compliment their planning with a digital version of User Story Mapping and work with the team, developers, customers, and even users for feedback.
If you want to learn more about building a project we recommend “easily testable” to “useable” then to “loveable” rather than building a broken bike in all stages. Read more in our Idea to MVP.
A story user map can be used as a method for visually outlining your roadmap for your product.
We started this intro to story mapping with a basic run down and a simple exercise taking you through the morning tasks and making a map. Now we will look at how to outline your roadmap. Also don’t forget to check out some good practises in going from Idea to MVP.
If you are following the intro, you’ll have looked at how to outline your feature definition.
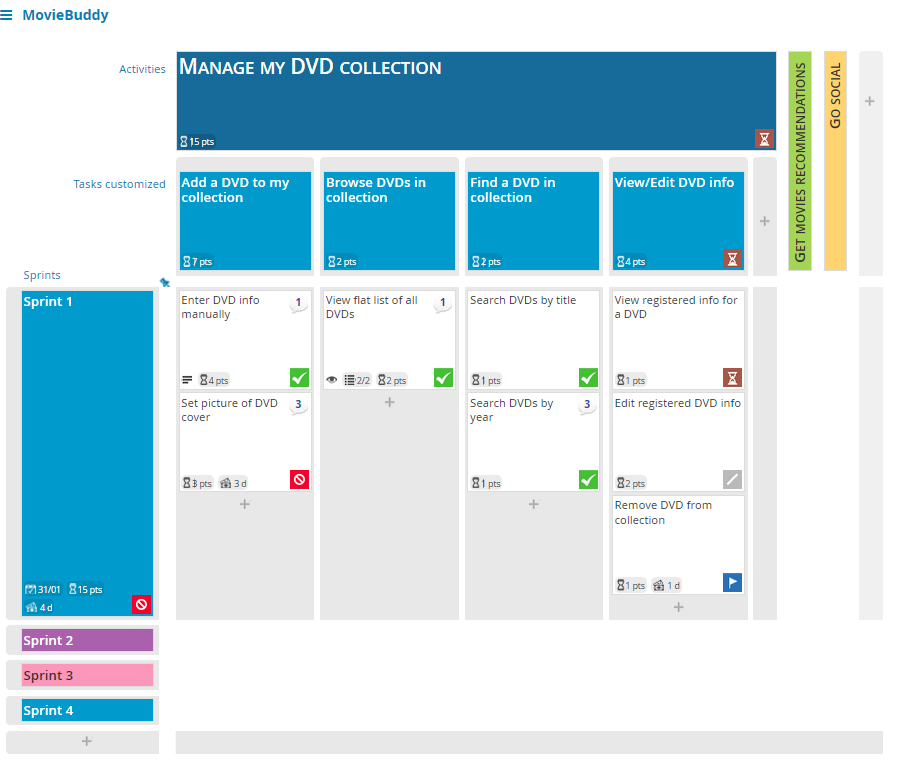
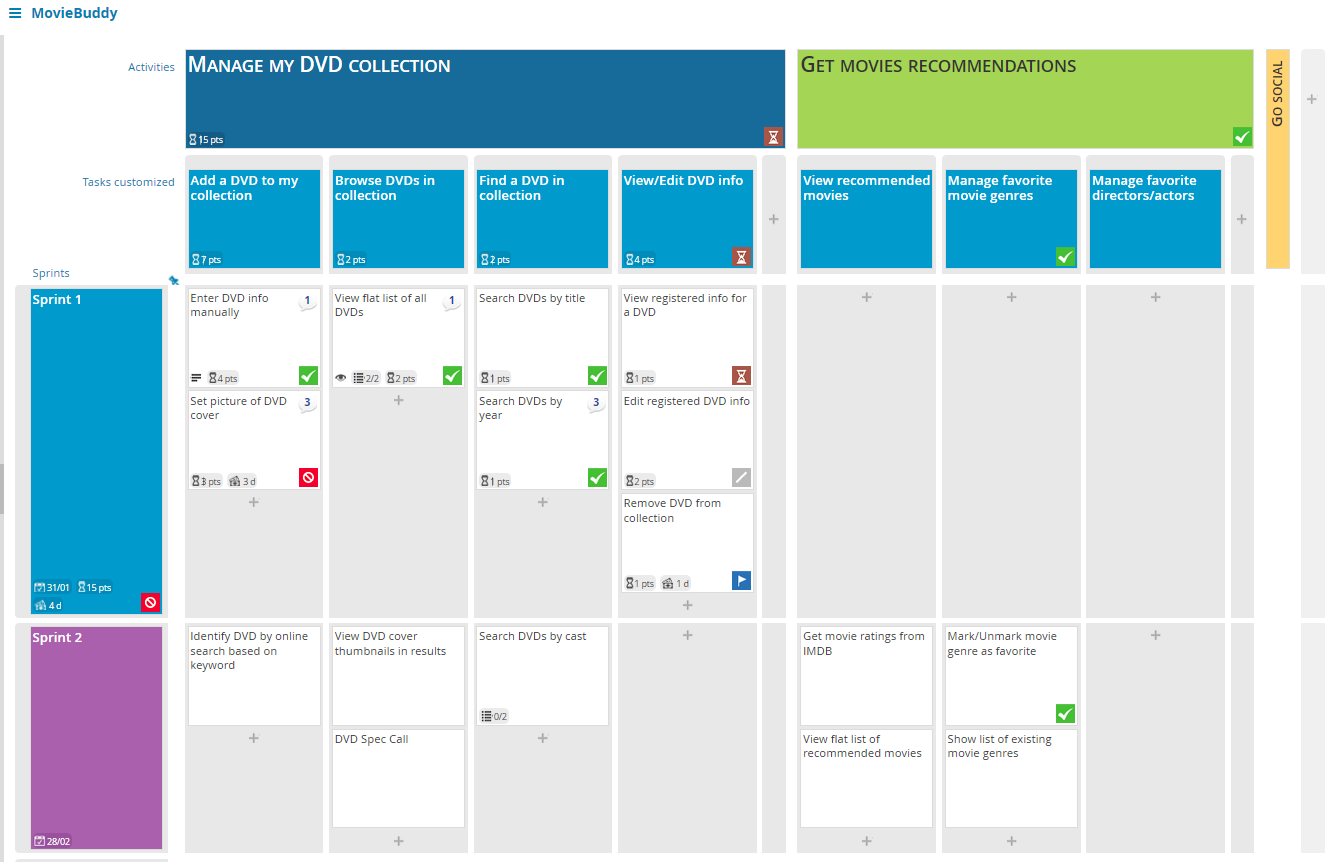
In our case study we are going to look at “Movie Buddy”. The Initial MVP was to generate an app which could be used to manage your DVD collection.
The first step is to identifiy your main goal, in this case it was “Manage my DVD Collection”
The next layer introducing tasks and we identified 4 main features.
Add a DVD to my collection
Browser DVDs in collection
Find a DVD in collection
View/Edit DVD info
From here we were able to fill in further details for each card in our first sprint.
Movie Buddy first MVP
The horizontal sprint delimits the first iteration we implemented from stories, from ideas and how we chose to postpone features for a further iteration. We chose to implement the backbone for the main features and come back later to add details and fine-tunings.
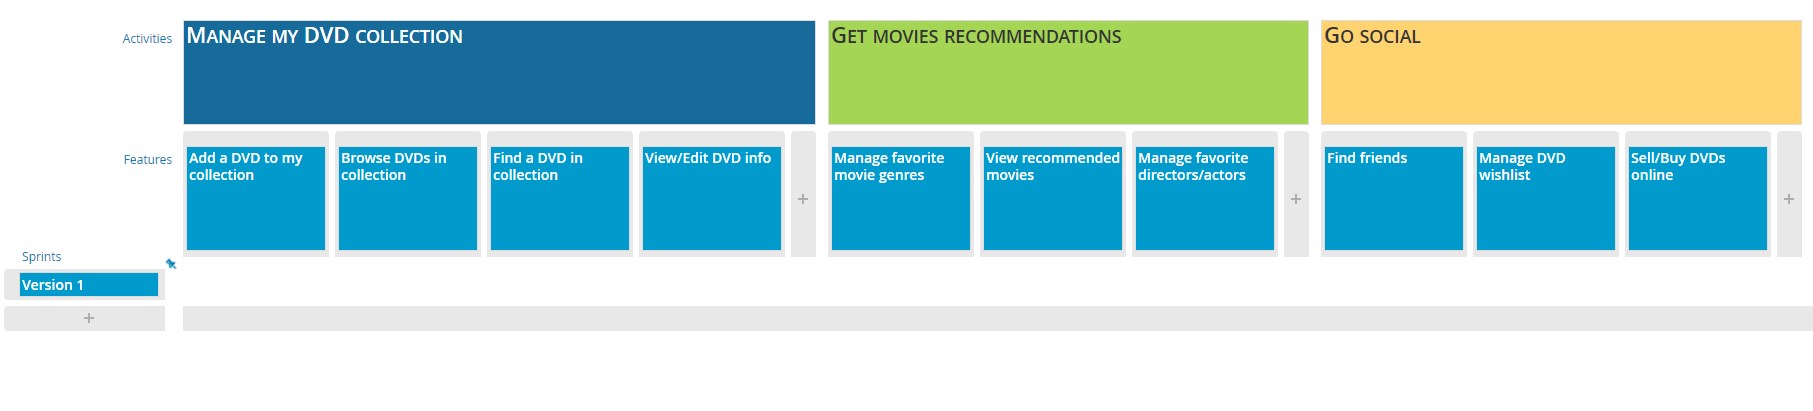
From here we moved to the next step and that was expanding our features. You can see we have expanded a colum to the right (in green.)
We wanted to introduce a social element, a movie recommendation feature.
Now to add cards to this next sprint we needed a new horizontal layer, so adding sprint 2 (in purple) this allowed us to identify what improvements we wanted to add to our core back-bone features.
Expanding to sprint 2
You can see how with each new column of improvements and with each deployment of your application (or version) you can develop and expand your application using a simple user story map.
At a glance you can see which features are implemented, or which features are set to be implemented down the road.
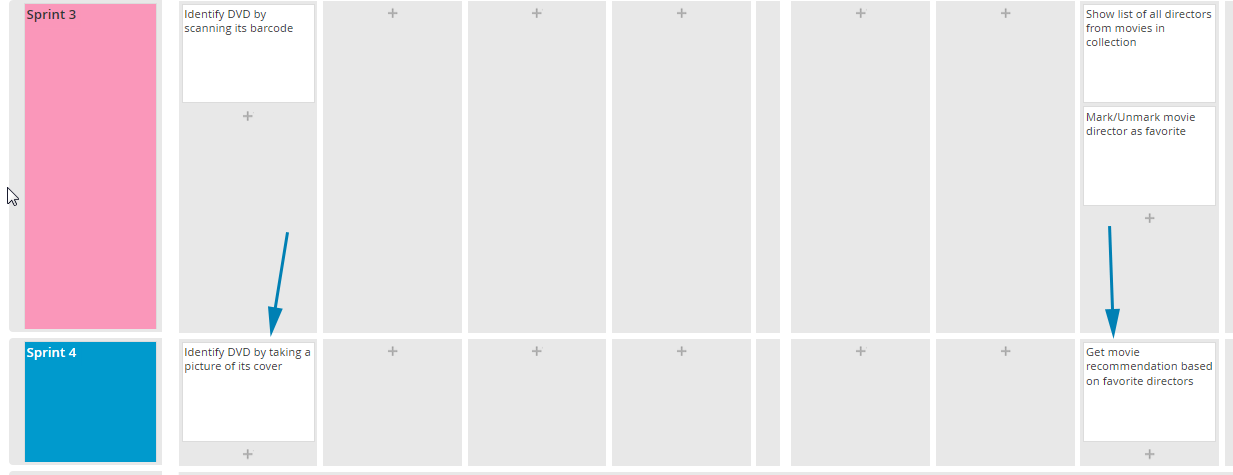
In this example it was decided that the “Get Movies Recommendations” section was a good hit and so the idea was expanded. In addition our users wanted to expand our core backbone and introduce scanning of barcodes of DVD’s to identify it in our database.
We realised we could scan DVD’s by barcode, but taking photos of the cover would need extra work so we seperated the sprints, in addition we also wanted to improve our management of favourite directors/actors by allowing recommendations on directors but that would take time. This was also added to the later sprint.
Moving features down to another Sprint
This left us with our final idea and roadmap for the coming development cycles.
Notes
When designing a roadmap from your MVP it is okay to place down expanded ideas and the best features you can imagine. A user Story Map is designed to allow you to see the overall roadmap, the big picture, the ideal application.
Taking that application can then allow you and your team to arrange the features, arrange the sprints, split the application up to version and settle, together, with an ideal roadmap.
We have the MovieBuddy Map here if you want to see the completed MovieBuddy Map.
We started this intro to story mapping with a basic run down and a simple exercise taking you through the morning tasks and making a map. Now we will look at how to define features in a product.
When you first start off it is best to have an idea of the ideal product, but have not yet started on your product roadmap. Instead start with the user’s normal workflow (minus the app or software) and figure out how to translate that flow into a product experience.
Below I have outlined an example case study of arranging a conference with the persona of the organiser and board member.
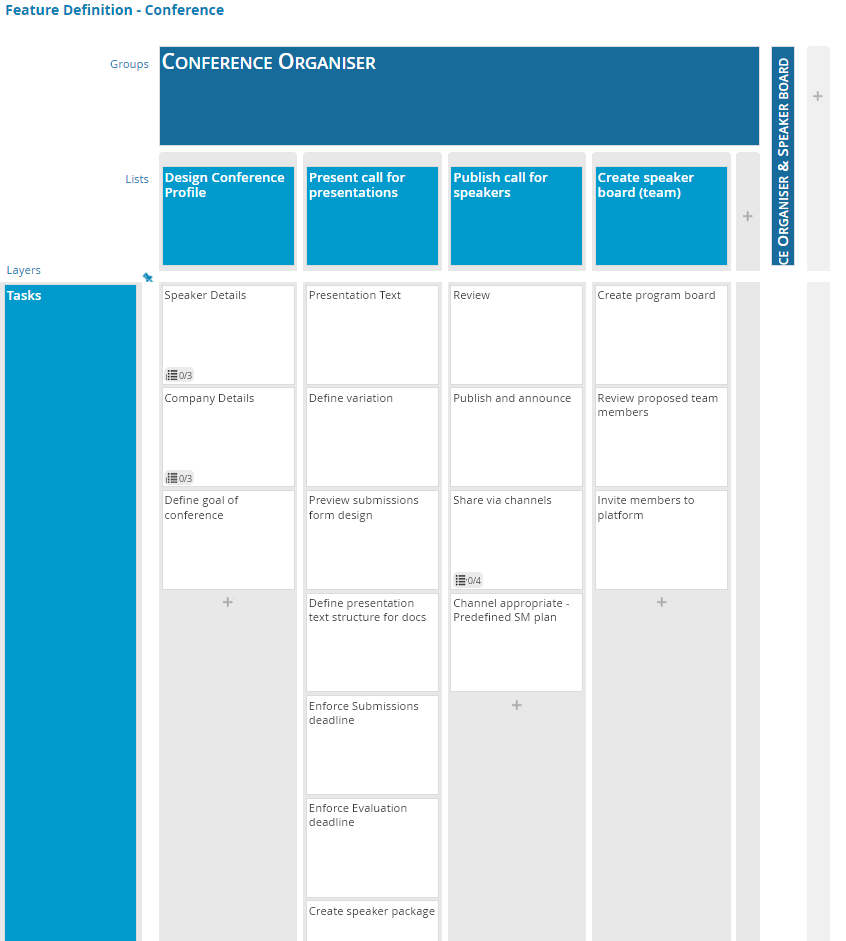
The team sat down and exchanged tasks, goals and ideas. We then started to construct a story map based on the conference organiser’s first set of responsbilities and workflow.
Conference Organiser Workflow
After the initial workflow you will notice the goal at the top linked to the persona.
The main activities are in the first row, divided into further tasks in each column which details each activity.
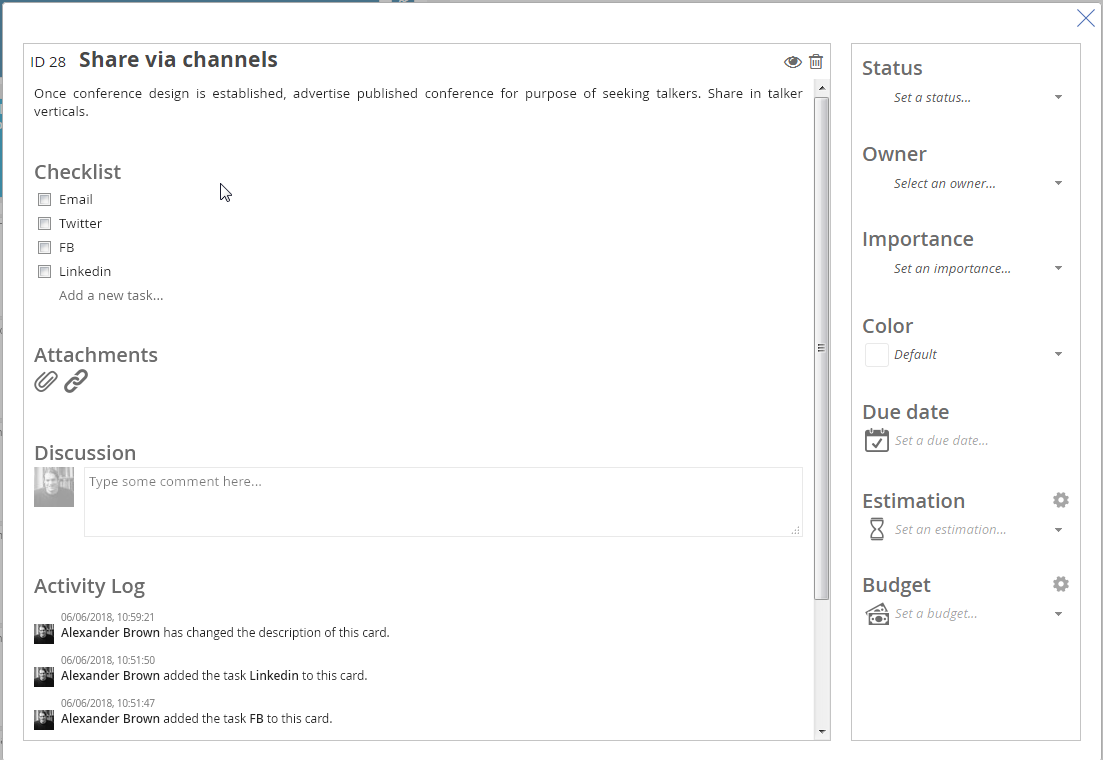
On a card we have further detail such as:
Detail on a card with checklist
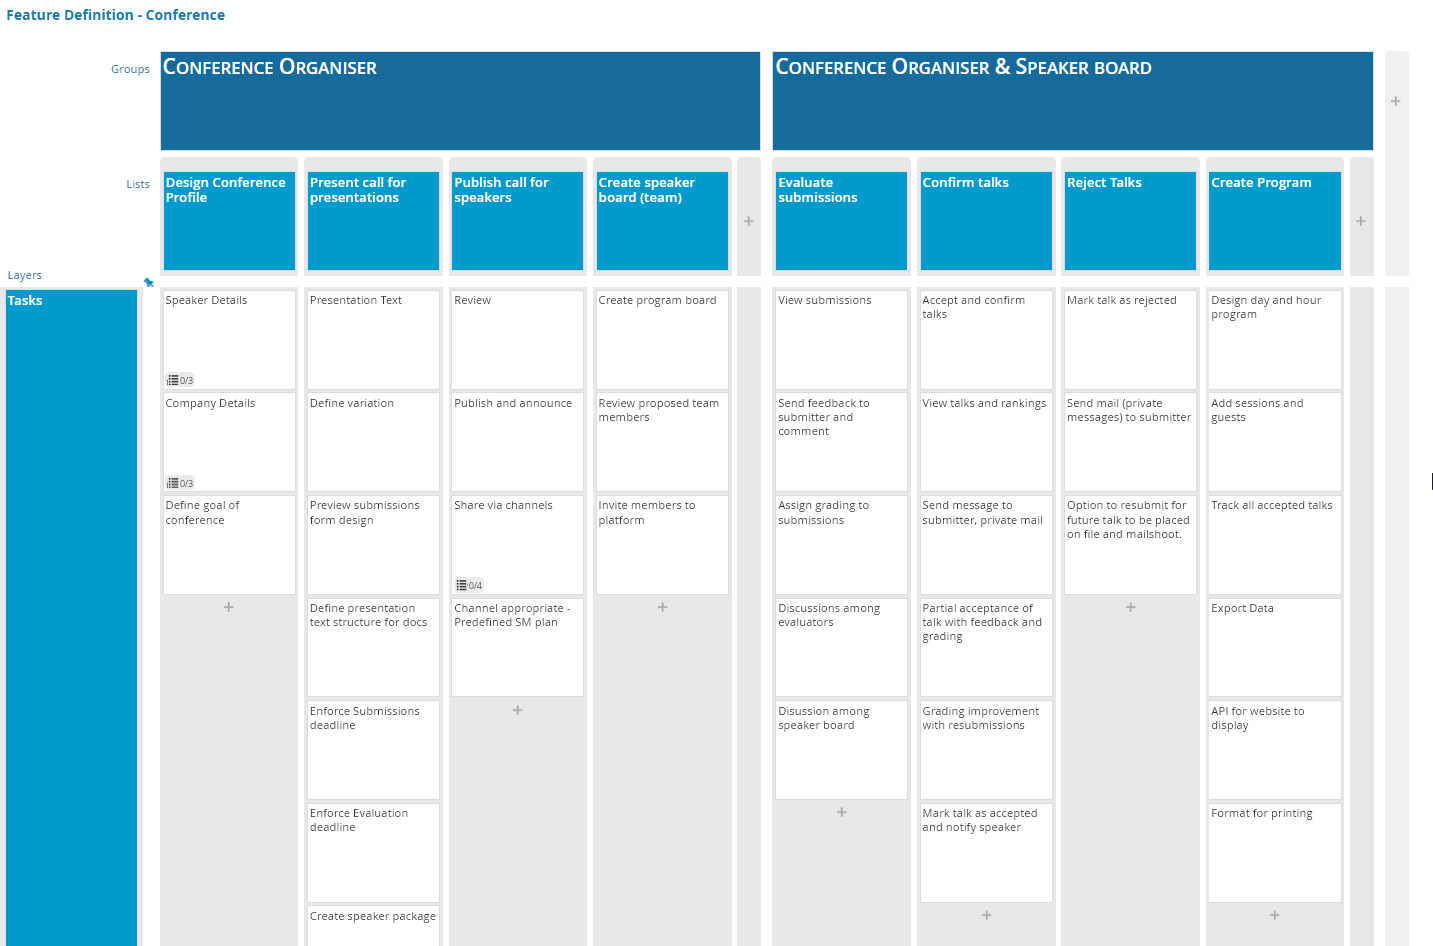
After we established the conference organiser’s tasks we then expanded the story map to include the expanded responsibilities and workflow of the entire Team.
Workflow of the organiser and speakers
With this map now completed we can see the user workflow and what features we need defined.
Next from this map we can develop and build a product roadmap.
Check in next week and have an introduction to designing our first MVP roadmap. Also check out from idea to MVP, a seperate article about building from the idea to the MVP.
When building your story map, you should include all the relevent people, regardless of position, in the team. Due to their different foundations and interests, they all get valuable points of view. Everybody has an unmistakable and common comprehension of what they are about to build together.
Product owner, testers, technical lead, customer support, architect, UX/UI designer, sales and marketing, etc. All have their own techniques and requirements which will help you create your map.
How to build a story map
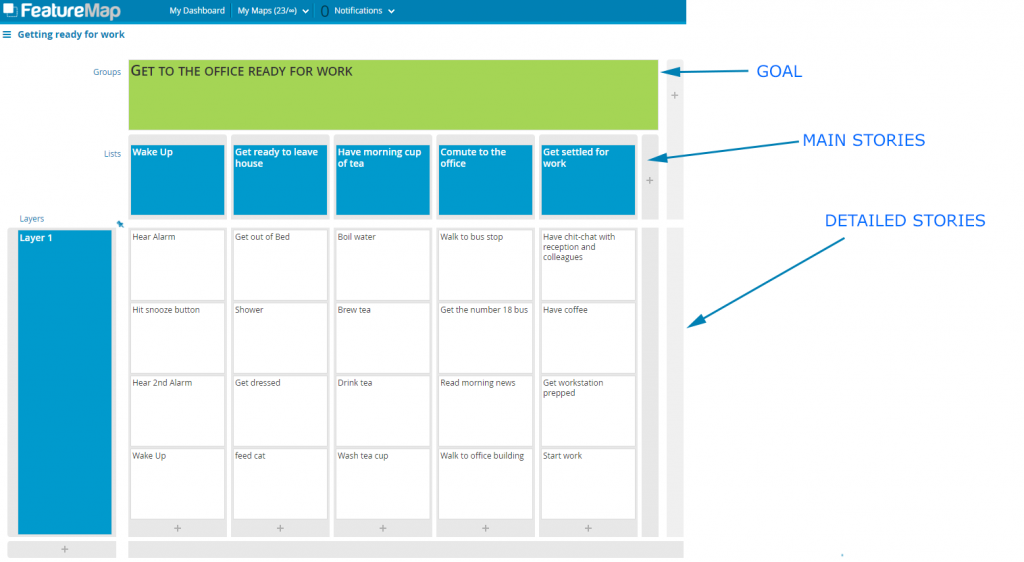
If you are brand new to user story mapping, we have a short and sweet exercise. Let’s take a simple real-life example of “getting ready for work”.
The StoryMap of Alex’s Morning
Start with the goal.
What is the story map about?
What are you trying to accomplish?
The main overall purpose.
Second list your main stories, your main tasks or activities. From left to right, insert the main steps of the story map that need to happen.
Move on and detail each main list – column by column, left to right.
In the case of product features, the layers can be then developed and you can plan out MVP‘s, or product iterations with each following layer.
When exploring product features, build story maps for multiple options that solve the underlying problem. Allow your entire team to contribute and come to and understanding of the final decision.
Story User Maps are ideal for allowing a team to design out a product feature and reduce the need to go back half way through development because XYZ requirement was missed out.
People often mistake User Story Mapping as a tool to start projects, but it is entirely suitable for building up an old project or design.
When looking at your application it is easy to first create User Story Map based on the products functions.
Establish the tasks, the goals and flesh out the map. Sometimes you may taken things for granted and forget certain tools of the application are actually tasks so it’s a good idea to bring in people from other teams to help identify all the functions of your project.
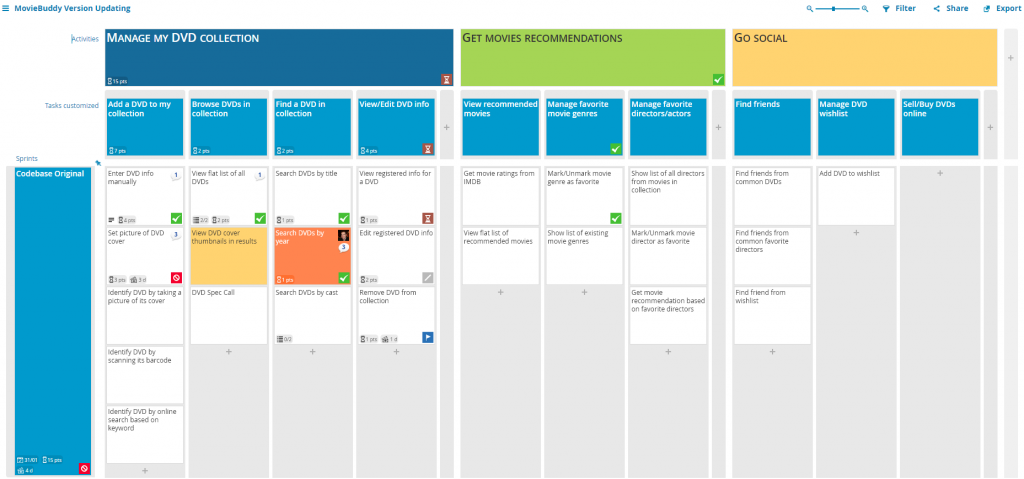
We once took an old tool and needed to update the codebase, as well as introduce new features and improvements.
A few options may be available to you, depending on the code. Are you able to update the tool in sections? Are you able to approach the update in sprints/versions? Do you need to rebuild the entire program from scratch?
We first built the map of our tool, you can see below our “Moviebuddy” example.
The Moviebuddy Current Version
We then worked through identifying which sections were redundant. We identified these and added them to a new column to the side. Essentially removing them from view.
We then talked out and identified which parts of the code would be updated and what we could do first. We labelled this as version 1 and aimed to get the core functions updated.
Identifying what we should upgrade first in Version 1
We were able to identify one function which we were able to upgrade. We also added new cards which reminded us to update our code standards and highlighted them green to ensure they were completed.
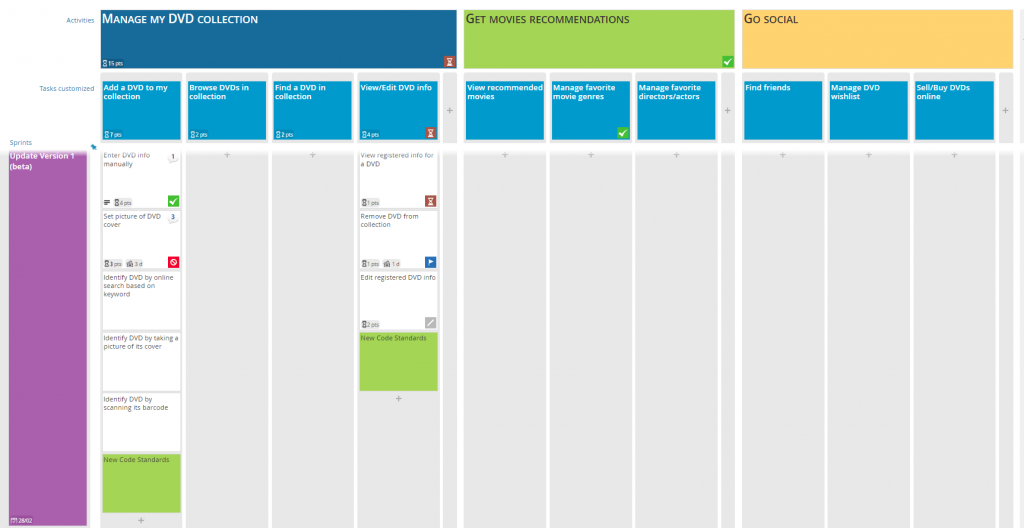
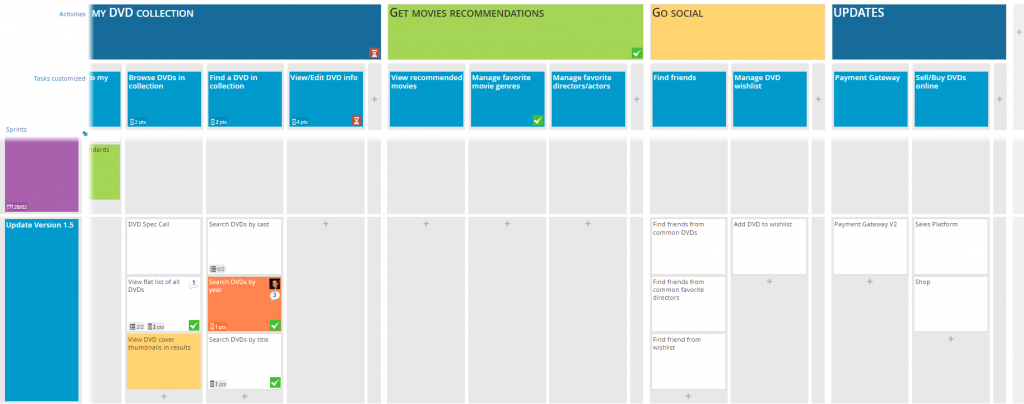
We then moved along to the next version which allowed us to introduce our new payment gateway to the application. A function that had alluded us due to the old codebase.
Adding a new Codebase column and moving to version 1.5
This allowed us to deploy more frequently and provide value sooner as we updated sections of the site. We still had a lot of ‘old legacy code’ but as we added new features we moved the legacy code functions inline with our updates.
As you can see using User Story Mapping can be brand new projects, or old existing projects.
Moviebuddy is all fictional for the purpose of training.